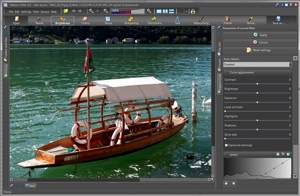
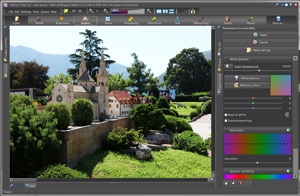
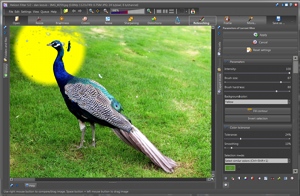
Helicon Filter is a program for enhancing digital images, it is intuitive but at the same time full of useful functions. Helicon Filter is designed for amateurs and for advanced photographers as well who want to obtain the high quality images without spending too much time. Helicon Filter provides all the most popular functionality, like:
![]() |
![]() |
![]() |
A - main menu; B - buttons for switching between filters; C - taskbar; D - image display area; E - File information panel (on this screenshot it is inactive while the Presets panel is active); F - History panel (on this screenshot it is inactive); G - filetree; H - Thumbnails panel; I - Help panel; J - Expert mode panel (on this screenshot it is inactive); K - Presets panel.
Every filter provides a set of tools that perform similar tasks. For example, the Resize filter has tools for cropping and resizing, and the Brightness filter has tools to change brightness.
After you switch to one of the filters, you can use any of the tools available on the Presets and Expert mode panels.
The Presets panel gives quick access to the most common image processing tasks. You can use the default presets or you can create your own. Read more about presets here.
The Expert mode panel provides access to the full set of tools.
The
button applies the current filter and switches the program to default mode when no filter is selected.The button switches the program to default mode when no filter is selected, without applying the current filter.
The button resets the settings in the current filter to the default settings.
The Folders and files panel consists of the filetree, which shows the folder structure of your hard drive, and the Thumbnails panel, where you can see thumbnails of the images in a selected folder.
/
The pushpin icon allows you to lock or unlock
a panel. If it's unlocked, it disappears as soon as you move the cursor away
from it and appears when the cursor is near the left edge of the screen.
This icon allows you to minimize and restore the whole
panel.
This icon lets you hide and restore the file
tree.
The File information panel shows the image histogram, image information, and EXIF information. The histogram and metadata describe the original image and not the altered one.
On the image histogram, the horizontal axis represents the range of variation (from 0 to 255) in pixel brightness. This is the dynamic range of a digital image. The vertical axis represents the number of pixels at a brightness level, going from dark on the left side of the histogram to bright on the right side.
![]() |
![]() |
![]() |
Monochrome histograms |
||
![]() |
![]() |
![]() |
Color histograms |
||
![]() |
![]() |
![]() |
This image is dark: there is a peak on the left side and the rest is fairly flat | This image is bright: there are peaks on the right side and the left side is flat | This image is balanced: it has pixels across the entire dynamic range |
The Presets panel gives quick access to presets. If no filter has been activated, there are presets for several filters available on the Presets panel. If you have switched to one of the filters, there are presets for one selected filter. Read more about the presets here.
The Expert mode panel contains all tools available for the currently selected filter. The panel can only be activated after you switch to one of the filters.
The Thumbnails panel shows thumbnails of the images in a selected folder.
On the screenshot above the first three files are selected (note the green "v" mark ); the other three - are not. The currently open file ("Candles.JPG") has the blue frame and red title.
You can call the popup menu by right-clicking on the Thumbnails panel. The operations offered by the popup menu are described below.
Note that opearations like . If the currently open file is not selected, the operation will not be applied to it.
The
command selects all the images in the folder. "Selecting" means selecting the checkbox below the image.The
command clears the selection: none of images is selected.The
command reverses the selections to the opposite state. (i.e., selected to deselected, deselected to selected).The command adds images that have been selected to the queue waiting to have either a preset filter or currently selected set of filters applied. The "currently selected set of filters" means those filters that are applied to the image that is open at the moment. About the preset filters you can read here.
The here.
command lets you rename one or more files using a template. For example, you can rename all your files, "2005.06.25 The Beach," so that your files are always shown sorted by date. More about renamingThe
command copies the files that have been selected into another folder.The
command moves the files that have been selected into another folder.The
command moves the files that have been selected into the trash folder for deletion.The
commands rotate an image and save it with the original date and time, using a lossless operation in order to keep the JPEG quality from deteriorating. RAW files cannot be rotated with this function.The
command analyzes the EXIF orientation flag and rotates the image accordingly. The orientation flag is reset afterwards.
The History panel shows the list of filters you have applied to an image. You can enable, disable, edit, and delete any filter. To enable/ disable filters, select/ deselect the checkboxes in front of the names of the filters. To edit or delete filter, click on it to bring up the local menu for that filter.
Filters are listed in the same order as they were applied. You can enable/ disable filters in order to preview what an image would be like with or without a specific filter.
The Original image link lets you open the original image, and the Resulting image link opens it after any filters or changes have been applied.
The following dialogue will appear when you select one or more files, right-click on it, and then choose
in the popup menu.Note: the shortcut for renaming a file is F2.
In order to rename several files with the same name, you'll need to set up a template in the Template field. Or you can choose a template from the list of predefined templates. To see the list, expand the template combo box.
As you change something in the Template field, the example below it will also change at the same time, showing what the new file name will look like.
In order to embed image metadata into the template, choose the metadata you want to include from the list and then press the
button.Press
to start renaming the file or files.Resizing and croppingThe Resize filter lets you rotate, crop a part, resize, and change proportions of images. The most common workflow is:
RotationAngle of rotation sliderIf you need to rotate an image just a little bit, use the rotation slider. Comment: To rotate by 90 or 180 degrees, go to the main menu and select Edit Rotate image (+90) or (-90) or apply the shortcuts (R, L rotate for the current preview only; CTRL + R, CTRL + L rotate the image and save to disk). This can be done on any tab. You can also right click a thumbnail in the image browser to access the command.
Horizon buttonIt is just another way to rotate images. Click the button and draw a line on the image which is parallel to the horizon as it is on the image. The program will rotate the image so that this line becomes horizontal.
Rotation with the help of the "green circle"When you see the green crop frame on your image then in the corners of the frame you can notice the green circles Setting proportions of selection frameAspect RatioThis feature helps to crop a part of an image with specified aspect ratio (proportions). The green frame is automatically set to the selected proportions. Drag the edges of the frame in order to change the area to be cropped. Set the cursor inside the selected area and wait for a second in order to preview the changes - the rest of the image will be darkened. Click on the arrow next to the icon Free - means that you can change the proportions of the crop frame as you like. Original - means that the frame will have the original proportions, you can only change size and change orientaion (portrait or landscape), see below. Web - aspect ratios typical for images on the web. If you need another aspect use the User defined option. Paper - aspect ratios which correspond most common paper sizes. If you need another aspect use the User defined option. User defined - if you haven't found the needed aspect ratio among the predefined ones, you can define your own ratio. For example, you need a square image. Then you should set the aspect ratio to 1:1.
Setting coordinates of selection frameClick on the arrow next to the icon Left size - sets the shift of the crop frame from the left side in pixels. Top size - sets the shift of the crop frame from the top in pixels. Width - defines the width of the crop frame in pixels. Height - defines the height of the cop frame in pixels. In order to hide the controls, click on the arrow next to the icon Changing orientation - portrait or landscape?You can change the orientation of the selection frame, for example change 4:3 to 3:4. For this just click and draw the frame of the needed orientation on the image. Max areaThe button sets the crop frame to the size of the original image. If you changed the crop frame, but then decided not to crop, then press this button to restore the frame to its maximum size.Save and restore the current position and size of the crop frameYou can save the current crop frame's size and position
ResizingClick on the arrow next to the icon Crop only - no resizing will be applied. Dimensions - use this option if you know exactly one of the dimensions in units: pixels, inches, millimeters or cantimeters. If you set one of the dimensions and press ENTER or TAB, the other dimension will be calculated by the program using the aspect ratio of the current crop frame. If you use inches, millimeters or cantimeters you can also set the DPI of the resulting image. Percents - allows setting in percents the size of the resulting image. Use this feature to downsize images. Limit large side - allows setting the size of the bigger dimension in pixels. The other dimension will be calculated according to the current aspect ratio.
|
Adjusting brightnessThe Brightness filter allows correcting brightness, contrast, and removing haze. We recommend to use the automatic brightness correction first, and if not satisfied, try different controls and their combinations. The histogram can help to understand which controls work better for the current image, see Reading the histogram section. Auto detect brightnessThe Auto detect tool adjusts brightness fully automaticaly. The program will analyze your image and set other controls accordingly. You can choose the degree of adjustment: conservative, normal, agressive, or extreme. In most cases the conservative or normal adjustment will work very well. We advice to use this tool first. If you are not satisfied with the automatic brightness correction, you can always do it manually with the help of other tools. Automatic correction is very useful for batch processing. You can add a folder with images to a queue and apply automatic correction. In most cases the brightness will be optimized automaticaly and you will have to correct only some images manually afterwards. Read more about batch processing here. ContrastThe Contrast slider works well for very contrast or very monotone images. If you look at the histogram of the original image, you can see "a hill" in the middle because most pixels have average brightness. Increasing the contrast makes the image more diverse and interesting.
BrightnessThe Brightness slider works well if you just need to make an image brighter. Increasing brightness makes dark areas brighter, but at the same time doesn't completely "overlight" the light ones. On the sample image below the whole room became brighter, but the mountains in the window became almost undistinguishable. You can apply other controls to improve the situation with mountains. For example, try to darken the Highlights. Typically, you use the Brightness slider when you have most areas on your image dark.
In some cases you can decrease brightness in order to make your image more dramatic. This will work well if you have a lot of light areas which are not overexposed. ExposureThe Exposure slider makes all pixels brighter or darker by the same degree. The effect is similar to changing the ISO, exposure time or aperture on your camera. When moving the exposure slider please look at the histogram and control that pixels don't "disappear" beyond the limits of the dynamic range which can cause overexposed areas and loss of details.
Local contrastThe Local Contrast decreases contrast between large areas of shadows and highlights, but improves visibility of fine details within those areas. It can be useful when there are only highlights (i.e. sky), shadows (i.e. trees) and almost no midtones. In this case you can see two big hills on the sides of the histogram. Applying local contrast will compress midtones and pull more details from the shadows and the highlights by stretching them.
Shadows and HighlightsThe Shadows and Highlights sliders allow changing brightness selectively for the shadows or for the highlights only, keeping the rest of the image unchanged. The Shadows and Hightlights sliders are very useful with RAW files. JPEGs can become greyish if you apply strong trasformations, but not the RAW files. This happens because RAW files contain more information about color than JPEGs. So, the tip is to shoot in RAW if the images come out too dark. Compare the results for JPEG and RAW below. If you apply the Shadows/Highlights try to change the Zone size - this can make the resulting image less greyish.
Zone sizeThe Zone size slider itself doesn't make any changes to the image, but it affects the work of other controls. It defines whether the transformations are based on the brightness of each individual pixel (zone size 0) or are based on some average brightness of several neighboring pixels. The slider defines the size of the zone to use for such averaging. If you are not satisfied with the effect of applying other tools, try to change zone size. In order to understand which zone size is better for the a particular image, just change its value until you like the result. Exposure warningsTick the Exposure warnings checkbox to see the overexposed and underexposed areas of the image. These areas will change in the process of transformations, so it is a good idea to control them periodically as you work with an image. The red areas are overexposed, the blue ones are underexposed.
Auto contrastThe Auto contrast tool can optimize the contrast automatically. If you see that an image is grayish and dull then it's a good idea to use auto contrast. The program will analyze your image and will apply necessary transformations. You can choose the degree of contrast adjustment: conservative, normal, agressive, or extreme. The Manual option doesn't automate anything, on the contrary, it gives you the fullest control over the brightness adjustment and is explained below. We recomment trying different degrees of Auto contrast before adjusting the contrast manually. From the histogram point of view it is a good idea to use the Auto contrast tool if you see that margins of the histogram are flat. The Auto contrast tool will "cut" the unused margins and "stretch" the histogram over the whole dynamic range. Red vertical lines on the histogram show the points where it will be cut.
Manual contrast adjustmentIf you choose the"Manual option in the Auto contrast combo-box the two sliders will appear below: Black point and White point. They allow choosing the points where the histogram will be cut. The Black point slider defines the left limit and the White point slider defines the right limit. Use the White point slider if you have a lot of unused space in the right part of the histogram. This will make grey toneless areas on your image brighter.
And use the Black point slider if you have a lot of unused space in the left part of the histogram. In other words, if you would rather have some midtone-pixels black in order to make the image look brighter.
Haze compensation and gradientFor hazy and greyish images use the Haze compensation tool. Haze can be present from the very beginning or can appear after transformations, like increasing brightness of "shadows", for example. If you want to apply the haze compensation partially, you can do this using the Gradient slider. You may wish this if some part becomes too saturated. If the Gradient value is 0, the compensation is applied to the whole image. If the value is negative (for example, -80) the compensation is applied to the 80% of the image bottom-up. If the value is positive, it is applied top-down. There will be no visible border between the two parts because the transformation will be applied gradiently. The auxiliary tiny grey line marks the border for your convenience.
Selection brush and Brightness brush
Applying changes to selectionIf your image has a selection made with the selection brush, you will see a new control at the bottom of the panel. Use it to define if you want to apply changes to selected areas, to not selected areas or to the whole image. Reading the histogramThe histogram can help to understand which controls work better for the current image. When you switch to the Brightness filter, you can see the histogram at the bottom of the right panel in the Levels group. The horizontal axis presents the range in which the brightness of pixels can vary (from 0 to 255). This is the dynamic range of a digital image. The vertical axis presents the number of pixels with the given brigtness. Dark pixels are on the left side of the histogram and the bright pixels are on the right side.
After you apply transformations the histogram changes: it's upper part describes the original image, the lower part describes the result and the green curve with red dots describes the transformation which was applied.
|
Adjusting colorsThe Colors filter lets you adjust the white balance, change the overall saturation or the saturation of selected colors, convert image to monochrome (black and white, sepia or else) and change brightness of the selected colors. White balanceThe sign of the wrong white balance is that colors look unnatural - either too cold or too warm.
The Color Temperature sliderThe fastest way to correct the color temperature is to use the Color temperature slider. By moving the slider, you compensate the white balance mistake that was made when shooting the image. Move the slider to the right to make the colors look warmer and to the left to make them look colder. The color temperature is measured in Kelvins. As you move the color temperature slider, you can see that the RGB sliders move simultaneously. This means that changing the color temperature is analogues to changing the intensity of RGB channels. The drop-down menu can help to set the white balance automatically.
Typicaly, we get the wrong white balance, if the camera setting is wrong or the lightning conditions are complex. For example, you take a picture in a room with daylight, but the camera's white balance setting is "tungsten". Then the camera tries to compensate the tungsten light and makes the image colors colder than they should be. If the camera's white balance setting is "Auto", it is still possible that the camera makes a mistake which results in unnatural colors. This typically happens under complex lightning conditions, like in a dark room or outdoors at night or when there are several light sources at once. You can correct the wrong white balance by making the color temperature higher or lower.
The White Balance buttonThe White Balance button allows you to "tell" the program which area on the image is in reality white or grey. This enables the program to correct other colors accordingly. Click on the White Balance button, the cursor turns into the eyedropper, then you click in the area which is white (or grey). The program will make the pointed area white (or grey) and will compensate other colors accordingly. This can help to correct the white balance. It is a very good method if you have a white or a grey object in scene.
As you apply the white balance correction with the help of the eyedropper, you can notice that the RGB sliders move. This means that changing the white balance is analogues to changing the intensity of the RGB channels. Memory ColorsThe memory colors tool can be used to correct the white balance. The idea behind memory colors is that you create a collection of colors from objects that appear in a number of images, such as the skin color, for example. You add the correct color to the collection and then use it to adjust the white balance of other images in which everything, including the skin, looks too warm or too cold. The memory colors workflow is described below.
The memory colors can also be used to convert images to monochrome. When you convert an image, you can choose a single color: black, sepia, or any other color from the memory colors collection. The Ignore brightness checkbox means that the selected memory color will be applied exactly as it was saved. If the checkbox isn't selected, the selected memory color will be applied after the brightness of the target image is taken into consideration. The Color Map and RGB (Red Green Blue) sliders
The color map and RGB sliders give the full control over the white balance. Just drag the RGB sliders until the image has the desired hue. Or point the desired hue on the color map. See also, RGB sliders, Saturation, and Spectral Sensitivity - What Is the Difference?! Black & WhiteTick this checkbox for making your image monochrome. By default the image will become "black & white". But you can choose any color from the collection of Memory Colors. Click the
Show exposure warningsTick this checkbox to see the overexposed and underexposed areas of the image. These areas will change in the process of transformations which you make to the image, so it is a good idea to control them periodically. The red areas are overexposed, the blue ones are underexposed.
SaturationThe Saturation equalizer allows controling saturation of different colors individually and the Saturation slider changes the saturation of all colors at once. As you see from the example, the opposite for satuated color is grey. The white vertical line on the equalizer (as you move the cursor over image) points to the color in the current cursor position. Move the cursor over the image and observer how the "white line" moves. Then click on the color which you would like to saturate and you will see the black vertical line which marks the color of the last click. This instrument helps you to find the exact color which you would like to saturate or desaturate.
Right click the equalizer (or the slider) to reset the changes. See also, RGB sliders, Saturation, and Spectral Sensitivity - What Is the Difference?! Spectral SensitivitySpectral sensitivity allows changing brightness of one selected color. The sliders allow changing only red, green, or blue separately and the hisogram allows selecting more specific hue, fx. orange or violet. The white vertical line on the equalizer (as you move the cursor over image) shows the color in the current cursor position. Move the cursor over the image and observer how the "white line" moves. Then click on the color for which you would like to change brightness; you will see the black vertical line which marks the color of the last click. This instrument helps you to find the exact color which you would like to make brighter or darker.
Right click the equalizer (or the slider) to reset the changes. See also, RGB sliders, Saturation, and Spectral Sensitivity - What Is the Difference?! RGB sliders, Saturation, and Spectral Brightness - What Is the Difference?!In brief, the RGB sliders change the hue, the Saturation changes color intensity, and the Spectral sensitivity changes brightness.
Selection Brush Colors Brush Saturation Brush
Red-Eyes Brush
|
Removing noiseWhen you switch to the Noise filter the program automatically detects the level of noise for your image and corrects it. In most cases this will be enough. But sometimes it is necessary to reduce noise more intensively for some parts. The Hightlights and Shadows sliders and the Equalizer allow reducing noise more intensively only for particular areas of the image - for highlights, for shadows, or for specific colors. These tools are described below.
The noise reduction is similar to blurring and it can result in loosing details. So, you need to find the reasonable balance between the details level and the noise level for your particular image. You can change the parameters of the noise reduction algorithm in order to get better results for your particular image. This makes sense because different images have different noise and detail levels. Hints and TipsNoise reduction is an important step in enhancing images. All the other operations like sharpening and color balancing increase noise and make it more noticeable. It is important to clean the noise from the image at the very beginning. Even bright images shot on a sunny day contain a lot of noise so do not skip this step without a good reason.
Noise LevelThe Noise level slider defines the level of noise reduction for the whole image. The default noise level is detected automatically after you switch to this tab. Noise level is measured in an abstract absolute value from 0 to 200. You can use this value to compare noise levels of different images. ShadowsThe Shadows slider defines the noise reduction level in shadows. If set to 0, it means that the noise reduction level in shadows is the same as in highlights and in midtones. If set to -100%, it means that there is no noise correction in shadows. If set to +100%, it means that the noise reduction level in shadows is twice more intensive (200%) than on the rest of the image. HighlightsIt works the same way as the Shadows slider, but for the highlights. Noise Reduction EqualizerThe equalizer lets you define the noise reduction level for every hue in your image. Usually higher noise reduction levels are set for skin tones and the sky with lower levels set for green.
Use the Noise Map to analyze the changes more precisely. Algorithm parametersRadius - higher values result not only in a cleaner image but also in artifacts on edges. Lower values preserve details but also show more noise. Chroma - defines how much of chromatic noise should be removed. Chromatic noise shows up as points coloured in a complete different way they should be. Noise reduction - defines how much of the luminance noise should be removed. In many cases an image looks more natural if chroma noise is completely removed, but a part of the luminance noise is left. Completely denoised image may look too "plastic". Method allows selecting an algorithm which gives the best results on your particular image. For images with low noise, the "standard" method is good enough, for very noisy images try the"aggressive" method. These methods use completely different algorithms. Noise MapOn the noise map you can see the noise reduction level for different areas of the image. The intensity of the red corresponds to the noise reduction level. You can use this map to check if fine textured areas are not considered to be noisy. It is also a good tool to see the effects of the noise reduction equalizer and the highlights/shadows sliders. Selection Brush
Noise Reduction Brush |
SharpeningThe sharpening mechanism finds edges and makes them crisper and more noticeable by making the bright edges brighter (white halo) and the dark edges darker (black halo). There are two sharpening tools in Helicon Filter: Sharpen fine details and Sharpen edges. The Sharpen fine details tool makes images look less fuzzy by detecting and amplifying thin lines and fine details. The Sharpen edges tool emphasizes all the edges by adding halos. If you use Sharpen edges, then the Sharpen fine details effect will be almost unnoticeable. The Sharpen edges tool has several parameters that change the brightness and width of the halos.
Hints and tips
Recommended Workflow
Sharpen fine detailsThe Sharpen fine details tool detects thin lines and fine details and amplifies them. Wide and/ or smooth edges are not affected. Please note that such sharpening will be noticeable only on larger prints. If you plan to print a 5 megapixels image on 10x15cm (4x6") paper or downsize the image to 25%, fine sharpening will not be noticeable. Sharpen EdgesThe Sharpen edges tool adds contrast to the edges. Bigger values correspond to greater contrast. The Edge width parameter defines the width of halos.
The Threshold parameter sets the minimal size of objects to be sharpened. If noise in your picture is increased, try setting a higher Threshold value. The White halo parameter defines the intensity of white edge sharpening as a percentage to black edge sharpening. In most cases, white halos are more noticeable than black ones, which is why the default value is set to 50%. Sharpening EqualizerThe Equalizer lets you define the sharpening level for every hue in the image. A common task is to keep skin details soft while sharpening the rest of the image. Note: The Equalizer appears when the value of the Sharpen edges slider is not zero.
Suppress HalosThe Suppress halos tool sharpens blurry edges without introducing white or black halos. If you already have a sharp image, the effect will be minimal.
Sharpening MapWhen you switch the Sharpening map on, you can see (in pink color) what parts are to be sharpened. Sharpening BrushThe Sharpening brush can either sharpen or blur a part of an image. Read more about the Sharpening brush here. Selection brushThe Selection brush selects a specific area of an image. After you have made your selection you can return to the Sharpening filter and apply any transformation either to the selection or to the rest of the image. Learn more about the Selection brush and its parameters here. |
DistortionsThe Dstortions filter lets you correct radial and perspective distortions and vignetting, stretch your image horizontally and vertically, skew, rotate, and bend. Lens correctionThe Barrel/pincusion tool compensates radial (spherical) distortions by stretching the corners. These distortions typically appear on the wide-angle lens and when you take a shot from a short distance.
The Horizontal perspetive tool squeezes left or right side of an image. These distortions appear if you take a shot while being positioned closer to one side of an object.
The Vertical perspective tool squeezes the top or the bottom of the image. These distortions appear if you take a shot while being positioned closer to top or bottom of an object.
GeometryThe Stretch horizontally tool squeezes or stretches an image.
The Stretch vertically tool squeezes or stretches an image.
The Rotate tool can be useful if a shot was taken under wrong angle.
The Skew tool defines the shift of the upper part of an image.
The Bend tool lets you straighten the horizon by lifting/sinking image sides relatively to the its center.
VignettingVignetting is an optical problem that results in unnaturally dark corners in the image. Vignetting is a common problem with many lenses and most often apears on wide-angle shots.
The Level parameter definess the intensity of brightening the darkened edges. The Curve steepess parameter defines how much of the image will be affected with un-vignetting. High values result in correction only in the corners, low values result in brightening larger area. Fill marginsTick this checkbox off to have the margins filled with black color instead of the reflection of image sides. Margins appear after many operations: rotation, squeezing, skewing, etc.
GridThis checkbox switches on the grid. Use the grid to assess the distortions more clearly. Selection brush Distortions brush
|
RetouchingThe Retouching filter offers a complete set of brushes for retouching. Their most popular application of them is to remove various facial blemishes, such as pimples, wrinkles, scars, spots, etc. Below are some examples.
Common ParametersSome brushes share common parameters. The Intensity slider defines the strength of the brush effect. The Brush size slider defines the diameter of the brush in pixels. The Brush hardness slider defines the blurriness of the brush edge. The Tolerance slider makes brushes "smart". In Helicon Filter all brushes are round, but with high tolerance you can apply the brush effect to an area that has a complex contour and similar color, like a face. The effect will be applied to the pixels that have more or less a similar color to those ones in the center of the brush circle. The Smoothing slider defines the degree of automatic smoothing applied to the selection's edges and heterogeneous areas.
1) outline your chosen contour with a brush, 2) Click on the button 3) Click inside the contour and the brush effect is applied to the outlined area. This works for all brushes except Delete Scratches and Distort. Delete ScratchesThe Delete scratches brush is optimized to fix small blemishes, such as wrinkles, scratches, pimples, etc. This smart brush fills the area that it is applied to with the colors of neighboring pixels. The color(s) of the pixels in the area between the dashes and the outside of the brush circle is used to fill the area inside it. The brush changes its orientation according to the movement of the mouse, because normally you will move the brush along a scratch. This works fine for areas with homogeneous texture. If the scratch is near an edge, line or coarse texture, it is better
to switch off the Auto
orientation checkbox and use manual orientation. Deselect the Auto orientation checkbox and use ALT
+ Mouse wheel to change the orientation manually.
CloneThe Clone brush can clone--i.e., copy--parts of an image. The Intensity slider defines the opacity
of the area to copy. If the Move source area checkbox is unchecked, you select what you want to copy and then click on where you want to copy it, if the checkbox is selected, you do the reverse (first choose where to copy and afterwards choose what to copy). With this checkbox selected, you can copy complex objects piece by piece, as shown in the duck example below.
The Texture only checkbox allows you to copy the texture of the source image and preserve the brightness and the color of the target. The Clone brush can be very useful for retouching faces. In some cases, it can remove skin blemishes better than the Delete scratches brush, for example, if the blemish is near an edge or on the gradient area.
Right-click or use the New area button to set the new source area. Change BrightnessThe Change brightness brush can either brighten or darken parts of an image. If the Intensity slider has a positive value, the brush increases the brightness, if the intensity is negative, the brightness decreases. If the Remove haze checkbox is selected, this brush adds some saturation and brightens the grays. Please note that you can also apply haze compensation to the whole image on the Brightness filter.
Change ColorUse the Change color brush to change the color of parts of an image. For example, you can change the color of a T-shirt or fix the color of a face. If you want to keep the texture of an area, select the Preserve the brightness checkbox. If it is deselected, the brush will paint over the original image with a solid color. You can also preserve the saturation of the original color by selecting the Preserve saturation checkbox. You can choose the brush color in three ways: 1. Select the color from the current image by using the button. 2. Pick a color from the standard color palette. 3. Select one of the memory colors. You can also add to the memory colors.
The Change color brush can be useful for retouching faces. For example, you can reduce the dark areas below the eyes by picking a brighter color from elsewhere on the face and painting it below the eyes with a low intensity.
Change SaturationThe Change saturation brush increases or decreases the saturation. If the Intensity is positive, the colors become more saturated. To make a selection monochromatic (black and white), set the intensity to -100%.
Blur/SharpenPositive values will sharpen the image and negative ones will blur it. This brush is typically used to blur the texture of the skin and to sharpen the eyelashes and eyebrows. Use small values to blur the skin (-5, for example) because otherwise the skin will look too plastic. The Radius slider defines how many neighboring pixels are used for the effect.
Reduce NoiseThe Reduce noise brush uses an aggressive algorithm to reduce noise in the selected areas only. By default, the Intensity slider is set to detect the noise level in the same way that it is done on the Noise filter. Higher values of the Intensity slider mean that more details will be treated as noise and removed. Fix Red EyesThis brush increases the saturation in the color of the pupils of the eye, and makes it darker as well. The brush is "smart" and tries to define the edges of the pupil if it is not round. The Pupil darkening slider defines the brightness of the pupil. A value of 50 means that the brightness will be reduced by 50%.
DistortThis brush can distort parts of images. You can fix such problems as face expression, thin lips, protruding ears, pot belly, etc. The Both directions checkbox lets you stretch or squeeze an image area symmetrically in relation to the center of the brush. Use this option to make long objects thicker or thinner, such as lips or legs.
Use Ctrl+Mouse wheel or Up/Down keys to change the orientation of the brush. Hold down the Ctrl key to set the brush orientation. Replace sky/backgroundThis brush lets you clone the sky from an external image. The primary goal here is to replace an overexposed sky with a more appropriate one. Please remember that adding a completely different type of sky will make the image look unnatural due to the differences in lighting, direction of shadows, etc. Please note that the Intensity slider changes the opacity of the entire sky. If you want to make only a part of the sky semi-transparent, you should use the Erase changes brush later on. TIP: when painting near the horizon, set the Tolerance slider to the minimum value and paint with single clicks. The button opens a folder of pre-existing sky images that come with the program. You can also copy your own images into this folder.The button opens a previously-used folder and loads the user's image of the sky.The Horizon level slider lets you squeeze the image of the sky image so that the final image looks more natural.
Erase ChangesThe Erase changes brush is designed to erase the effect of the previous brushes selectively. You can restore pixels to the state they were in before being retouched, or even to their original state. The Erase up to combo box allows you to erase all changes going back to any previous step (for example, before they were retouched, before the brightness was changed, before conversion to B&W), including returning the image to its original state.
Make SelectionYou can achieve many effects with this brush. First, select an area, then switch to another filter (such as Brightness, Colors, etc.) and apply any available effect either to the selection or to the rest of the image. As soon as you have made your selection and switched to a filter (Brightness, Colors, etc.), a combo box will appear at the bottom of the Expert mode panel, which allows you to apply changes either to the selection or to the rest of the image. The default is for changes to be applied to the whole image. While all the other brushes are specialized and produce the most popular effects, the Make selection brush is universal: it allows you to apply any available effect to a part of an image. For example, the Brightness brush produces an effect analogous to moving the Brightness slider on the Brightness filter. However, there are many other tools for adjusting brightness that you can apply to a selection made with the Make selection brush. You can apply a number of effects at the same time to either a selection or the rest of an image, as well as different effects to each part of an image. You can save an image in which you've made a selection so that you can continue retouching it later, in which case you should save the file as a PNG.
|
Adding frames To make your images look even nicer we offer five types of frames and some effects, let's take a look at them. Artistic Frames Those frames are probably most interesting. Helicon Filter is shipped with a few artistic frames, but you can download more free frames from our web site. The Classic Frames Samples
The Love Frames Samples
The Grange Frames
The Ornamental Frames
The Postcard Frames
The Wooden Frames
Original Image (Stretch) Frames
Original Image (Mirror) Frames
Custom Background Frames
Gradient color frames
Frame type and sizeTheFrame type is the most influential parameter, it defines what the frame will be like:
The determines the width of the frame for all or for each of four sides of the image. The Aspect control allows you to set the proprotions for the resulting image. For expample, you need the result to have 2:3 aspect ratio, even if the source image is square. Frame effectsDepending on the frame type, this group of parameters contains controls to set various effects. The Color controls let you define the colors for the solid color, gradient frames. They also define colors for the artistic frame if it is possible. The Image control shows background or artistic frame that is used for the frame. The button on the right side of the image allows you to select different images from standard or last used folder. The Brightness slider changes the brightness of the frame background. The Additional effect control applies blurring or desaturation to the background image. Image effectsThese controls affect the transition between the image and the background. The Effect type select allows you to add such effects as shadow, highlight or different types of transition between image and background. The Effect width defines the size of the effect, i.e. width of shadow or transition area. The Inner frame control allows you to add rectangle of specified type around the image. |
Chromatic Aberration (CA)Chromatic aberration (CA) decreases the sharpness of images and removes color contours, lines, and spots that objects do not actually possess. It is caused by certain optical effects and processes in a camera sensor. Two types of CA occur most often in images taken with digital cameras: 1) purple fringing; 2) lateral CA. Helicon Filter can help to fix both of these. 1) Purple/blue fringing (blooming):
2) Lateral CA
Lateral CA is most often visible in contrasting areas on the sides and in the corners of images. It tends to make it look like the red and blue parts of the image have shifted from or to the center of the image. For more about CA, you can read the following: http://www.dpreview.com/learn/?/key=chromatic+aberration. Helicon Filter has two mechanisms for fixing CA. 1. To fix purple fringing, the program determines which areas have a brightness level higher than the brightness threshold. Then it desaturates the pixels of the CA colors that are within a specified radius from the bright areas. 2. To fix lateral CA, the program distorts the red and blue color planes of the image to compensate for the error(s) created by the lens. Recommended workflowTo fix purple fringing:
To fix lateral CA:
Current CA Color & Other CA ColorThe eyedroppers let you define two exact colors of CA by clicking on the image with the mouse pointer. Based on the desired Color tolerance level, the program will look for similar colors and desaturate them. Zoom in to pick the exact colors. CA ParametersThe Radius slider defines the distance from the bright, overexposed areas that will be desaturated. Try to find the minimum radius sufficient to remove all the effects of CA. The Brightness threshold slider defines the bright areas themselves. The program assumes that areas brighter than the threshold cause the blooming effect. Try to find the highest suitable threshold value to minimize the effects of CA in the other parts of the image. The Color tolerance slider determines the degree of precision for the color match. A zero level of color tolerance means that only the exact colors defined by the current CA color and other CA color parameter will be removed (desaturated). A very high color tolerance (100) will include all colors in the processing. CA MapThe CA Map switches the software to a special mode in which the intensity of the blue color corresponds to the degree of desaturation. In this mode you can check to see where your image is affected*. Lateral CAThe Lateral CA slider changes the intensity of the changes in the blue and red color planes. Move the slider back and forth to find the value that will give the best result. Please note that this tool has no effect in the center of the image because lateral CA is most pronounced in the corners. Lateral CA compensation should be applied before cropping. |
The Artistic blur filter lets you add interesting blur effects to your images. You can create bokeh with different shapes, radiuses and intensity. Most of the time, you will not probably want to blur the whole image but rather a part of it. To do this, you must first select the portion of the image for the bokeh and then apply blur.
There are two ways to make a selection in Helicon Filter: 1) use the Selection brush and 2) use the Gradient selection filter.
1a. Switch to the Gradient selection filter, position the selection (Center X, Center Y sliders), set the correct size (Stretch X, Stretch Y sliders) and then set the gradient width along the sides of the selection. Invert the selection if necessary (Using the Invert effect checkbox).
1b. Or switch to the Retouching filter, pick the Selection brush and select the part of the image that you want (or do not want) to blur. It is possible to apply blur to either the selection or the rest of the image. So you should choose whichever part is easier to select.
2. Switch to the Artistic blur filter and then, in the combo box at the bottom of the Expert mode panel, choose either "apply to selected" or "apply to not selected." Try different bokeh shapes and radiuses; also try to boost highlights.
Try different shapes and choose whichever one you like best.
![]() |
Creamy circle bokeh |
![]() |
Hard circle bokeh |
![]() |
Heart shaped bokeh |
![]() |
Hexagon shaped bokeh |
![]() |
Horizontal blur bokeh |
![]() |
Star shaped bokeh |
The Radius slider allows you to make an image more or less blurred. If the radius is set to zero, there will be no blurring at all; the larger the value, the greater the blurring effect.
The Boost highlights checkbox increases the brightness of bright areas and spots. It makes the bokeh brighter and more interesting.
The Gradient selection tool lets you select a part of an image and then apply any other filter (Brightness, Colors, Sharpening, Artistic blur, etc.) to either the selection or the unselected part only. You can change the size, shape and position of the selection with several tools as described further below.
![]() |
![]() |
![]() |
Original image | Gradient selection with parameters: Gradient profile: +50 |
Processing parameters for the unselected part: Brightness filter: Brightness: -50 |
The Center X slider defines the position of the center of a selection along the horizontal axes. You can move it left and right.
The Center Y slider defines the position of the center of selection along the vertical axes. You can move it up and down.
The Rotation slider rotates the selection.
The Stretch X slider stretches or squeezes the selection horizontally.
The Stretch Y slider stretches or squeezes the selection vertically.
The Gradient profile slider defines the width of the gradient transition from the selected to the unselected area.
The Show gradient only checkbox turns on the special preview mode in which the gradient selection is shown in black and the rest of the image is white. You can use this mode to see the exact contour of a selection if you cannot see it clearly in regular mode.
The Invert effect checkbox lets you invert a selection.
GeoTaggingGeoTagging a photoGeoTagging is the recording of the latitude and longitude of the location where a phototgraph was taken and adding them to image EXIF. Some modern cameras can geotag photos automatically; if so, you can view your images on a map with Helicon Filter. If your camera doesn't have the geotagging skills, you can attach photographs to the map manually with Helicon Filter. To open/close the map, click the
How to geotag a photo
Map optionsYou can browse map in several modes:
|
Helicon Filter offers two ways to save images: save with user defined parameters and quick save with default parameters which are implemented accordingly with
and buttons.The
function lets you save an image after you've applied filters; the original image remains untouched. You can choose a target folder, enter a new file name and choose the file type.For JPEGs and JPEG2000 file types ("lossy" formats) you can set the quality of the saved image. Please note that TIFF and BMP provide lossless storage of images. If you plan to process the image further, it is recommended that you store it in a lossless format (TIFF) or at least in 100% JPEG. If you plan to print the image, 10(82%) - JPEG quality will usually suffice.
The Resize filter and reduce the image to a lower resolution. If you plan to email the image, it is recommended that you keep the file size to 50-200KB and reduce it to 800-1280 pixels on the larger dimension.
button shows the size of the file for the selected file type and quality. If the file is too large, try lowering the JPEG quality. If this does not help, switch to theThe Open source folder option opens the folder that contains the original image.
The Save encrypted option lets you encrypt the image when you save it. The encrypted image cannot be opened in any viewer without a password that you set when you encrypt the image. In addition, in order to view an encrypted image you will need to open it in Helicon Filter and enter the correct password. If you want to decrypt the image, you will need to use another program from Helicon Soft - Helicon Photo Safe. You can open the encrypted image in Helicon Photo Safe and decrypt it. Read more about encryption, decryption, and safes in user guide for Helicon Photo Safe.
The
button on the taskbar works like a "quick save" because it saves the resulting image automatically without showing the dialogue for saving a file. The resulting image will be saved in the same folder and with the same name as the original one. The original image will be moved to a subfolder named "Originals" which will be created automatically in the folder where the original image resided before saving.If you can't find the
button on the taskbar, then expand the button which is on the taskbar after all buttons for switching between filters.Helicon Filter supports several methods of saving images.
"Save" or "Quick save" commands save image with its original name. But the program always copies original image to "Originals" subfolder and you can always revert all the edits with "menu\File\Reprocess original" command. By default the image is saved in the same format as the original image if possible (e.g. jpg->jpg, tiff->tiff, raw->tiff), but you can change this behaviour (e.g. always save tiffs) in the Preferences.
"Save As..." command asks for the new file name and overwrites the existing file. If you use "save as" to overwrite original file, it will be overwritten without making any backup copy!
"Non-destructive save" is performed automatically if the appropriate option is set in the Preferences. The program automatically saves the last image state, preserves original image and all the edits. If you open the file again, you can see all the changes, you can add new filters or revert to original image.
StackingWith Helicon Filter you can merge several images into one. Why would you do that? To extend the depth-of-field or to reduce noise or to get an interesting artistic effect. Extending the depth-of-fieldBlending several partially-sharp images into the one fully sharp is called "focus stacking". Focus stacking can give you an amazing depth-of-field which can never be achievied with one shot. What do you typically do when you need bigger depth-of-field? You use small apertures. But at some point there comes lens difraction and overall loose of sharpness. And all the same, in some cases the small aperture cannot give the needed depth-of-field. You often face it in macro-photography, and always in micro-photography; the bigger magnification you use, the shallower depth-of-field you get. So, what to do? Use focus stacking! Focus stacking is a post-processing technique which completely solves the depth-of-field problem. Now, how does focus stacking works? You prepare a stack of images, each one focused on different part of the scene. Then you open them in Helicon Filter* and merge the sharp parts into one completely sharp image. On the example below you can see how just two images can give you bigger depth-of-field than ever possible with one shot.
*Helicon Filter offers the basic focus stacking, if you want the advanced solution, then download Helicon Focus - a specialized program for focus stacking from Helicon Soft. How to prepare a stackHere is how you can shoot a stack manually:
Shooting a stack manually can be a cubersome task. But you can get it automated by using Helicon Remote - a program for tethered shooting. In such a case you connect your camera to a computer with Helicon Remote, set the farthest and the nearest focusing points and the program does the shooting. How to process the stackSelect the folder with the stack. Mark the checkboxes for the images which you would like to merge. Go to the main menu and choose: That is all! Now you can save the resulting image.Alternatively, you can mark the files, right-clcik to call the context menu and choose Merge focused areas. Reducing noiseYou can reduce noise by averaging several images of the same scene. Ideally, the camera should not move between shots. Mark the checkboxes for the images which you would like to merge. Go to the main menu and choose: Now you can save the resulting image.lternatively, you can mark the files, right-clcik to call the context menu and choose Reduce noise by averaging. Merging images for artistic purposesYou can achieve different artistic effects by merging and by averaging completely different or partially different images. Note, that the results of applying Merge focused areas and Reduce noise by averaging will differ. |
The Send by e-mail function automates the process of creating attachments. It also lets you downsize, convert, and encrypt an image before sending it.
If you can't find the
button on the taskbar, then expand the button which is on the taskbar after all buttons for switching between filters.The
function lets you control the size of your resulting image in advance. This is particularly useful for email attachments, because mail servers often limit the size of messages or attachments..Have you ever noticed how tedious it can be to apply the same corrections to several images in a row? Normally, you have to open an image, correct the brightness and color temperature, for example, and save the image. Then you have to open the next image, repeat the same operations, etc. And then the next image...and the next.
There is a better way to deal with this kind of repetition: with queues.
It's simple: just add several similar images to a queue and then let Helicon Filter do the work for you, applying the same corrections to all of them automatically.
The following are examples of tasks that can be applied to images in a queue:
Normally you'll set your filters (Brightness, Colors, Sharpening, etc.) for the first image in a series, add a number of similar images to a queue, and then let Helicon Filter apply the current set of filters to the queue. Here's what you do:
You can read about what the presets are and how to create them here.
If you have presets, you can apply them to images in a queue.
When you open a queue (F7 or Queue dialogue appears.
), theBefore making the following screen capture, I clicked on the image "Croatia, Krka.jpeg." Below you can see a thumbnail of it and the source folder, plus that the Brightness, Colors, Sharpening filters will be applied to it. To skip a filter, simply deselect it.
The Saving results tab lets you choose format of the results and output folder for the results. By default Helicon Filter will create a subfolder called "Filtered" in the source folder and will put the results there.
Presets are intended to give quick access to routine commands, such as increase brightness, sharpen, remove noise, or add saturation; presets can be applied to queues of images and this can save you a lot of time. Just add images to a queue, choose a preset, start the queue processing and then go take a rest while Helicon Filter processes your images. Read more about using presets with queues here.
The name of a preset tells what it does. Presets show up as buttons on the Presets panel and as options in the main (and popup) menu and as options of the button.
When you first launch Helicon Filter, you'll see the pre-existing presets that we created and pre-loaded for you, but you can easily create your own presets and delete the default ones by going into expert mode. In order to switch to expert mode, activate the Expert mode panel.
A preset is a file that contains the parameters for one or more filters. The filters in Helicon Filter are Brightness, Colors, Noise, Sharpening, Distortions, Text, Retouching, and Frame. A presets file is only intended to be processed by the software and not meant to be read by a person. Nonetheless, if it were readable, the contents of one would look like something like this: brightness: +20; contrast: - 2; sharpening: +20; put date and time in the bottom right corner.
Sometimes it's useful to save a preset in the same folder as the one with the images for which it was created. That way you can remember which filters you applied to your images, and you can still reuse this preset for other images. For example, if you processed several images and you want to remember the parameters for the future, save your parameters as a preset and then save the preset to the same folder as the images. This way it will be easier for you to find the preset later on. In order to save a preset in the same folder as the images, go to the main menu and select
.
A preset for several filters contains the parameters for several filters, such as, for ex., brightness, colors, resizing, and frame parameters, all in a single preset.
The presets for several filters appear as options in the main menu, as in the following:
The presets for several filters also appear in the popup menu when you right-click on the Thumbnails panel (with one or more images selected); then you can apply one of the presets to the selected images:
On the Presets panel you can see the presets for several filters when no filter is activated at the moment; when any filter is activated then you see the presets for this active filter.
The presets for several filters should be saved into either the Presets library or the folder with the images for which the preset was created. The Presets library is a special folder: C:\Users\<username>\AppData\Local\Helicon\Filter\5\presets\Common\.
A preset for one filter contains the parameters for a single filter only, such as the parameters for brightness or colors, for example. When you switch to one of the filters then on the Presets panel you will see the presets for one filter; and when no filter is activated you can see the presets for several filters.
In expert mode, you also get quick access to the presets for a specific filter through the
button. If you click on the arrow to the right of the button, a drop-down menu with the presets for this filter will appear. This menu also allows you to save and load presets.Using shortcuts is handy and efficient. You may want to print out the following page and keep it close at hand.
Right mouse button | Click on an image to compare it with the original or
drag the image (pan) Click on a slider or equalizer: to reset to default value |
Space + Left mouse button | Drag the image (pan) |
Left mouse button |
Show the magnifying glass (click on the image) |
Mouse wheel | Change the zoom factor (over an image), change the slider value (over a slider), or switch between 100% and "Fit to window" zoom modes (click on the image) |
Retouching only
Mouse wheel | For all brushes: change the brush size |
Shift+Left button | For only some brushes: draw a line between two points (previous and current ones). |
Ctrl+Z. | Undo |
Ctrl+Y | Redo |
Right mouse button |
Clones brush only: set a new source area |
1,2,3,4,5,6+Mouse wheel | For all brushes: change the value of a slider ('1' for Intensity, and so on. See "tooltips for the slider titles" for more details.) |
Ctrl-O | Open a new file |
Ctrl-S | Save file in the original folder with a new name |
Shift-Ctrl-S | "Save as": to save a file in a recently used folder |
Right arrow | Open the next file in the current folder |
Left arrow | Open the previous file in the current folder |
Ctrl-C | Copy to clipboard |
Ctrl-V | Paste from clipboard |
L, R | Rotate the current image (counter-) clockwise for the current previewed image. The rotation will not be saved |
Ctrl-L, Ctrl-R | Rotate the current image (counter)-clockwise and save |
Del | Delete the image from the disk |
Ctrl +, - | Zoom in, Zoom out |
Ctrl+Q | Add the current image to the queue (with the current settings) and load the next image |
F7 | Show queue |
Ctrl + Shift + F7 | Add the current folder to the queue with the current set of filters |
Enter/Esc | Switch to/ from full screen mode |
F1 | Show help |
To open the Preferences dialogue, use the
command from the main menu.Parameter name | Description |
Automatically rotate image when opening | Tells the program to use EXIF information about the orientation of the image |
Adjust brightness of the magnifying glass | Determines whether or not the magnified area will be brightened. It lets you see details in the dark areas of the image more clearly. |
Enable switching scale modes by clicking mouse wheel | Allows you to switch between 100% and "Fit to window" modes with a single click of the mouse wheel over the image |
Background color | Determines the color under the transparent areas of the image |
Resample method | Sets the interpolation quality used for image resizing. Better quality means slower speed, as well as the reverse. |
Accelerator for dragging the image | Increases the efficiency of navigating through the main window by moving the image more quickly than a mouse pointer can travel |
Set mouse pointer speed when retouching | Adjusts the mouse sensitivity and precision for painting. When this is set at 50%, the mouse will move twice as slowly. |
The following group of settings lets you customize the layout and behavior of the software panels.
Parameter name | Description |
Opacity of program panels | Makes any
unlocked panels partially transparent. The settings chosen here only affect the
unlocked panels. Note: the lock/unlock icons are ![]() ![]() |
Time before unlocked panel closes | Sets how many seconds the unlocked panel will stay visible after the cursor leaves it. |
Sensitive area for hidden panels | Defines the width of the area hidden near the edges of the screen. When you move the cursor over this area the hidden panels appear. |
Layout of the browser | Defines whether the thumbnails panel is positioned vertically or horizontally. If "Automatic" is chosen, the software will decide which layout is better depending on your screen dimensions, i.e., for wide screens it will be vertical, for ex. |
Help hints appearance | Defines where and whether the hints to current controls are shown. |
Show captions for filter buttons | Determine whether or not the captions to the filter buttons are shown. The filter buttons let you switch between filters (Resize, Brightness, Colors, etc.). If the captions are hidden, the buttons are minimized and the whole taskbar can be fitted into one row; with captions, the buttons are clearly visible and occupy a whole row on the taskbar. |
Show navigation buttons of sliders | Determines whether or not small panels pop up below each slider; these panels make it easier to move a precise number of steps forward or backward or to restore the default or previous value of a slider. |
Show all hidden dialogues | Renews showing all prompts; this is especially useful for certain prompts, such as "Are you sure you want to delete this image?" where you may have selected the checkbox "Don't show this window again" in the past. With this button, you can begin showing all such prompts again. |
Color management
In Helicon Filter, you can set different color profiles for saving, representing and printing images. This allows the software to save, represent and print the images accurately.
Parameter name | Description |
Use the following color profile when saving images | Determines which color profile will be used when saving images. This list contains profiles that reside in the Windows system folder for color profiles. |
Monitor profile | Is used to represent images on the monitor. Your monitor has its own color profile, which is saved in the system folder during monitor installation. Helicon Filter will pull up the appropriate default monitor color profile, but you can set an alternate one if you wish. |
Printer profile | Allows you to make color corrections before printing images. If you've calibrated your printer and have your printer color profile, you can set it here. |
The Method parameter determines the algorithm for developing RAW files. Helicon Filter contains three converters: embedded, DCRAW and AdobeDNG. It is also possible to convert a RAW file to DNG and then process the file with the embedded or DCRAW converters. Which convertor to use - depends on the RAW format. For different RAW formats (RAW files from different cameras) different convertors may work better.
You can select one of five options:
Parameter name | Description |
Action on filter changing | Defines what happens when you go from one filter to other (e.g., from Brightness to Colors, for ex.). There are three options: apply changes, discard changes, or ask user what to do. |
Format of quick saving | Defines what the format of an image saved with quick save will be (SHIFT+CTRL+S or | button on the taskbar or in the main menu ).
Reset filter settings for new image | Determines whether or not the filter parameters stay intact or are reset to default when the user loads the next image. |
Automatically check for updates | Determines whether or not the program should check the availability of newer versions. |
Delete images into recycle bin | Determines whether the images are deleted forever or first sent to the system recycle bin. |
Allow only one copy of the running program | Determines what happens if you want to run another copy of Helicon Filter. |
Add shell extension | Determine whether or not Helicon Filter is registered to process certain specific image file types or not. |
Save settings of processed images | Defines whether or not the software should restore the settings that were used earlier to process an image. This can be very useful if you are not satisfied with the result of a filter and want to change some parameters only while leaving the others as they were set during the first processing stage. |
Temporary folder | Sets up the temporary folder, where different user settings for the current session are saved. |
Run the installer and follow the instructions.
The installer will copy the files into the selected folder and save the settings into the system registry. Some additional libraries (i.e., Nikon, etc.) will be placed in the "C:\Program Files\" folder.All features of Helicon Filter are available during the free 30-day
evaluation period without any limitations. Once the trial period is over, the
output image resolution is limited to 4 Mpixels without a license.
You can purchase a license from our web site (http://www.heliconsoft.com). The
activation code will be sent to your email address automatically.
Helicon Filter connects to the server and checks for updates automatically after each launch. It shows a message if it finds an update. If you choose to upgrade later, it will ask the next day; if you say “later” again, it will ask in a week, if again you say “later” it will ask each month until a new update is available.
In order to upgrade manually go to the main menu and choose
.To process 10 megapixel images, the recommended system configuration is:
The minimum system requirements are:
Helicon Filter is a shareware program. After thirty (30) days of evaluation period it switches to the free mode with limited functionality. More details at our home page (http://www.heliconsoft.com/heliconfilter.html).
Once you have purchased a license, all updates are free.
You can buy a license online here: http://www.heliconsoft.com/filter_purchase.html.
We support users via email (support@heliconsoft.com) and at http://www.heliconsoft.com/forum/.
Web:
Email:
Phone:
Tel: +380-67-579-52-44
Authors: Danylo Kozub, Vitaly Khmelik, Jury Shapoval, Vitaly Chentsov, Stanislav Yatsenko, Bogdan Litovchenko, and Vladimir Starikh
Helicon Soft Ltd. (c) 2000 - 2012
All rights reserved.
After installation, the Helicon Filter plug-in will automatically be added to the most popular programs that support PS-compatible plug-ins.
Helicon Filter automatically registers itself in the following software programs:
If you have a program that supports PS-compatible plug-ins but is not included in this list, please write to us at support@heliconsoft.com. We will include it in the next version.
To register a plug-in manually for 32-bit versions, copy the following two files into the folder that has the plug-ins: "C:\Program Files\Helicon Software\Helicon Filter\library\HeliconFilter32.8bf" and "HeliconFilter32.ini." Register the 64-bit versions in the same way.
The Helicon Filter plug-in can handle 16-bit per channel images and images with an embedded color profile.
Helicon Filter can be used to call PS-compatible plug-ins. You can see which plug-ins are installed in the main menu:
.Helicon Filter looks for installed plug-ins in the folders of popular software programs, such as Adobe Photoshop or Corel Photo-Paint*, and adds all compatible plug-ins to the Helicon Filter plug-ins menu.
To add external plug-ins manually, copy the plug-in file into the appropriate folder of Helicon Filter (C:\Program Files (x86)\Helicon Software\Helicon Filter 5\Plug-ins\).
If you are working with RAW or tiff images and an external plug-in does not support 16-bit-per- channel images, the program will convert the image to 8-bit and then back again to 16 bit after calling the plug-in. This may cause some loss of details. If it does, use this plug-in as the last step.
With the generous permission of Harald Heim, we have included Harry's Filters 3.0 in our installation. You can get the latest version of this software at www.ThePluginSite.com.
If you have problems using plug-ins within Helicon Filter, please write to us at support@heliconsoft.com.
Helicon Montage is our new utility for EASY image montage that allows you to copy objects/ parts of objects from one image to another.
One of the most common applications of Helicon Montage program is to swap heads or faces in group portraits. If you've ever tried to capture several people in one shot, you know all too well that someone almost always accidentally closes their eyes on just about every shot — and it's usually a different person in each shot! This is just one example of how individual people "spoil" group portraits.
The good news is that it's very easy to fix such problems with Helicon Montage — even for newbies.
For a quick start, watch our video tutorial at http://www.youtube.com/watch?v=3rdsHtylnQw. Or you can continue reading the Introduction and Step-by-step tutorial below.
In Helicon Montage you have two images: a source image (the one you copy a portion FROM) and a target image (the one you place this portion ON). You can use as many different source images as you want.
The following is the general workflow with Helicon Montage:
Click on the source image to select the part of the object that you wish to copy.
Click on the target image where you want to place the object that you just copied.
Switch back to the source image and continue selecting the object. At the same time, observe how the object appears in the target image. You can read more about how to select exactly what you need in the tutorial below.
Check the target image to see what else can to be done to the cloned object to make it fit the target image better. You can do any or all of the following:
Switch to the Adjust colors mode to alter the brightness, color temperature, and/ or saturation of the cloned object. The Adjust colors mode shortcut is: press and hold the C key.
You can switch to the Move and Adjust colors modes while you are in the process of making a selection, then switch back to continue selecting the object.
You can clone several objects from one source. But if you want to change (i.e., move, scale, etc.) the next cloned object separately, you will need to start a new area before selecting the new object. To start a new area, click the New area button.
Read the Step-by-step tutorial below for more details on each step.
Here an example of using Heliocn Montage.
Source image | Target image |
![]() |
![]() |
Result of using Helicon Montage on the above two photographs | |
![]() |
Click on the source image to select the part of the object that you want to copy. Below you see the source image.
Advice: If you clone a head or a figure, it is handy to start with selecting the face or a part of it. Before the first click set the Tolerance parameter of the brush to 100 (default value); in this case everything inside the brush will be selected.
Click on the target image to position the source area (which you just selected) approximately where it should be. You will be able to move the object later, so it's not a problem if you misplace it a little. Below you see the target image; also you see how the cloned part is positioned on the target image.
Switch back to the source image and select the whole object, varying the values of the Brush size, Brush hardness, and Tolerance parameters of the Select brush tool to create a precise selection. It's not a problem if you select a little extra: you can just choose the Deselect brush tool and correct the selection. As you select the object, observe how it appears on the target image.
The most important thing here is to distinguish the object from its background. So when you select the edges you will constantly need to change the Tolerance value. As soon as the edges are selected, the inner area can be selected with zero sensitivity.
To change the Brush size, rotate the mouse wheel.
The Tolerance parameter is the most important parameter while you are selecting the object, as it allows you to select pixels of similar color. To change the Tolerance, press the "2" key and rotate the mouse wheel. As you change the value you can preview what will be selected with that value.
If the Tolerance is 100, everything inside the brush is selected.
With Tolerance 23 I can select part of the hair with a similar color.
With Tolerance 35 I select the red fabric from the shoulder.
Sometimes it can be useful to change the selection preview mode. To do this, press the button, as shown in the screenshot below.
The selection is filled with a chessboard pattern as the default.
Click the button to hide the chessboard pattern for both the selection and the rest of the image.
Click again to fill everything EXCEPT the selection with the pattern, like on the image below. In this mode it's easy to see the excess areas of the selection and correct them.
To correct the selection, choose the Deselect brush and click on the areas that should not be selected. You can change the Tolerancey in the same way that you did for the Select brush.
The Brush hardness parameter of the Select and Deselect brushes defines the edge of the selection. To change the Brush hardness, press the "1" key and rotate the mouse wheel.
If the Brush hardness is at the maximum (100), the edge is hard:
If it is at a minimum (0), the edge is soft:
Values around 80 are usually the most useful.
Look at the target image and evaluate what else can to be done to the cloned object to make it fit the target image better. You can do any or all of the following:
To switch to Move mode, press the corresponding button, as below, or press and hold the M key.
Advice: If you switch on the Alighnment mode checkbox on the Move panel (below the positioning arrows), the cloned object will become partly transparent. This will allow you to place, scale and turn the cloned object more precisely.
In this example, I need to scale the cloned object. I enlarge the object by moving the Scale slider.
To position the cloned object, I click on it and drag it to where it belongs.
I position the cloned woman so that her original shoulder and the cloned one are at the same level.
But now the original image of the woman is not quite covered by the cloned image! To correct this, I switch back to the Create selection mode and clone a part of the background. The background will cover the hair from the original image.
I will also correct the selection of the hair on the right side by picking the Deselect brush to deselect areas near the right edge of the hair.
And here is the result!
Helicon Print is a smart but simple utility for printing photos. Although it's a separate application, it's still tightly integrated into Helicon Filter.
With Helicon Print you can add several images to a printing queue, choose and apply the same settings for all of them, start printing, and then forget about the printer until the entire queue is done.
The printing workflow is easy:
To add images to the printing queue, select one or more images and press CTRL+P (or you can either go to the main menu and choose
, or right-click on the image (to bring up the pop-up menu) and then chooseYou can also paste an image from the clipboard using the paste button
or the CTRL+V shortcut.
In addition, you can use Helicon Print as a separate application. Press the Windows START button → choose All programs → choose Helicon Software → choose Helicon Filter → choose Helicon Print. You will immediately see the Open File dialogue in Helicon Print. There you can choose one or more images.
If Helicon Print is already open, simply press the Open new file button.
The printing queue is cleared when you close
Helicon Print. Therefore, do NOT close it every time you add an image: just
minimize the window.
Once you have one or more images in the printing queue, there are five basic steps needed to prepare them for printing. Follow the steps on the screen print below.
A. Fit to page. The whole image will be printed, but some of paper may remain unused.
B. Fill page. Some of the image may be lost, but the whole printable area of paper will be used.
C. Original size.
Use printable area. If this checkbox is selected, you will see the part of the page that will be printed upon. This varies for each printer.
4. Position the image on the paper (optional step). Click on the image and move it where you wish.
4a. You can also use the buttons to position and rotate the image on the page.
5. Press
button. If you would like to print all the images in the printing queue with the same settings, press . Then expand the button and choose .Helicon Web Gate is a FREE utility integrated into Helicon Filter that lets you upload images to the most popular photo sharing services: Picasa, Facebook, and Flickr.
To open Helicon Web Gate, click the button on the toolbar. You can also run Helicon Web Gate as a
separate application. Press the Windows START button → choose All programs
→ choose Helicon Software → choose Helicon Filter → choose
Helicon Web Gate.
Before uploading images, you will need to have either a Google (for Picasa) or Facebook account or a Yahoo ID (for Flickr). Of course, you can have accounts for all three services as well as multiple accounts with any of them. To register for a new account, use the following links:
![]() |
Create new Google account |
![]() |
Sign up to Facebook |
![]() |
Sign up to Yahoo |
To add images, select one or several images in Helicon Filter and click
the button on the toolbar.
If Web Gate is already open, use the Add files and
Add folder buttons. You can also paste
an image from the clipboard using the CTRL +V shortcut. Also, you can drag and
drop files from File Manager into the Helicon Web Gate window (from Windows
Explorer, Total Commander, etc.).
Before Helicon Web Gate can upload images, it needs to log in to your online account with Picasa, Facebook or Flickr, so it needs to "know" your login credentials. When you first open Web Gate, it will ask if it can create a new account for one of the services (Picasa, Facebook or Flickr).
To create a new account, you can either:
If you don't want the program to store your credentials,
deselect the Keep registration
information checkbox in the Account
properties dialogue.
To create a new account, you must fill in the following two fields:
Account name - give a descriptive name, for example, "Tomas at Flickr".
Service - select either Picasa, Facebook, or Flickr.
For Picasa, you will have to enter the e-mail address and password that you use to sign in to Google.
For Facebook or Flickr, you will only see the Account name field on the form. When you click the OK button you will be redirected to a web page where you will enter your Facebook or Flickr login ID and password. After you sign into your account at Flickr or Facebook, you will be prompted to authorize Helicon Filter. Once you authorize the software, you can close the browser and switch back to Helicon Web Gate.
To open the Preferences dialogue,
expand the button and choose Preferences.
The Default file size option determines whether and how much the image(s) will be compressed before being uploaded. For example, if you choose 1600px, the image will be resized to 1600 pixels along the larger dimension, after which it will be uploaded.
The Stay on Top option determines whether or not the Helicon Web Gate window remains on top or not. This can be handy for keeping the Helicon Web Gate window visible if you drag and drop files to add them.