Retouching
The Retouching filter offers a complete set of brushes for retouching. Their most popular application of them is to remove various facial blemishes, such as pimples, wrinkles, scars, spots, etc. Below are some examples.
 |
 |
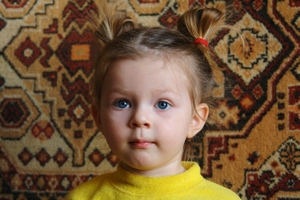
| Original image | Brushes used: Delete Scratches, Clone, Change Color, Change Brightness, Blur/Sharpen, Distort |
 |
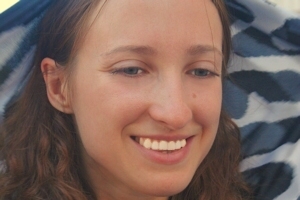
 |
| Original image | Brushes used: Delete Scratches, Clone, Change Brightness, Blur/Sharpen, Distort |
Common Parameters
Some brushes share common parameters.
The Intensity slider defines the strength of the brush effect.
The Brush size slider defines the diameter of the brush in pixels.
The Brush hardness slider defines the blurriness of the brush edge.
The Tolerance slider makes brushes "smart". In Helicon Filter all brushes are round, but with high tolerance you can apply the brush effect to an area that has a complex contour and similar color, like a face. The effect will be applied to the pixels that have more or less a similar color to those ones in the center of the brush circle.
The Smoothing slider defines the degree of automatic smoothing applied to the selection's edges and heterogeneous areas.
 |
Tolerance 70%. |
1) outline your chosen contour with a brush,
2) Click on the button
3) Click inside the contour and the brush effect is applied to the outlined area.
This works for all brushes except Delete Scratches and Distort.
Delete Scratches
The Delete scratches brush is optimized to fix small blemishes, such as wrinkles, scratches, pimples, etc.
This smart brush fills the area that it is applied to with the colors of neighboring pixels. The color(s) of the pixels in the area between the dashes and the outside of the brush circle is used to fill the area inside it.
The brush changes its orientation according to the movement of the mouse, because normally you will move the brush along a scratch. This works fine for areas with homogeneous texture.
If the scratch is near an edge, line or coarse texture, it is better
to switch off the Auto
orientation checkbox and use manual orientation. Deselect the Auto orientation checkbox and use ALT
+ Mouse wheel to change the orientation manually.
 |
 |
| Original image | The brush is over the brown spot.
You can preview the result |
Clone
The Clone brush can clone--i.e., copy--parts of an image.
The Intensity slider defines the opacity
of the area to copy.
If the Move source area checkbox is unchecked, you select what you want to copy and then click on where you want to copy it, if the checkbox is selected, you do the reverse (first choose where to copy and afterwards choose what to copy). With this checkbox selected, you can copy complex objects piece by piece, as shown in the duck example below.
 |
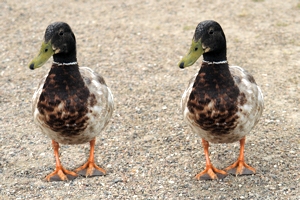 |
Move source
area: on First, click where you would like |
This poor duck was cloned without any genetic engineering! |
The Texture only checkbox allows you to copy the texture of the source image and preserve the brightness and the color of the target.
The Clone brush can be very useful for retouching faces. In some cases, it can remove skin blemishes better than the Delete scratches brush, for example, if the blemish is near an edge or on the gradient area.
 |
 |
| Original image | Removing pimples Intensity: 100 Texture only: off |
 |
 |
Reducing wrinkles |
The wrinkles below the eyes and the pimples were removed |
Right-click or use the New area button to set the new source area.
Change Brightness
The Change brightness brush can either brighten or darken parts of an image. If the Intensity slider has a positive value, the brush increases the brightness, if the intensity is negative, the brightness decreases.
If the Remove haze checkbox is selected, this brush adds some saturation and brightens the grays. Please note that you can also apply haze compensation to the whole image on the Brightness filter.
 |
 |
| Original image | The foreground was brightened Intensity +70, Tolerance 70% |
 |
 |
| Original image | The skin was brightened |
Change Color
Use the Change color brush to change the color of parts of an image. For example, you can change the color of a T-shirt or fix the color of a face.
If you want to keep the texture of an area, select the Preserve the brightness checkbox. If it is deselected, the brush will paint over the original image with a solid color. You can also preserve the saturation of the original color by selecting the Preserve saturation checkbox.
You can choose the brush color in three ways:
1. Select the color from the current image by using the button.
2. Pick a color from the standard color palette.
3. Select one of the memory colors. You can also add to the memory colors.
 |
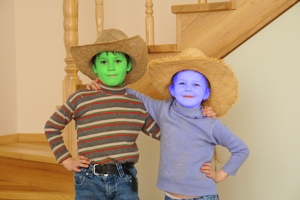 |
The Change color brush can be useful for retouching faces. For example, you can reduce the dark areas below the eyes by picking a brighter color from elsewhere on the face and painting it below the eyes with a low intensity.
 |
 |
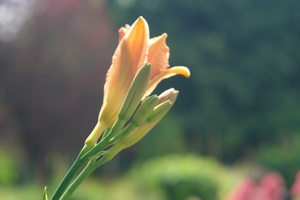
Change Saturation
The Change saturation brush increases or decreases the saturation. If the Intensity is positive, the colors become more saturated. To make a selection monochromatic (black and white), set the intensity to -100%.
 |
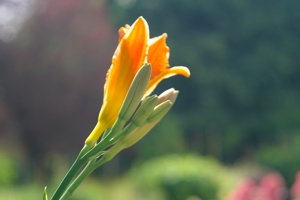 |
| Original image | The colors of the flower are saturated |
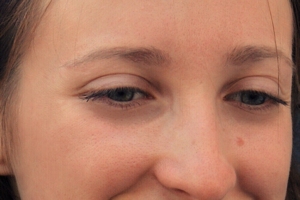
Blur/Sharpen
Positive values will sharpen the image and negative ones will blur it.
This brush is typically used to blur the texture of the skin and to sharpen the eyelashes and eyebrows. Use small values to blur the skin (-5, for example) because otherwise the skin will look too plastic.
The Radius slider defines how many neighboring pixels are used for the effect.
 |
 |
| Original image | The background was blurred |
 |
 |
| Original image | The eyelashes, eyebrows, pupil and iris were sharpened |
Reduce Noise
The Reduce noise brush uses an aggressive algorithm to reduce noise in the selected areas only. By default, the Intensity slider is set to detect the noise level in the same way that it is done on the Noise filter. Higher values of the Intensity slider mean that more details will be treated as noise and removed.
Fix Red Eyes
This brush increases the saturation in the color of the pupils of the eye, and makes it darker as well. The brush is "smart" and tries to define the edges of the pupil if it is not round.
The Pupil darkening slider defines the brightness of the pupil. A value of 50 means that the brightness will be reduced by 50%.
 |
 |
| Original image | Red eyes fixed with just two clicks |
Distort
This brush can distort parts of images. You can fix such problems as face expression, thin lips, protruding ears, pot belly, etc.
The Both directions checkbox lets you stretch or squeeze an image area symmetrically in relation to the center of the brush. Use this option to make long objects thicker or thinner, such as lips or legs.
 |
 |
 |
| Distortion in one direction | Squeezing in both directions | Stretching in both directions |
|
|
| Original image | Notice how the nose was shortened, and the
lower lip and chin lines were corrected |

Use Ctrl+Mouse wheel or Up/Down keys to change the orientation of the brush. Hold down the Ctrl key to set the brush orientation.
Replace sky/background
This brush lets you clone the sky from an external image. The primary goal here is to replace an overexposed sky with a more appropriate one. Please remember that adding a completely different type of sky will make the image look unnatural due to the differences in lighting, direction of shadows, etc.
Please note that the Intensity slider changes the opacity of the entire sky. If you want to make only a part of the sky semi-transparent, you should use the Erase changes brush later on.
TIP: when painting near the horizon, set the Tolerance slider to the minimum value and paint with single clicks.
The button opens a folder of pre-existing sky images that come with the program. You can also copy your own images into this folder.
The button opens a previously-used folder and loads the user's image of the sky.
The Horizon level slider lets you squeeze the image of the sky image so that the final image looks more natural.
 |
 |
Erase Changes
The Erase changes brush is designed to erase the effect of the previous brushes selectively. You can restore pixels to the state they were in before being retouched, or even to their original state.
The Erase up to combo box allows you to erase all changes going back to any previous step (for example, before they were retouched, before the brightness was changed, before conversion to B&W), including returning the image to its original state.
 |
| First, the image was converted to B&W
(with the Colors filter ) Next the effect was erased for the rose only with the Erase changes brush |
Make Selection
You can achieve many effects with this brush. First, select an area, then switch to another filter (such as Brightness, Colors, etc.) and apply any available effect either to the selection or to the rest of the image.
As soon as you have made your selection and switched to a filter (Brightness, Colors, etc.), a combo box will appear at the bottom of the Expert mode panel, which allows you to apply changes either to the selection or to the rest of the image. The default is for changes to be applied to the whole image.
While all the other brushes are specialized and produce the most popular effects, the Make selection brush is universal: it allows you to apply any available effect to a part of an image. For example, the Brightness brush produces an effect analogous to moving the Brightness slider on the Brightness filter. However, there are many other tools for adjusting brightness that you can apply to a selection made with the Make selection brush.
You can apply a number of effects at the same time to either a selection or the rest of an image, as well as different effects to each part of an image.
You can save an image in which you've made a selection so that you can continue retouching it later, in which case you should save the file as a PNG.
 |
 |
 |
| Original image | Selection | Brightness increased for the |