Memory Colors
The memory colors tool can be used to correct the white balance. The idea behind memory colors is that you create a collection of colors from objects that appear in a number of images, such as the skin color, for example. You add the correct color to the collection and then use it to adjust the white balance of other images in which everything, including the skin, looks too warm or too cold.
The memory colors workflow is described below.
STEP 1
Remember a color
|
 |
 |
|
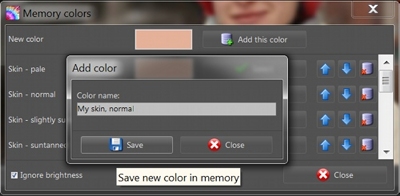
1. Choose a photo where you like the skin color.
2. Click the Memory Colors button and point to the skin color you
want to remember.
|
3. When the Memory Colors dialog appears, click the Add this color button, enter the name (for example, "My skin, normal") and save the
color. |
|
STEP 2
Use the normal skin color to correct the white balance.
|
 |
 |
 |
Here the skin color is more orange than it
should be; the other colors are also too warm.
1. Click the Memory Colors button and point to the skin color you
would like to correct.
|
2. When the Memory Colors dialog appears,
click at the color that you saved before ("My skin, normal") or click
the Select button next to this color.
3. The program will correct the skin color and adjust other colors
accordingly.
|
As a result, the colors are more natural in
the whole image. |
The memory colors can also be used to convert images to monochrome.
When you convert an image, you can choose a single color: black, sepia, or any
other color from the memory colors collection.
The Ignore brightness checkbox means that the selected memory
color will be applied exactly as it was saved. If the checkbox isn't selected,
the selected memory color will be applied after the brightness of the target
image is taken into consideration.