Helicon Focus 9
The most up-to-date version of this Helicon Focus User Guide is available on our website.
Main how-to's and features are explained in Video tutorials.
Helicon Focus 9 |
The most up-to-date version of this Helicon Focus User Guide is available on our website. Main how-to's and features are explained in Video tutorials. |
Helicon Focus is intelligent yet easy-to-use software for focus stacking and micro panorama stitching.
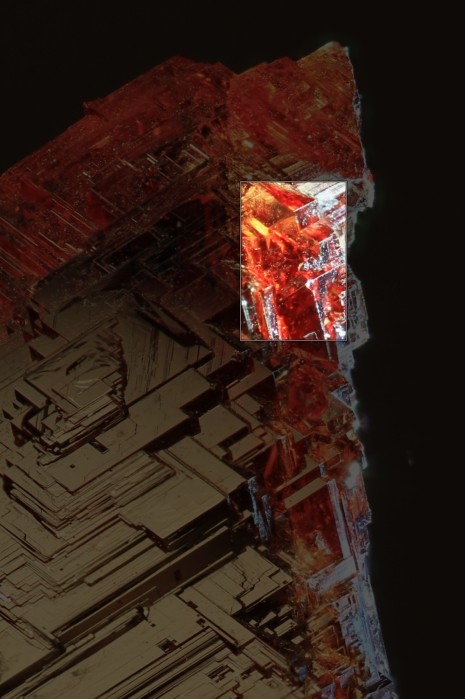
Focus stacking is a photographic technique used to overcome the limited depth of field of optical systems. Instead of a single exposure, the subject is captured in a series of images, with the focus shifted incrementally across the subject. These images are then combined into a single output in which the entire subject appears sharp.
Helicon Focus automates this process using advanced image analysis algorithms. The software analyzes each image in the focus stack, identifies the sharp regions, and merges them into a single fully-focused output. This makes it possible to achieve a level of clarity and detail that cannot be produced by a camera lens in a single exposure.
Focus stacking is used across a wide range of applications - from macro, micro and product photography to architectural documentation, forensic analysis, digital art preservation, materials inspection, and scientific research. Helicon Focus is designed to handle both simple and complex stacks reliably, delivering consistent, professional-quality results while remaining easy to use.
The latest version of Helicon Focus is always available on the Downloads page of our website.
1. Go to Downloads page.
2. Click
the Windows link
![]() .
.
3. Run the .exe file.
4. Follow the installation instructions.
5. Launch Helicon Focus from the Start menu or the desktop shortcut.
This video tutorial demonstrates the entire installation process on Windows.
You can uninstall the program from the Control Panel.
1. Go to Downloads page.
2. Click
the macOS link
![]() .
.
3. Open/mount the .dmg file from the Downloads folder.
4. Drag the Helicon Focus and Helicon 3D Viewer icons onto the Applications folder icon.
5. Launch Helicon Focus from the Applications folder.
This video tutorial demonstrates the entire installation process on macOS.
You can uninstall the program from the Applications folder.
The first installation of Helicon Focus automatically initiates a 30-day trial period. No activation or registration steps are required to begin the trial.
The same installer is used for all versions: Trial, Lite, Pro. No reinstallation is necessary when switching from a trial to a licensed version - entering the activation code unlocks the corresponding feature set.
Helicon Focus is available in two editions: Lite and Pro.
The Lite edition provides essential focus stacking functionality. Helicon Focus Pro includes the full set of advanced features and comes with Helicon Remote license in Pro and Premium software packages.
The Pro package includes Helicon Focus Pro and Helicon Remote license for desktop computers (Windows and macOS).
The Premium package includes the same Helicon Focus Pro license and the Helicon Remote multi-platoform one (Windows, macOS, Android, iOS).
Helicon Focus Lite = Helicon Focus Lite license
Helicon Focus Pro Package = Helicon Focus Pro license + Helicon Remote for desktop computers (Windows, Mac OS X)
Helicon Focus Premium Package = Helicon Focus Pro license + Helicon Remote multi-platform (Windows, Mac OS X, Android, iOS)
Includes all Lite features, plus:
Includes all the features of the Pro package, plus:
Helicon Focus uses one installer for all editions. On first installation, a trial license is applied automatically - no registration is required.
The trial lasts 30 days and provides full functionality (equivalent to the Pro edition). After the trial ends, Helicon Focus switches to Demo mode. The program remains usable, but the resolution of the saved output will be limited and a watermark will be added.
Full functionality is unlocked by entering the activation code in Helicon Focus. No reinstallation is required before license registration.
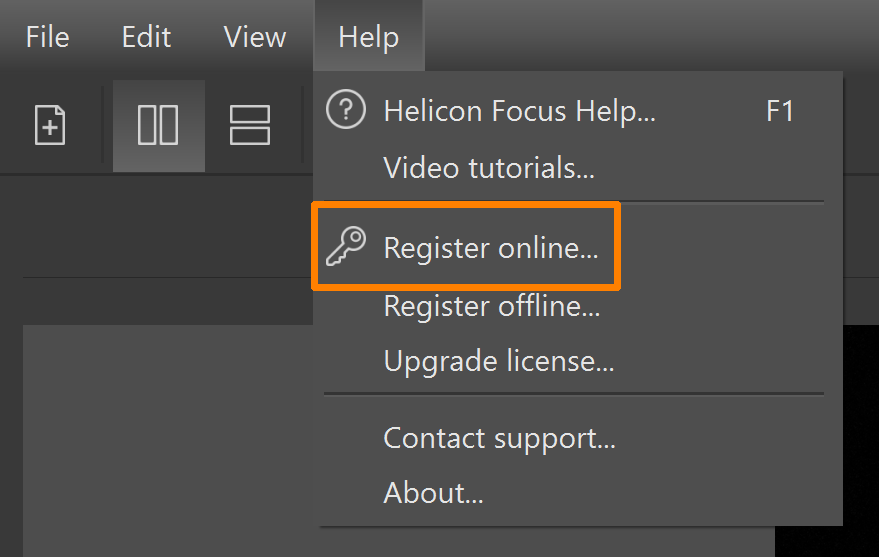
An activation code is provided by email after the purchase. There's no need to assess the website or log in to Help Desk - the activation code has to be entered within the program: go to main menu->Help->Register online
paste your activation code and press Register.
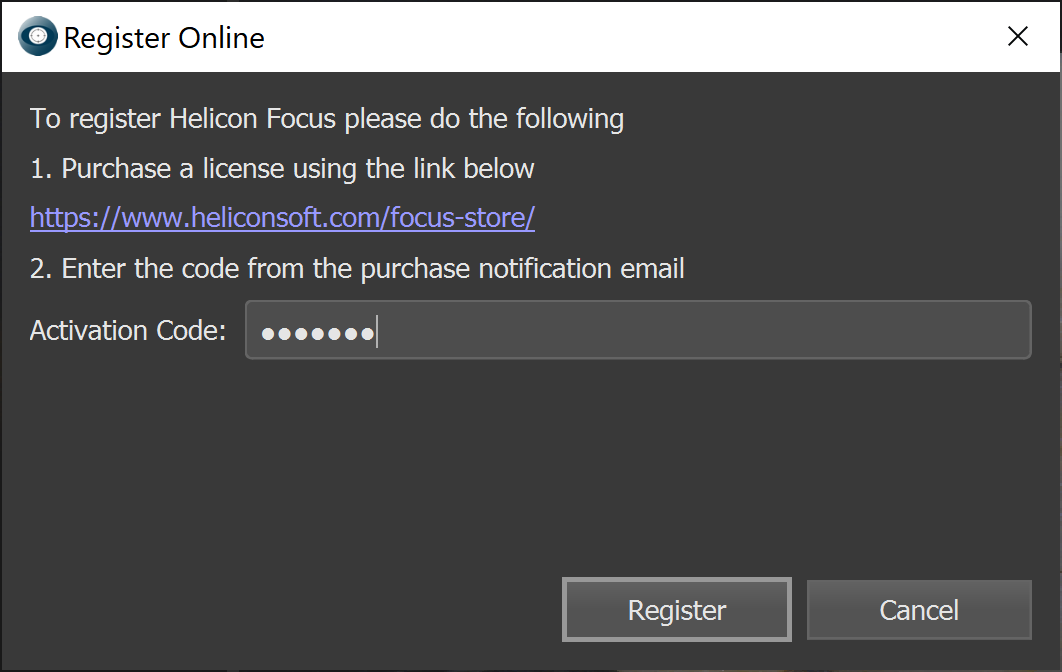
The activation code unlocks the purchased edition (Lite or Pro).
If online registration is not possible, follow the instructions on our website.
The minimum system requirements are:
Focus stacking requires a series of images with the focus position being gradually shifted between frames.
The final result in Helicon Focus depends heavily on the quality of the source stack. This best practices for capturing a stack suitable for rendering include:
- minimal or no movement within the scene;
- even and consistent focus steps between frames;
- consistent lightning;
- stable viewpoint.
Focus stacks can be captured handheld, using a tripod or macro rails, camera built-in focus braceting functionality or tethering apps allowing full automation, like Helicon Remote.
If you don't have your own focus stack yet, you can run tests on the built-in demo stack: File -> Run Focus Demo. This sample stack is included with the software for testing and demonstration purposes.
There are two primary methods for shifting focus during stack acquisition:
Each of these methods has its own specifics, advantages and limitations, and may result in changes in scale or viewpoint. Some of these changes can be compensated more easily during processing, while others may lead to more noticeable artifacts in the resulting image.
The workflow begins with an empty workspace. To begin, drag and drop your source images directly into this area, or use any other option to open the images.
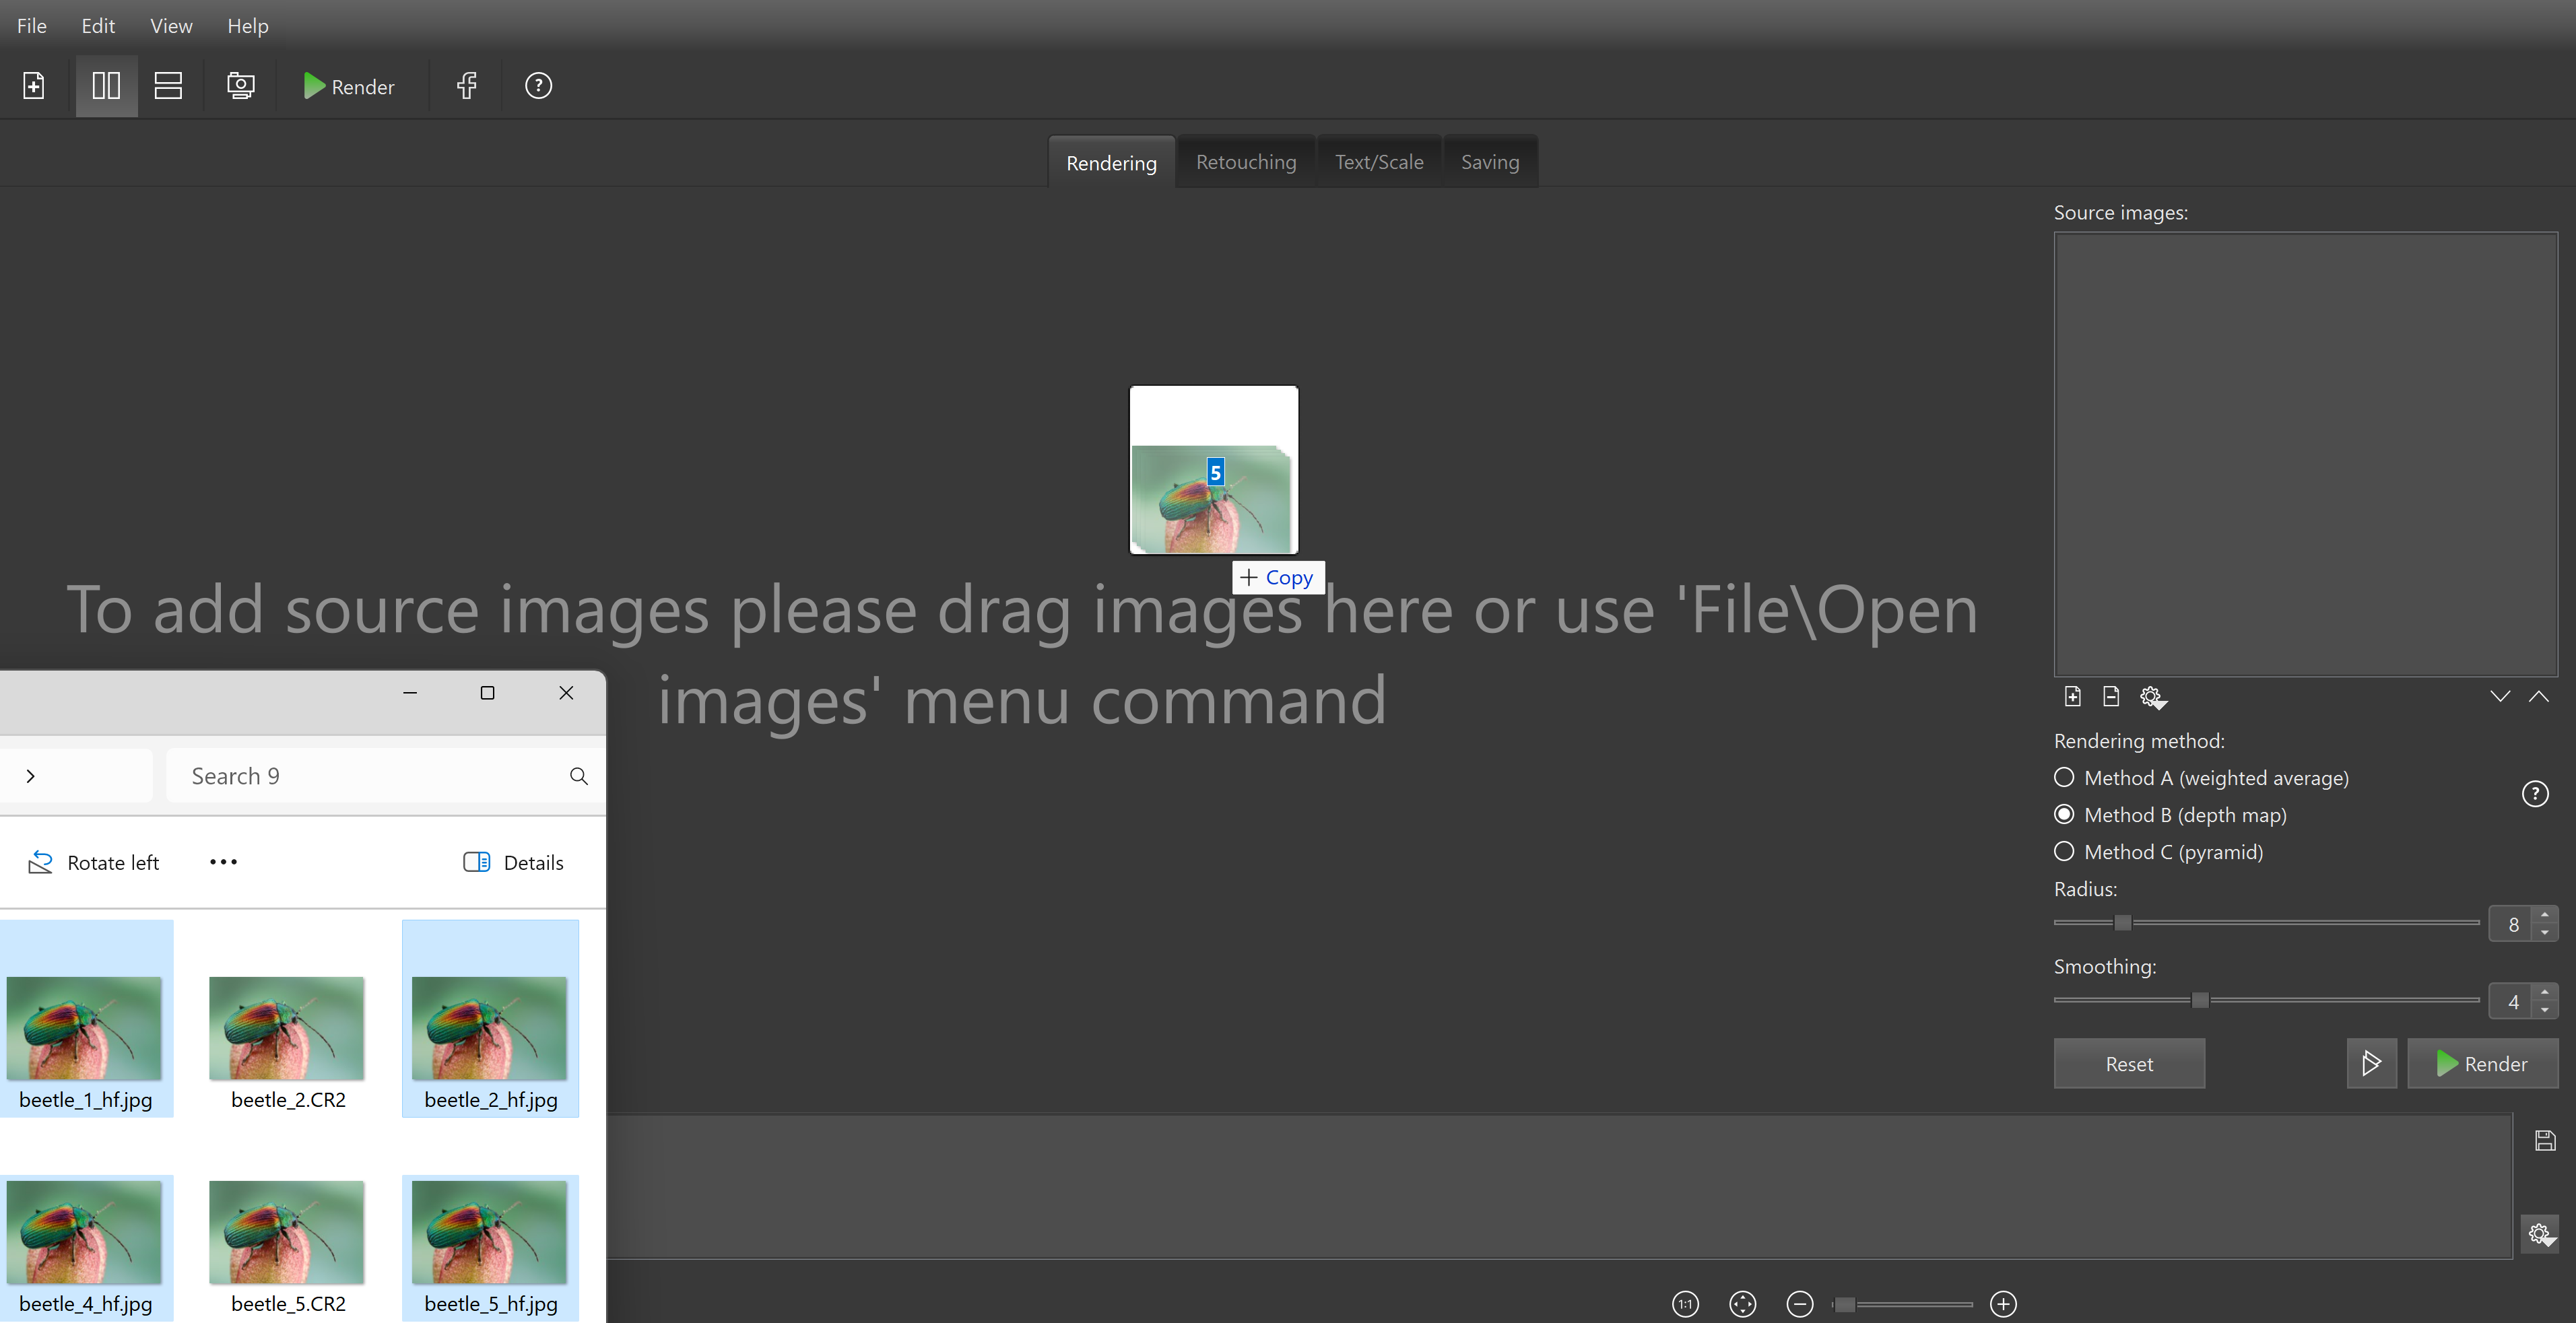
Once the images are loaded, you can proceed with the default rendering settings, or adjust the rendering parameters. When ready, click the Render button to start the stacking process.
It is often useful to begin with the Preview mode.
Save the resulting image after rendering is complete.
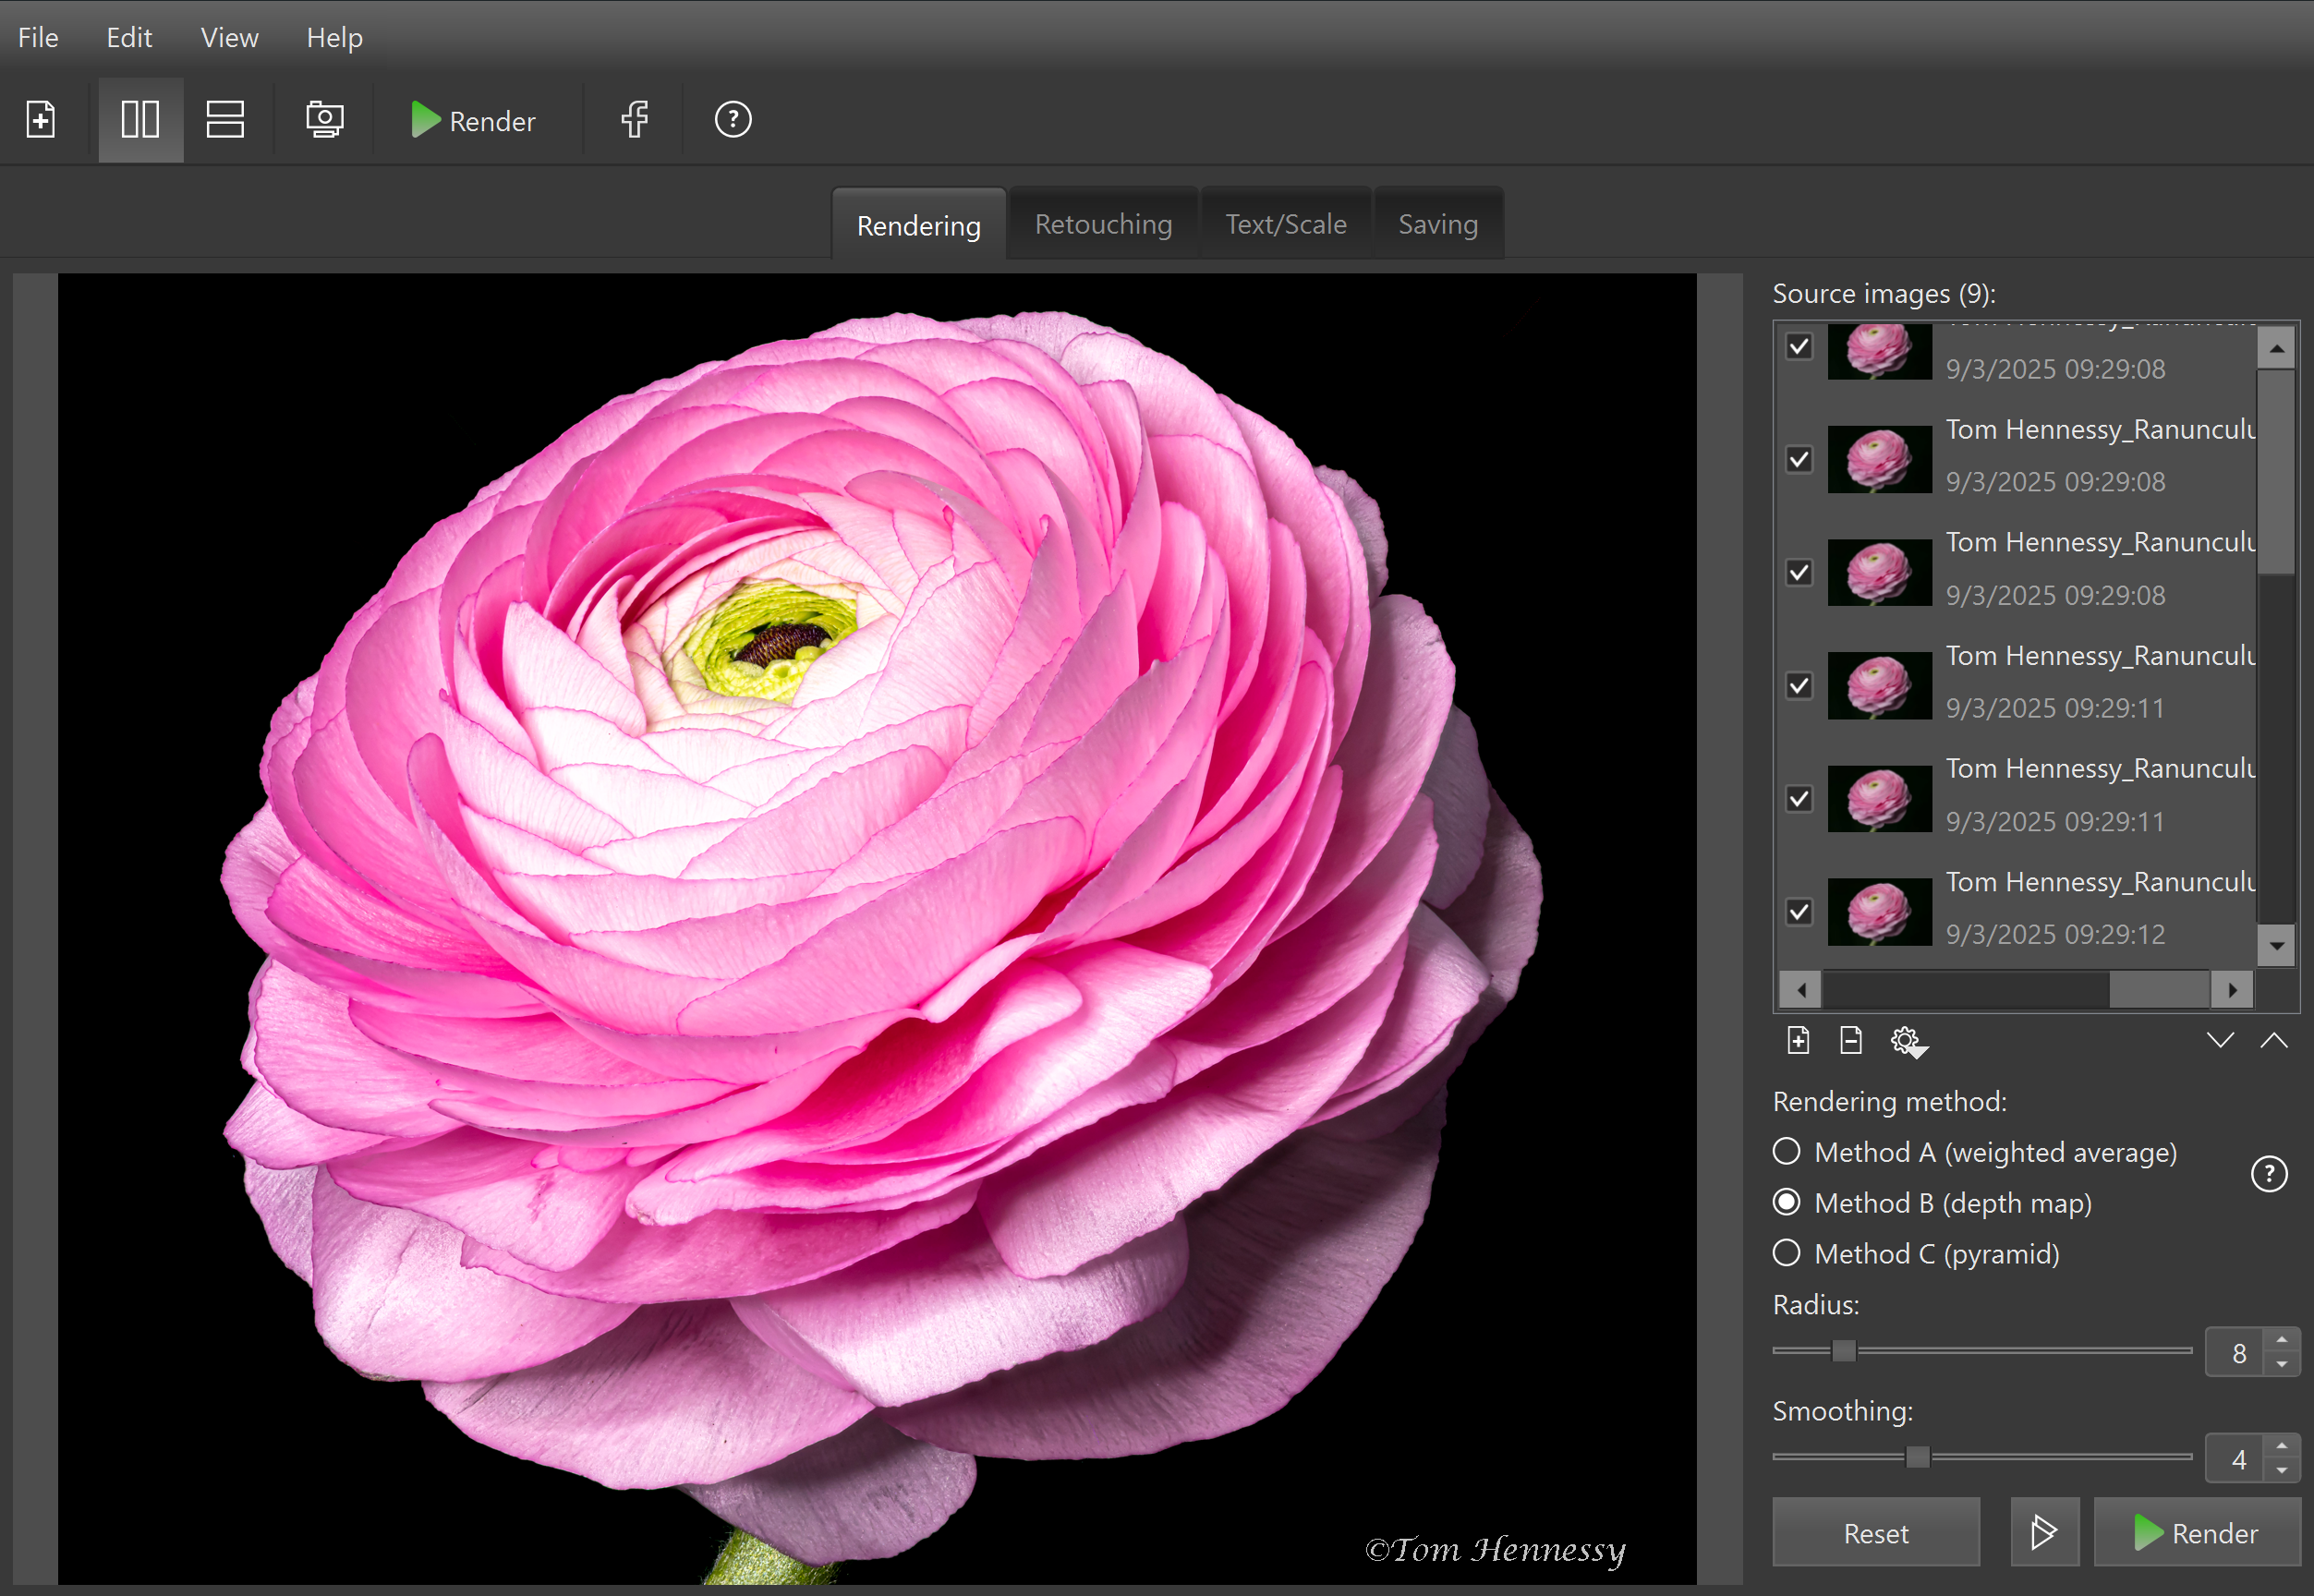
The main work screen has four tabs, guiding the workflow step by step from opening source images to saving the final output.

The Rendering tab is the starting point and the main workspace in Helicon Focus. Here you open source files, set the focus stacking parameters, launch rendering and preview the results.
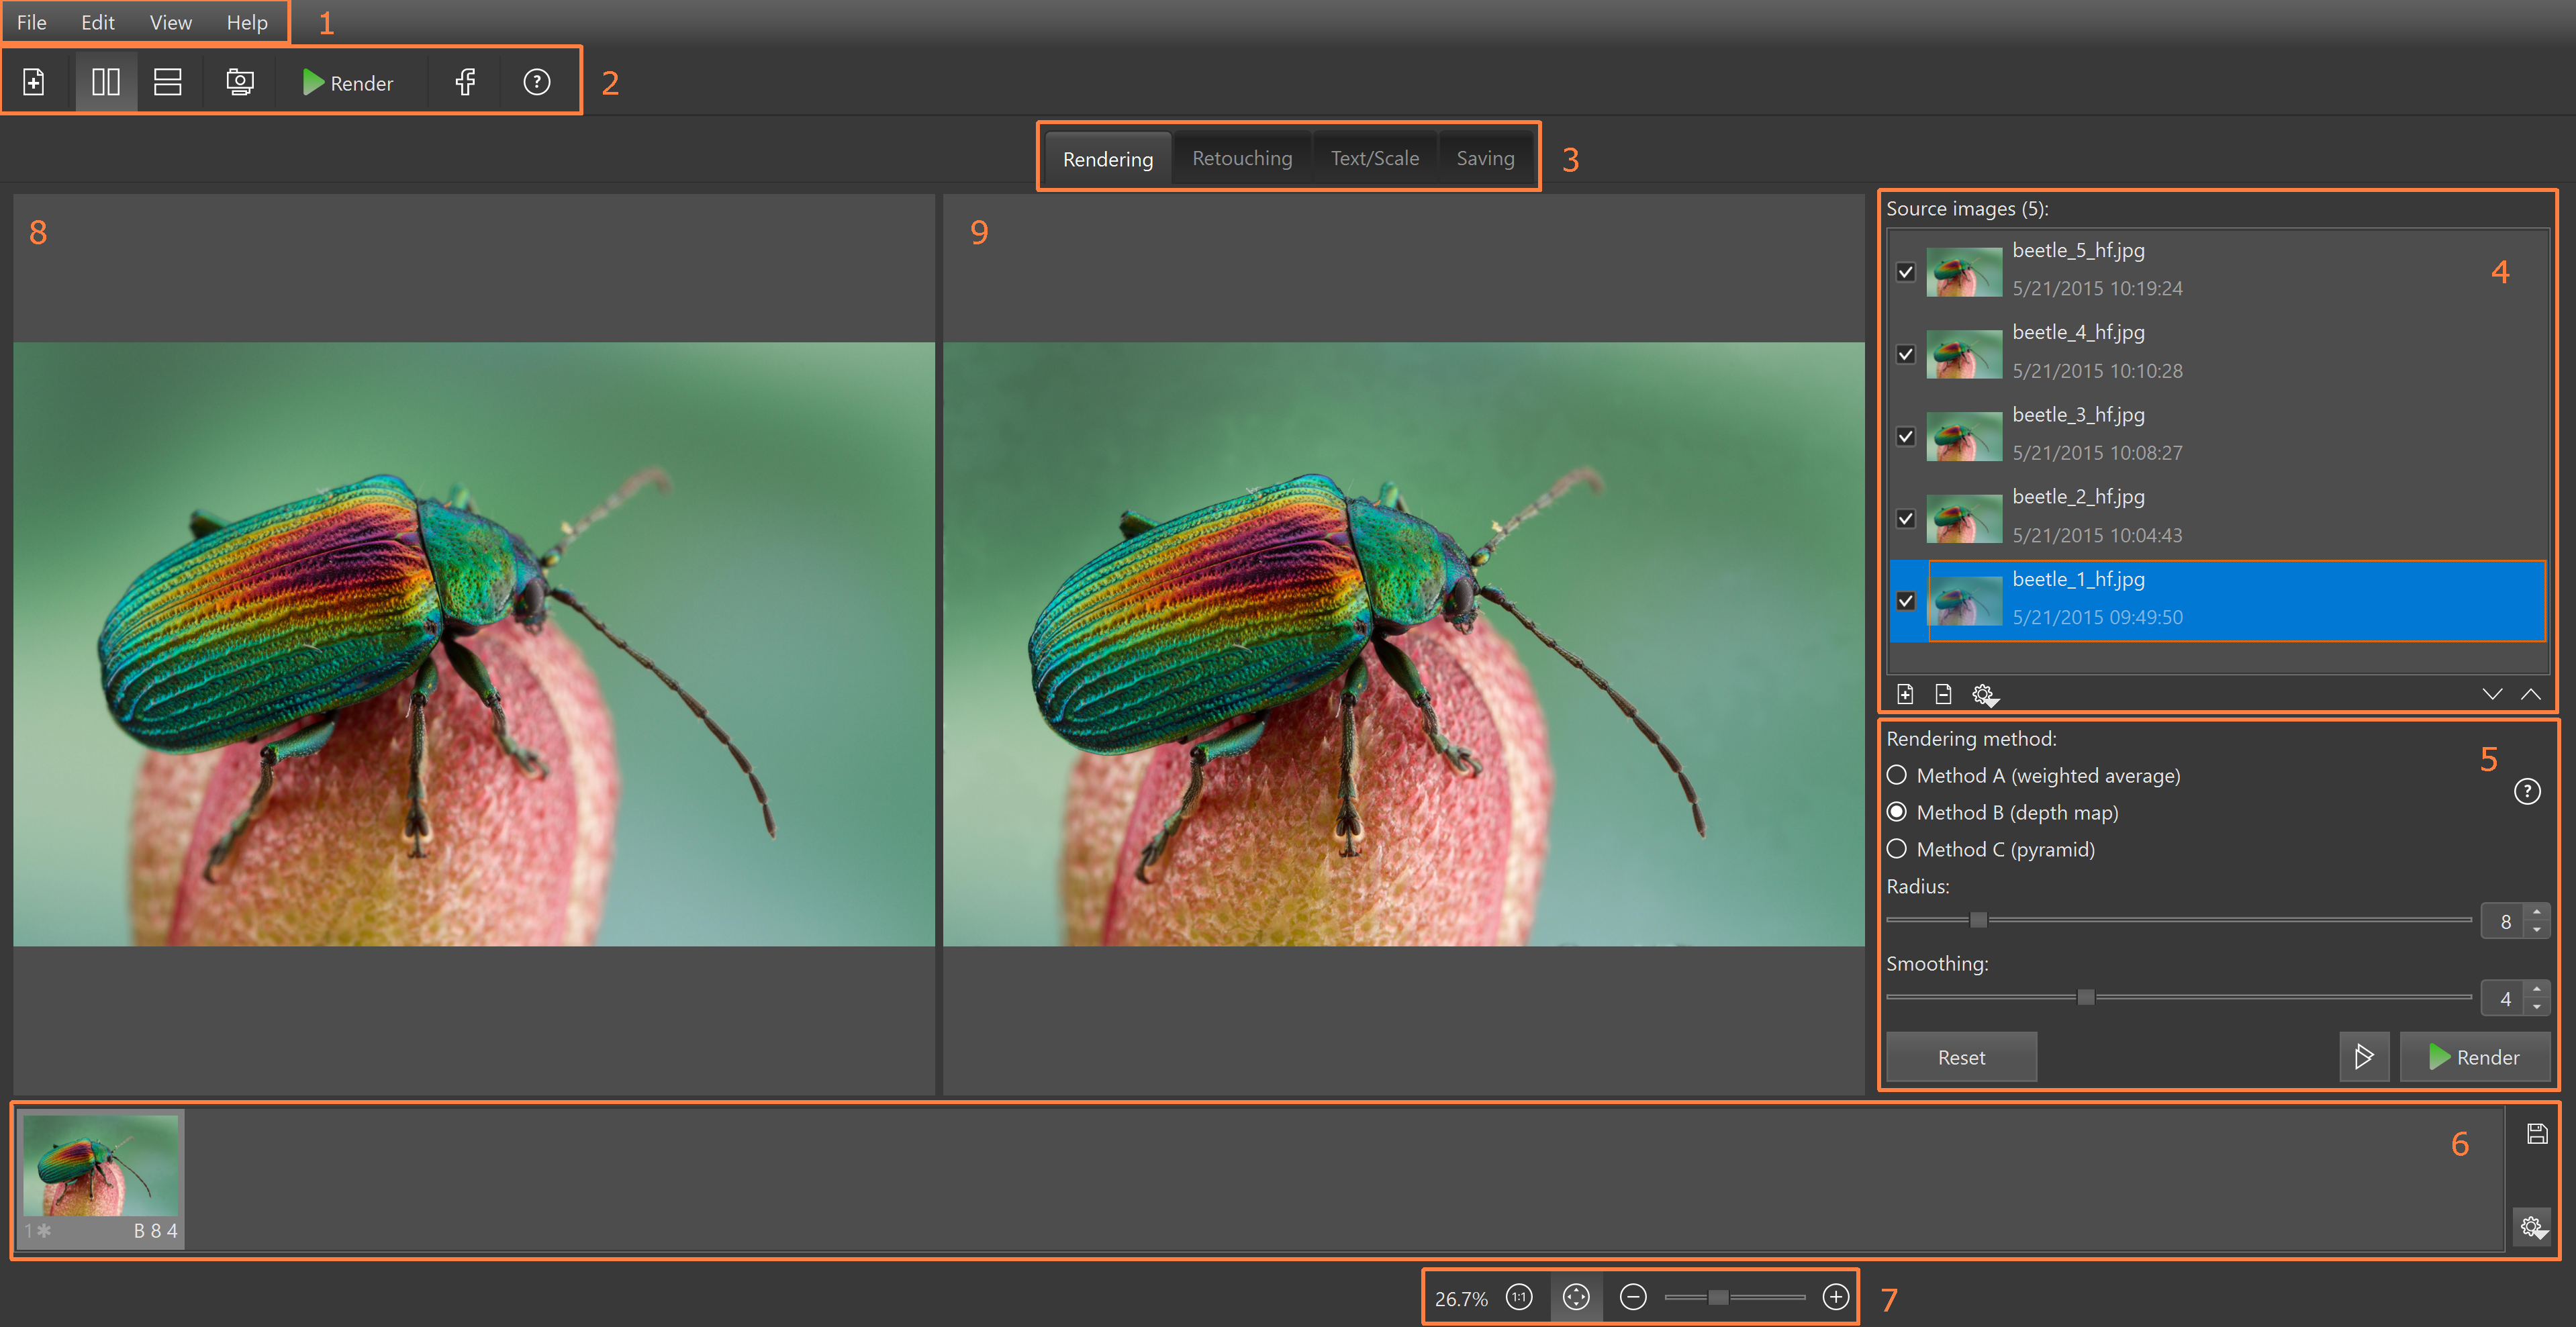 |
1 - Menu bar 2 - Toolbar 3 - Workspace tabs 4 - Source images 5 - Render parameters 6 - Output images 7 - Zoom controls 8 - Current source image (can be top or left) 9 - Current output image (bottom or right) |
Before rendering, it is often useful to open Preview in order to evaluate the result and determine optimal rendering methods and parameters.
The Preview mode provides a real-time view of how the change of parameters affects the output, making it easier to compare results before final processing. The stacks with different sets of parameters can be send to render from the Preview window using Enqueue button.
1. Open images in Helicon Focus.
2. Press the ![]() button to open Preview window.
button to open Preview window.
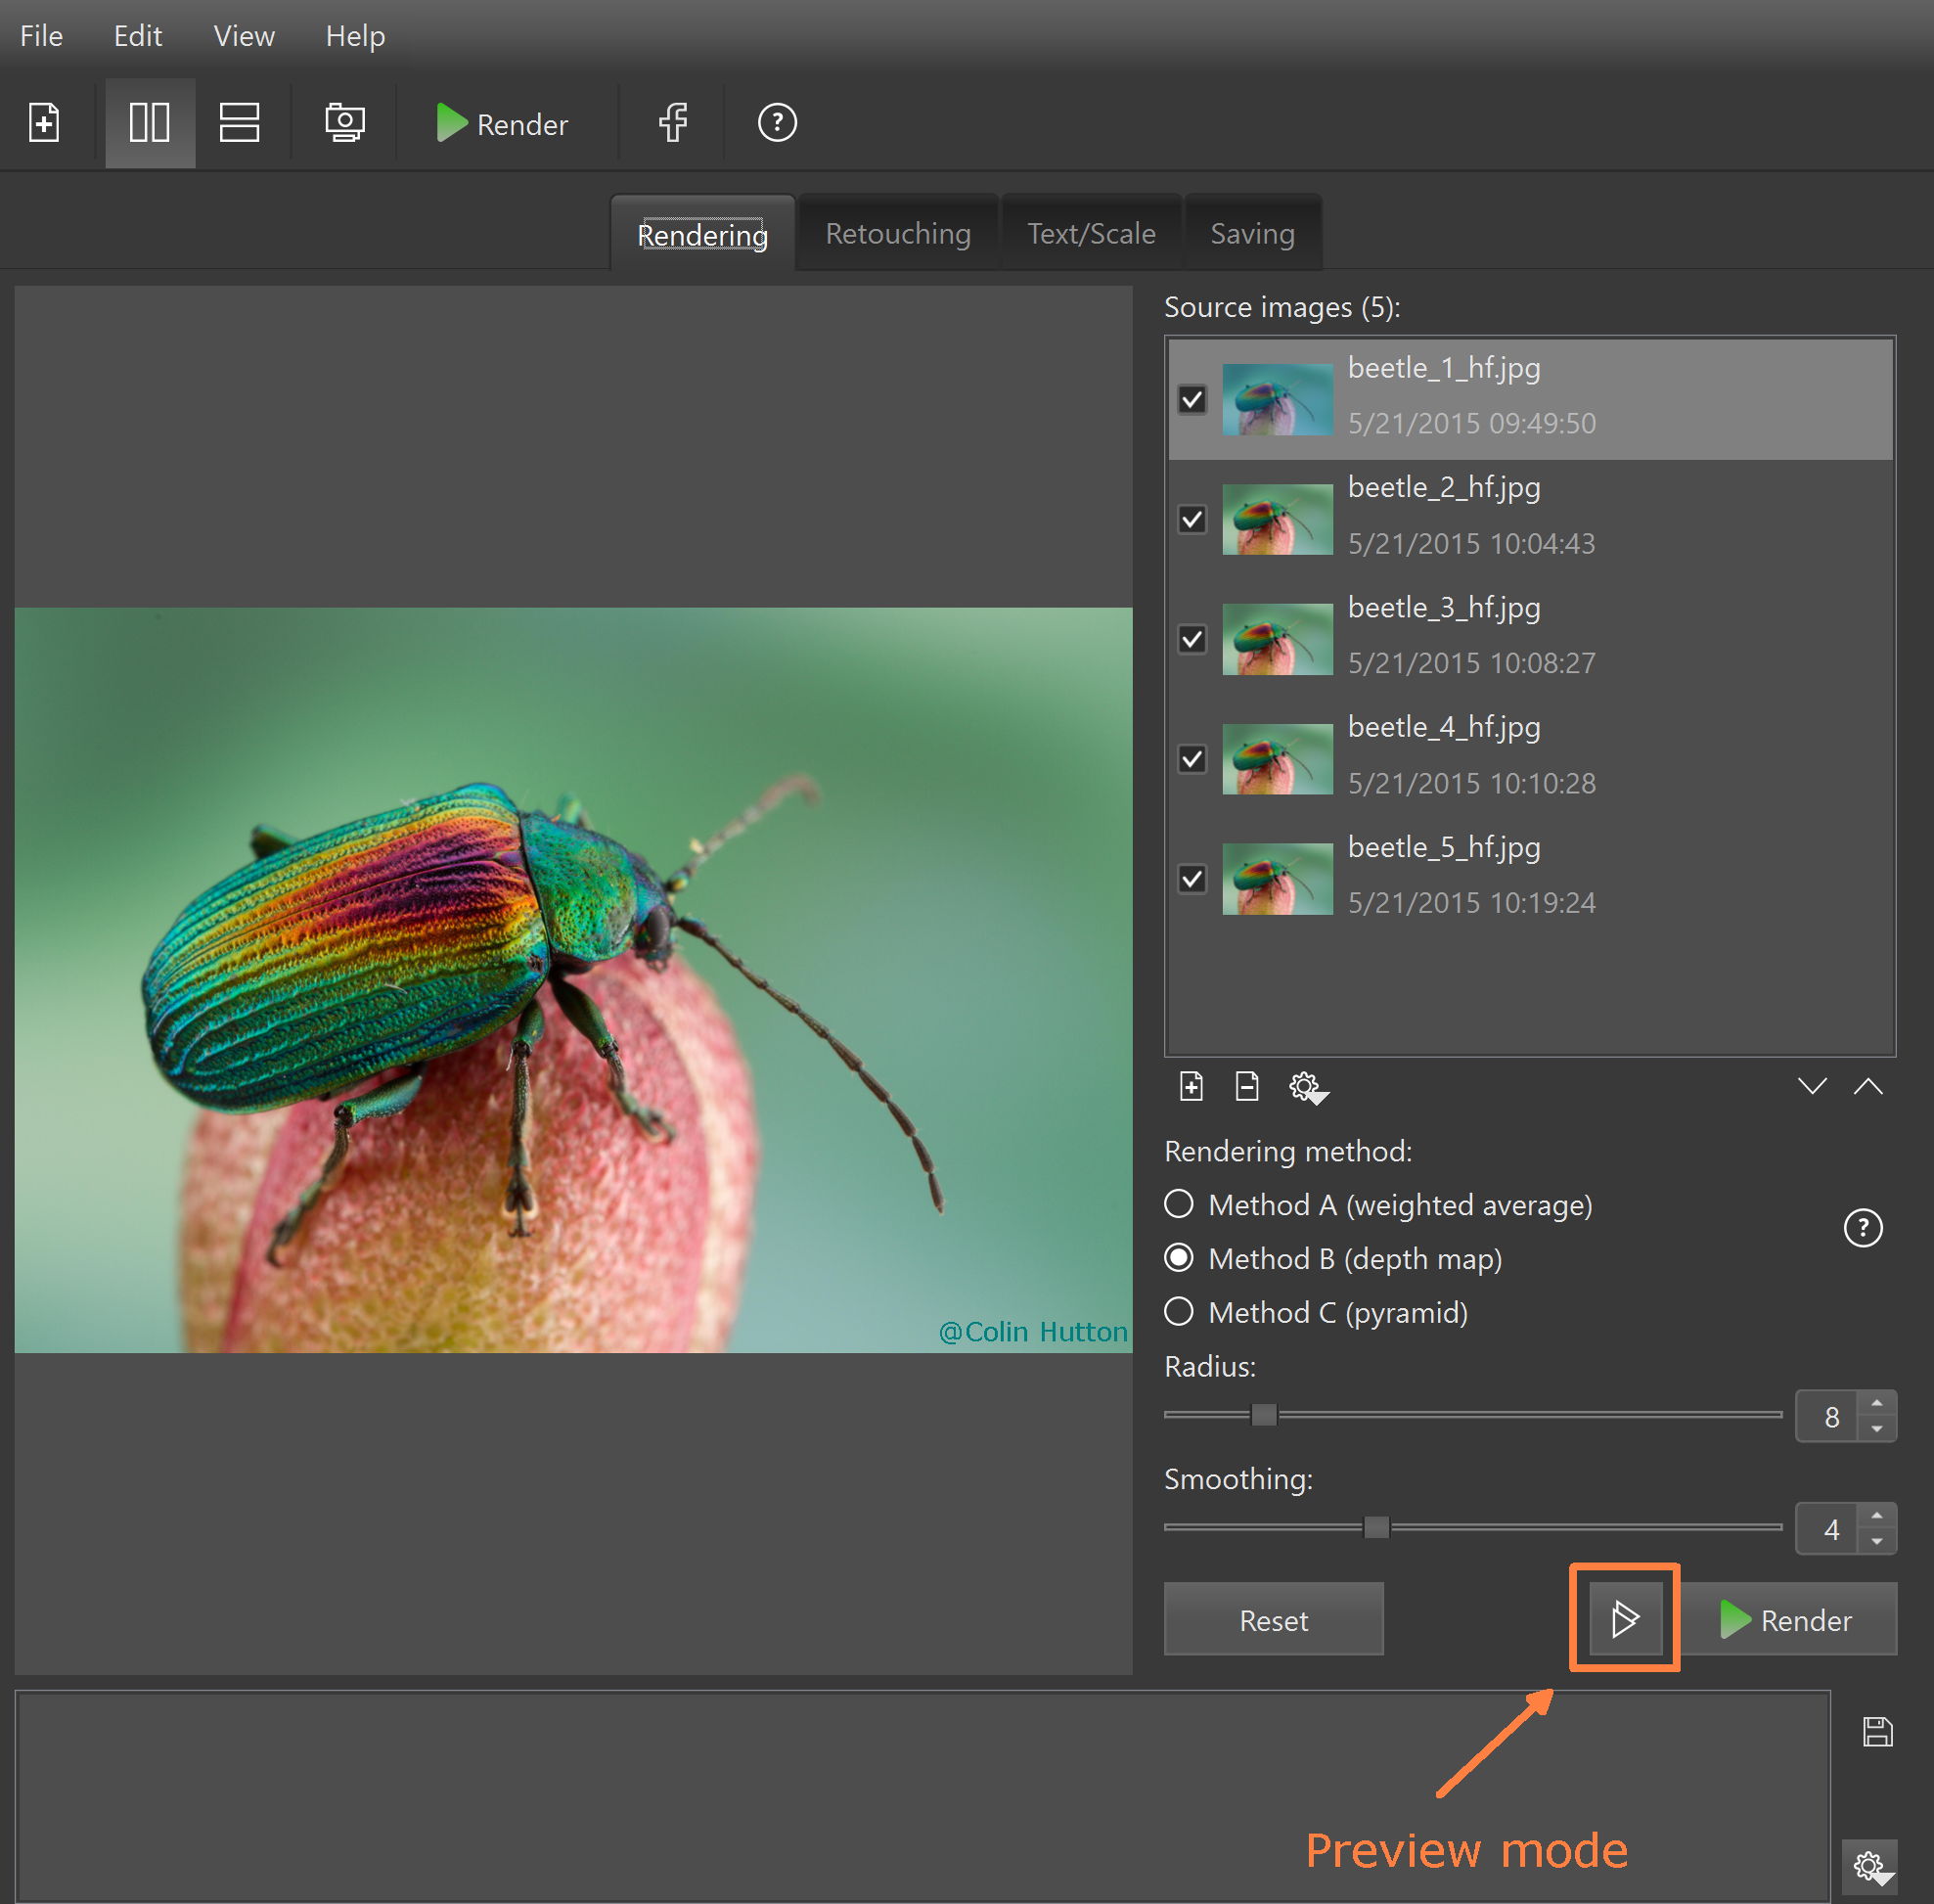
3. Select Preview size.
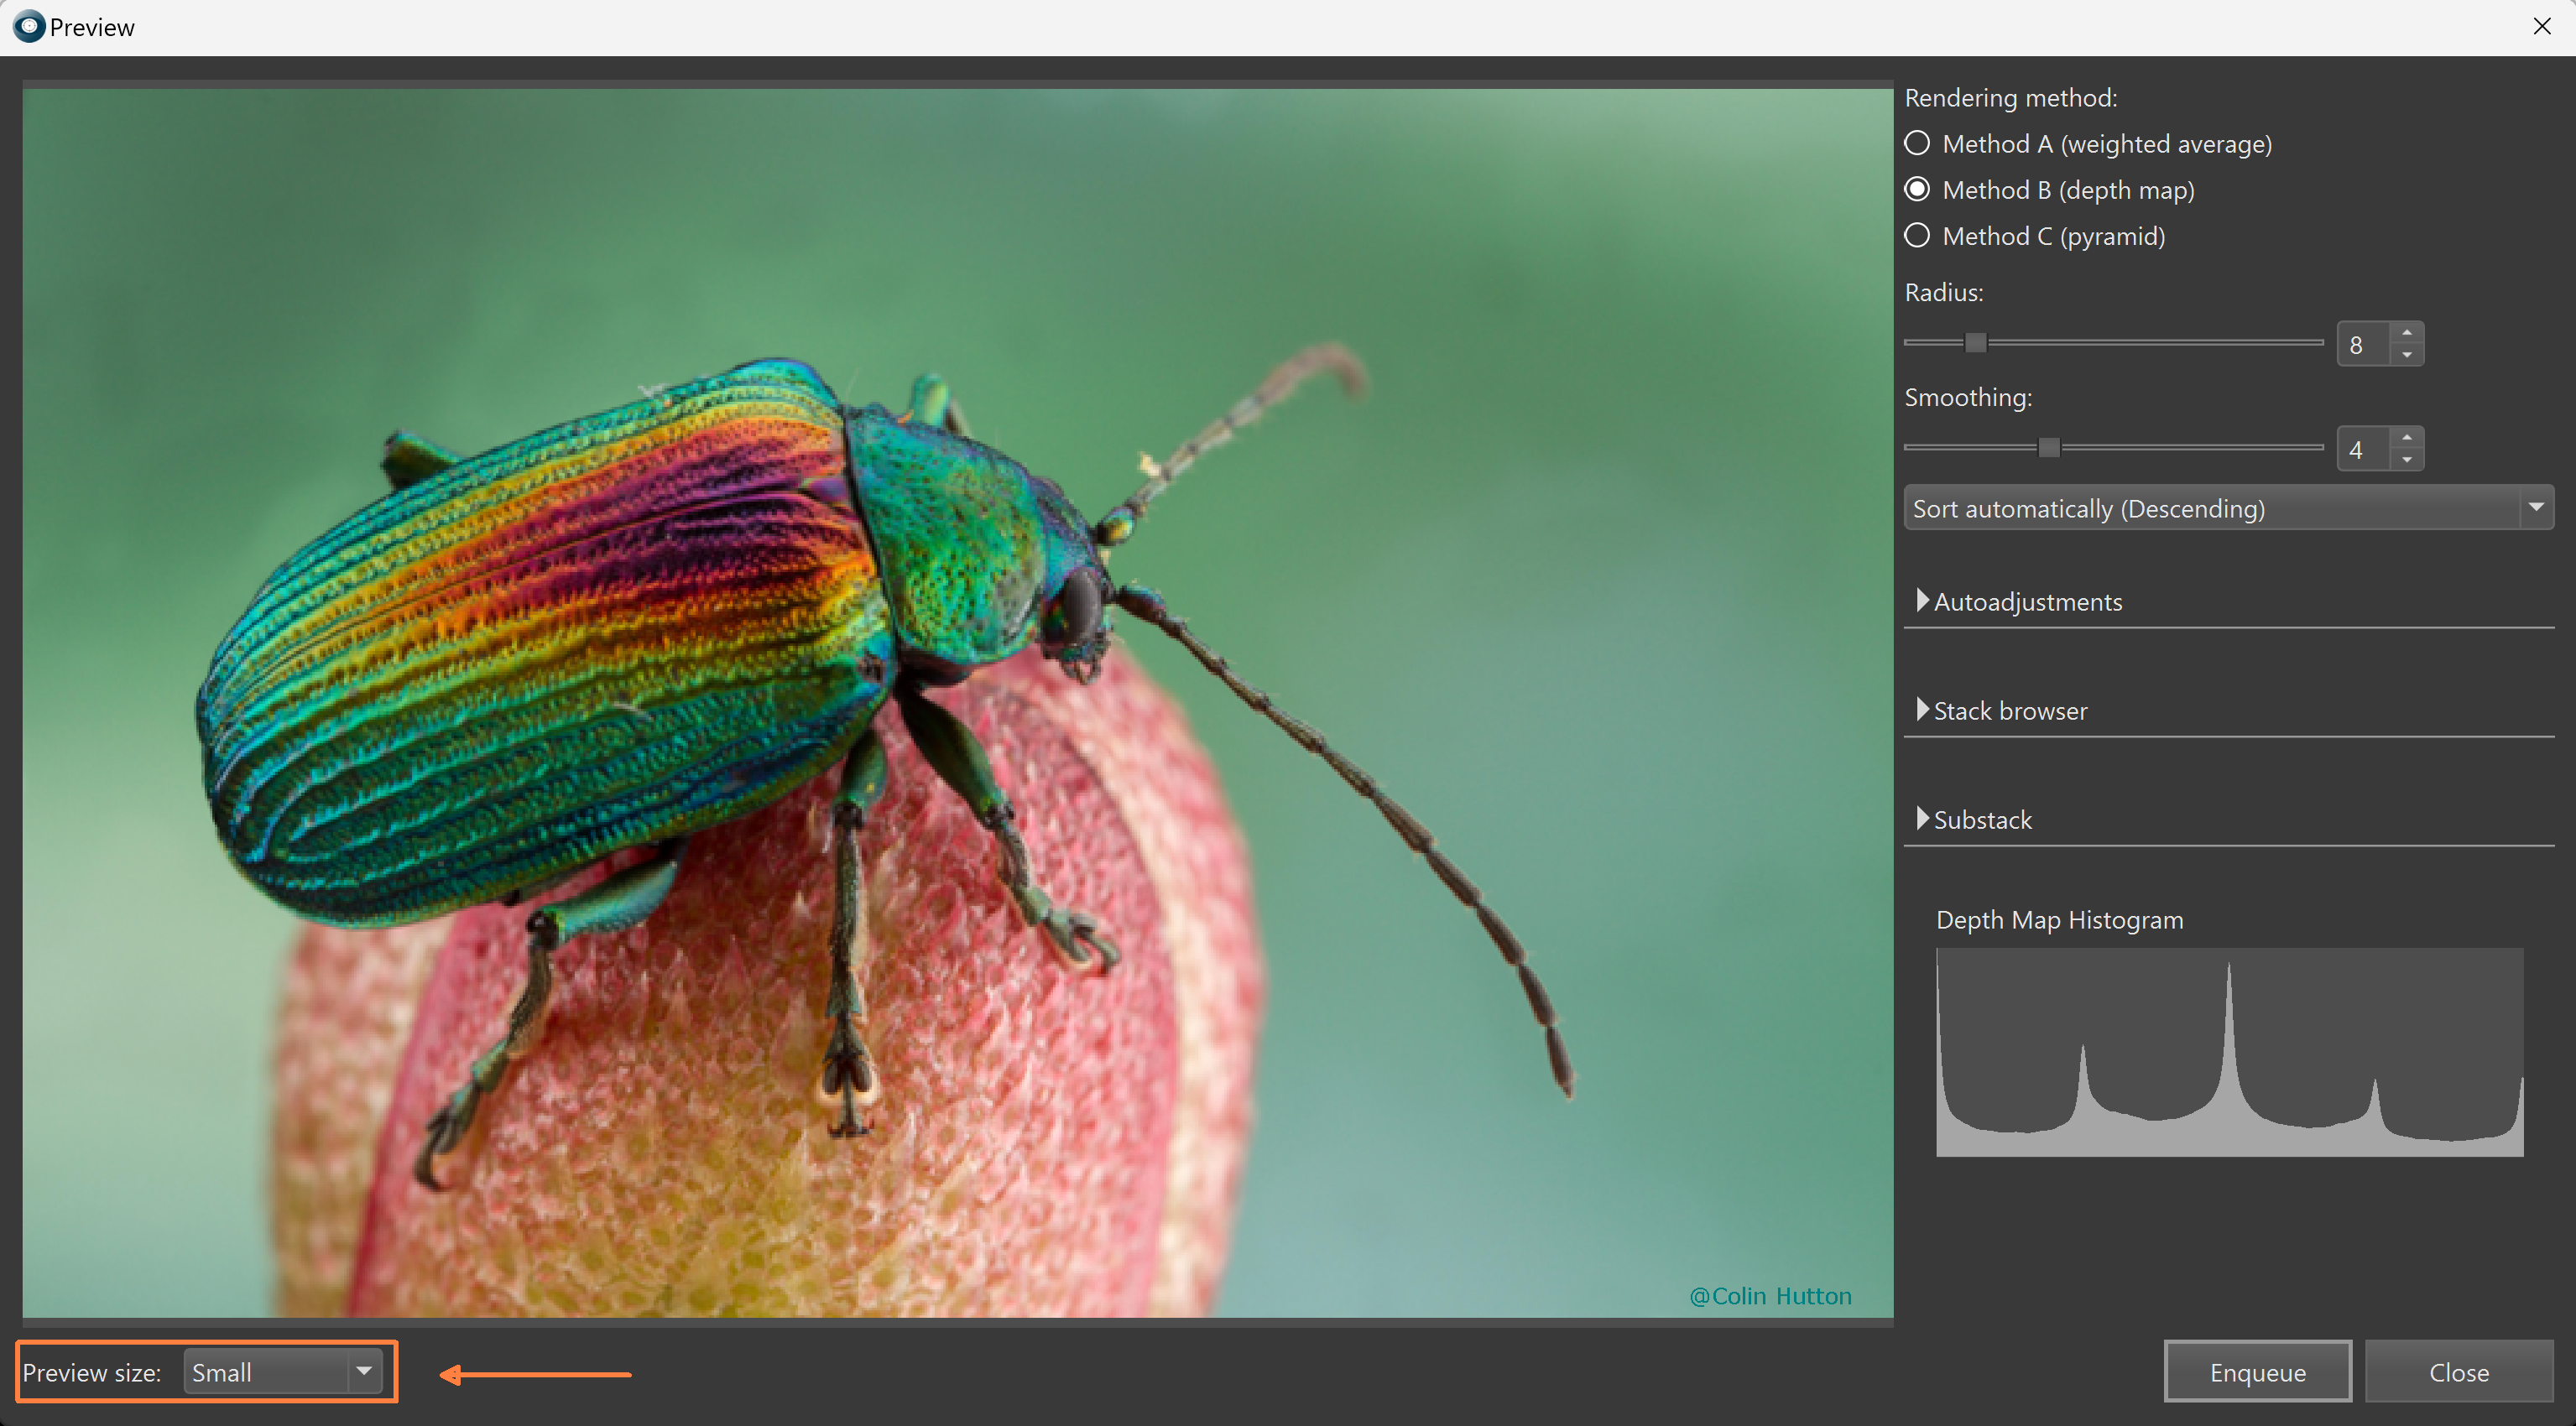
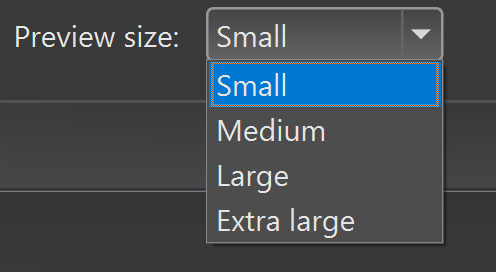
Higher resolution of the review image will allow to preserve more details, but may increase refresh time.
4. Switch between rendering methods, experiment with Radius and Smoothing, with the sorting order to see the effect this has on the output.
Once you have found the right set of parameters for this stack, click Enqueue button.
The Enqueue button sends the current stack with its parameters to the render queue without closing the Preview window. This allows to continue adjusting parameters while the previously enqueued stack is being processed.
The software automatically aligns content as accurately as possible, so additional adjustments are usually unnecessary. Default parameters generally provide optimal results.
If needed, alignment parameters can still be fine-tuned to see how changes affect the output. Adjustments should better be made in small increments, as maximizing parameter ranges will not necessarily improve the result. Once a satisfactory configuration is achieved, click Enqueue to send the stack with the current parameters to the render queue.
Crop output automatically option removes unwanted edges that may appear during stack alignment (can be toggled globally in Preferences->Autoadjustments).
Apply user crop rectangle option becomes available in Preview only if enabled in Preferences->Autoadjustments.
The quality of the source stack determines the quality of the render output.
Open the Stack Browser panel and use the slider to browse through the images. This helps verify:
These are the main factors to check when evaluating the stack quality and its possible influence on the resulting image.
Show Adjusted
When unchecked, the images are shown for browsing as shot, revealing any original misalignment or displacement.
When enabled, adjustment parameters are applied, letting you preview how the program managed to align the images.
The Substack feature allows visually splitting the full image stack into substacks.
Sliders are used to select the first and last image of the substack. Each substack can then be sent for rendering using the Enqueue button.
The Depth Map Histogram shows which images contain in-focus details and how these areas are distributed across the stack.
Based on the Depth Map Histogram data, the Substack sliders can also be used to exclude images that contain no focus data at the beginning and/or end of the stack, which is recommended for better stacking results.
Helicon Focus supports the following types of source files:
The Adobe DNG Converter is our recommended raw processing engine, and it is used as the default codec when opening raw files (Raw-in-DNG-out).
Converting raw files to other formats, including .dng, prior to opening in Helicon Focus is not required. Raw files can be imported into Helicon Focus directly.
It is highly recommended to avoid mixing image formats in the source stack.
There are several ways to open source files:
Now the Source image list shows which files will be processed (stacked) once you press the ![]() Render button. The list of source images will be updated each time you choose another output image, showing the files that were used to render current result.
Render button. The list of source images will be updated each time you choose another output image, showing the files that were used to render current result.
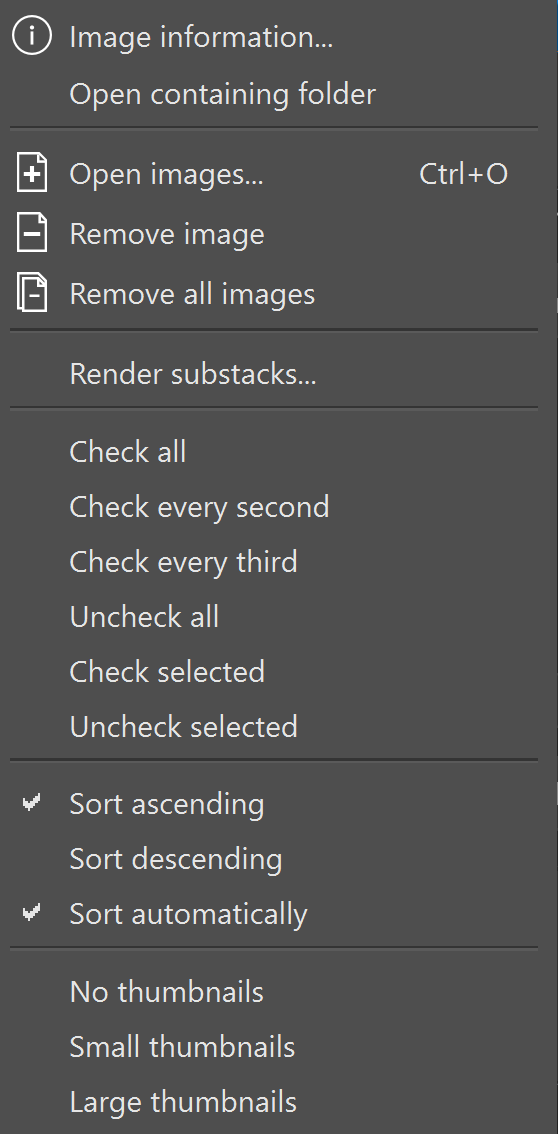
The Source image list has a context menu that can be called by right-clicking on any of the images on the list or by pressing the ![]() button:
button:
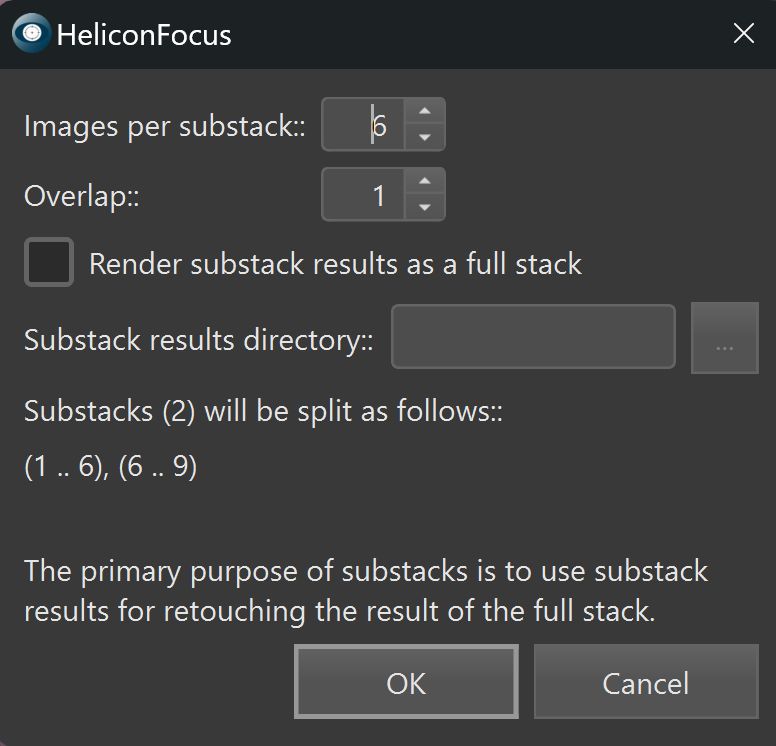 |
Images per substack defines how many images are included in each substack. Overlap defines how many of the last images from the previous substack are included in the next substack, creating an overlap between them. If Render substack results as a full stack is enabled, Helicon Focus will automatically render results of all processed substacks as a single stack. The results of substack renders will be added to the list as .tiffs.
Substack results directory has to be specified to save the substack results only in case if 'Render substack results as a full stack' is enabled. The save format is .tiff. |
Removing Source Files
To remove one or more files from the Source images list, select one or multiple images holding down the Ctrl key. Then right-click on one of the highlighted files to call the context menu and choose the Remove image option. You can also click the Remove image button right below the Source images list, or just use Del button.
Removing images from the list doesn't delete the files from the disk.
Three focus stacking methods are available in Helicon Focus: Method A, Method B, and Method C.
Method Bl (B legacy) is not on the main list, but can be enabled in Program preferences.
A brief description of each method and its typical applications is provided below:
While the choice of the rendering method depends largely on practical experience, some general guidelines are summarized in the table below.
| Intersecting details, complex shapes | |||
 |
 |
 |
 |
 |
 |
 |
 |
| Images with a glare | |||
 |
 |
 |
 |
| Long stack (> 100 images) |
|||
| Non-consecutive (random) order of images | |||
| Preserving color and contrast as a priority |
Although method C can handle some stacks shot in non-consecutive order, we still strongly recommend to capture images in a single direction only, i.e. either from fore- to background or vice versa. Consecutive shooting order is one of the conditions for achieving high-quality focus stacking results.
The choice of the optimal method depends on the complexity of the stack, the number of images, and other factors. Therefore, there is no single rule strict rule, and testing different approaches is recommended to identify the best combination for each case.
Using the Preview mode is highly recommended. It provides a clear view of how the selected method and settings affect the result and allows to send the stack to render with the chosen parameters.
This feature allows combining the results from different rendering methods into a single stack. Starting with version 9, individual results no longer need to be saved and reopened to do this:
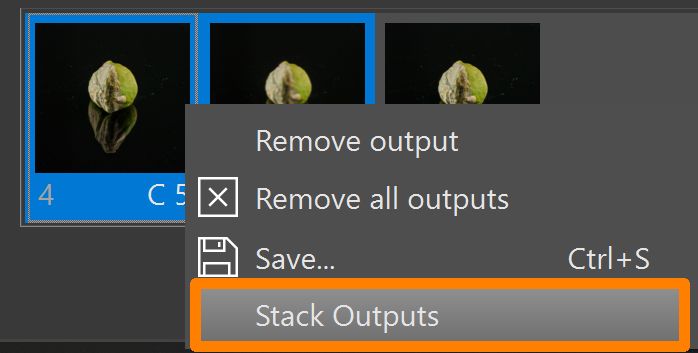
The selected outputs will be automatically added to the source list as .tiff files for further stacking.
The Radius parameter is one of the two main controls available in Methods A and B.
During focus stacking, the program evaluates each pixel of the source images to determine whether it is in focus. The detected focused areas from the entire stack are then combined into a single output image. The Radius defines the size of the area analyzed around each pixel.
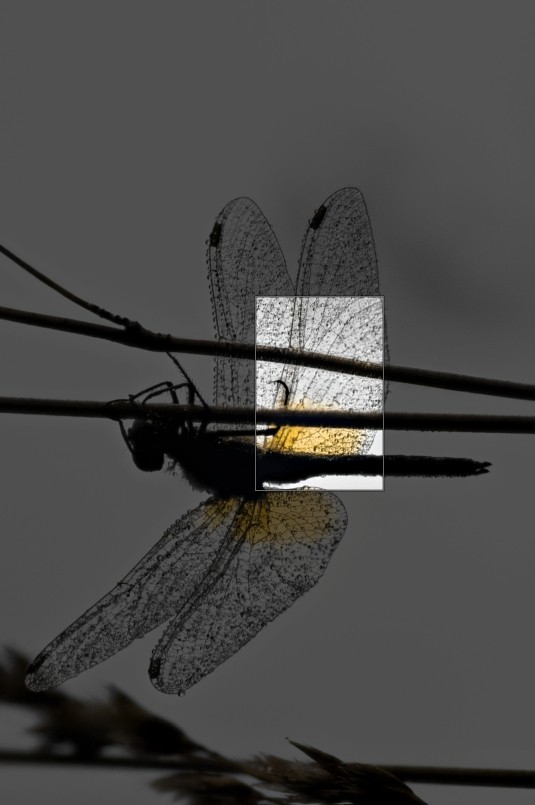
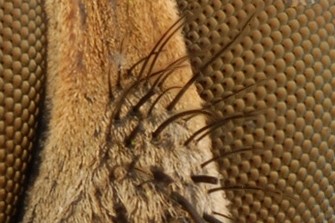
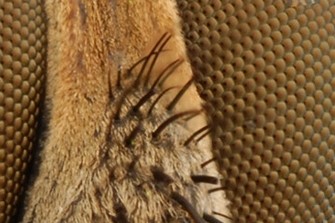
Experimenting with different Radius values is recommended. Start with the default setting, then decrease it to observe its effect. Gradually increase the value to reduce noise, unwanted artifacts, or halos along edges. For images with fine details or thin structures - which is common - a low Radius of about 3-5 usually yields the best results, though it may introduce minor noise or halo effects.
Preview mode is especially useful for visualizing how changes to this parameter impact the final result.
Two typical scenarios illustrate its effect:
1. Images with fine, intersecting details: close-ups of insects, fur, bristles, or other fine structures may benefit from smaller Radius values, which preserve sharpness of fine details. However, artifacts may appear on smooth, uniform surfaces, so a balance must be found.
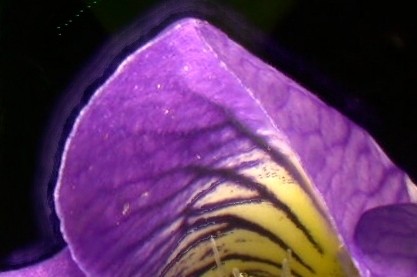
Below are two examples of stacking results rendered at different Radius values using Method B:
| Method B, Radius = 1 | Method B, Radius = 22 |
 |
 |
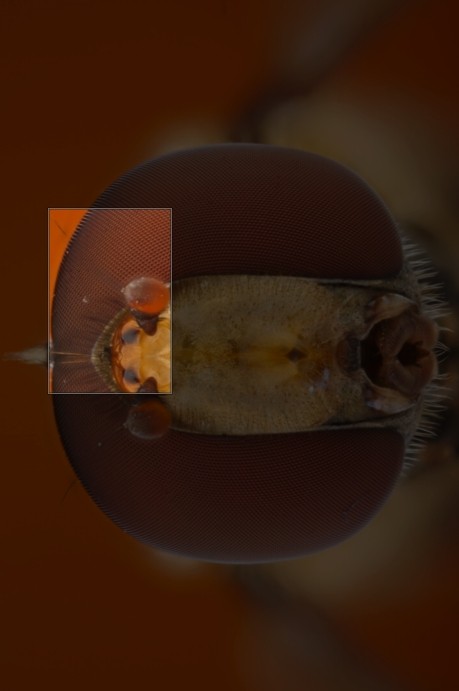
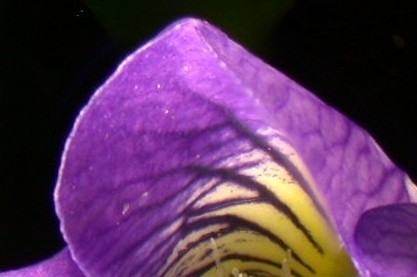
2. Higher Radius values may reduce halos and other artifacts along object edges. Increasing the Radius can minimize halo effects, though excessively high values may soften fine details:
| Method B, Radius = 2 | Method B, Radius = 22 |
 |
 |
Experiment with different Radius values in Preview mode and compare results to find the optimal balance between detail sharpness and artifact reduction.
Smoothing is the second main parameter in focus stacking. During processing, the program identifies the sharpest areas in each source image and combines them into a single output.
For Methods A and C, Smoothing determines how these sharp areas are blended. Lower values preserve sharpness but may produce artifacts in transition areas. Higher values create smoother transitions, though the overall image may appear slightly softer.
For Method B, this parameter controls the smoothing of the depth map.
Experimenting with the Smoothing parameter in Preview mode is recommended to see its effect on the final image.
Tip: To reset any parameter to its default value, right-click the slider. This applies to all controls in Helicon Focus.
Stack processing starts immediately after pressing the Render button or after clicking Enqueue in the Preview window. All resulting images, along with progress bars for each image, appear in the Outputs panel in the lower part of the screen. Here you can find all results produced during the current working session.
There is no need to wait for one render to finish before starting the next one, multiple renders can be queued to run in sequence.

Each output in the list has a number and a method designation (A, B, or C). The applied parameters are displayed as well: Radius and Smoothing for methods A and B, and Smoothing only for method C.
Un-saved renders have an asterisk (*) next to their number in the bottom strip, e.g., 1*. After saving the output, the asterisk is removed. This allows you to easily see which outputs have been saved and which haven't.
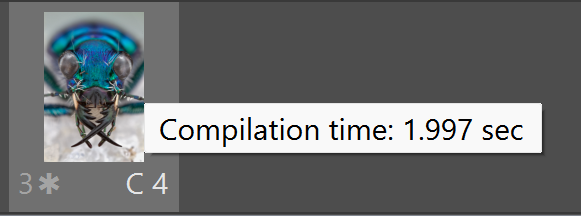
The compilation time can be viewed by hovering the cursor over the output thumbnail in the Outputs panel.
Select any output to view the source images used for that render in the Source image list.
The context menu for outputs includes the following options:
Progress bars indicate the completion status for individual images, helping to monitor long processing sessions.
Sound notification can be enabled in Preferences->General to signal when all renders have completed.
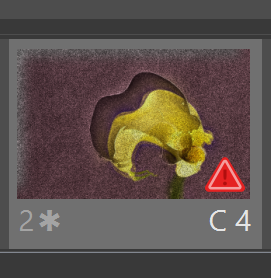
A red triangle on the output thumbnail indicates that the program has detected a factor - or a combination of factors - that may potentially decrease the quality of the resulting image. This can occur if there are significant brightness variations within the stack, if the focus was moved non-linearly during capture (i.e. the direction of focus movement changed), or if the focus steps between consecutive images were uneven.
For an optimal stack, the focus steps should be consistent, the focus should be moved in a single direction across the stack, and the exposure should remain stable. If one or more of these conditions are not met, the program reports this by displaying a warning icon.
It is important to note that this is only a warning. If the quality of the output is satisfactory, the warning can safely be ignored. It does not indicate that the render has failed, that there were errors during processing, or that there will be any issues with saving the resulting image.
If the output is satisfactory, proceed with retouching or saving according to the workflow. If the result is not satisfactory, hover the cursor over the output thumbnail in the Outputs panel to view the warning message. This information can help identify the cause of the issue and improve the result.

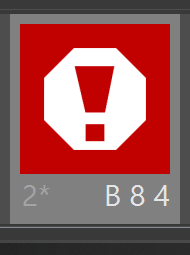
The second type of warning (a white hexagon with an exclamation mark on a red background, shown instead of the output thumbnail) is displayed when, for any reason, the stack cannot be processed.
Unlike the red triangle mentioned above, this warning cannot be ignored - the render will only be possible after the underlying issue is resolved.
Hover the cursor over the warning icon to view the message describing the cause of the failure.


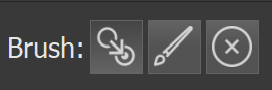
Some outputs may require retouching. The Retouching tab offers three brushes: - Copy from source, Clone and Erase. You can choose the brush in the right part of the tab.
Copy from source
Both images appear perfectly synchronized, even when zooming in or out. The left pane displays the selected source image, and the output image is shown on the right.
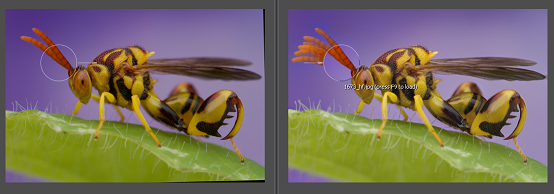
Shooting a stack can be quite challenging due to various external factors affecting the process. This may result in blurring, banding, halos, or other artifacts. Many of these issues can be corrected using the Copy from source brush. This tool allows replacing artifacts in the output image by copying the corresponding area from the relevant source image.
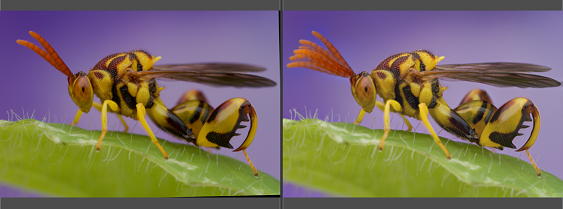
On the left - one of the source images, on the right - the output image right after rendering (the antennae were moving during shooting, so the combined antennae from all source images into the resulting one).
To copy an area from a source image to the output, select the Copy from Source brush, then choose the source image from the list where the area appears best. Adjust the brush parameters and hold the left mouse button down to paint over the desired area.
On the left - one of the source images to copy from, on the right - the output image with Copy from source brush applied.
The source image can be chosen manually from the list in the Source Images window. But there also is a quicker method, especially relevant for long stacks: once the brush is positioned over any part of the output image, the file name it was taken from will is displayed and pressing F9 loads that image as a source for retouching.
Page Up and Page Down keys navigate through the source images list.
The Use another output as a source button below the Source images list allows to choose one of the output images to serve as a source one.
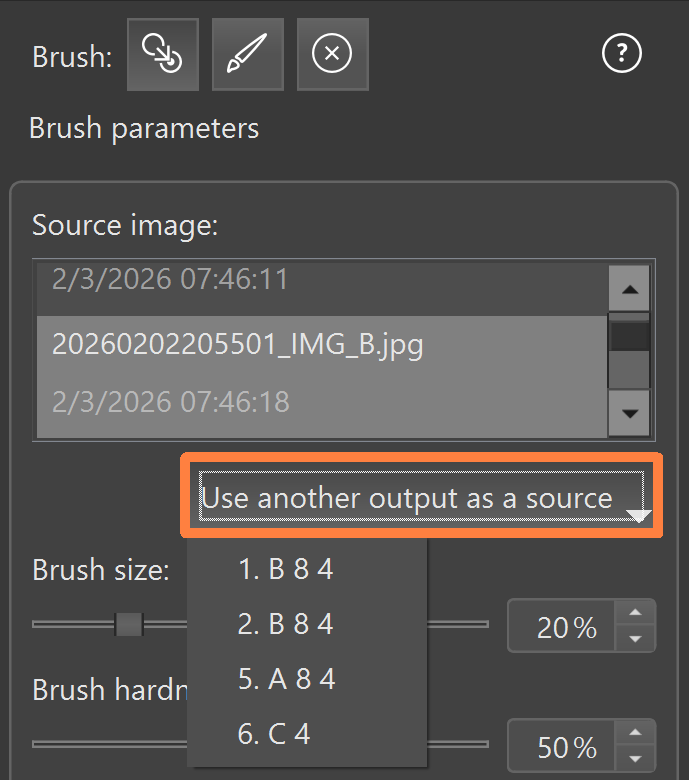
Only compatible outputs will be listed. The stacking output can be used as a retouching source if the first images of the stacks are located in the same folder. The stack composition, the image format, and the first images may differ.
Retouching functionality is only available in Pro version.
There are four main brush parameters:
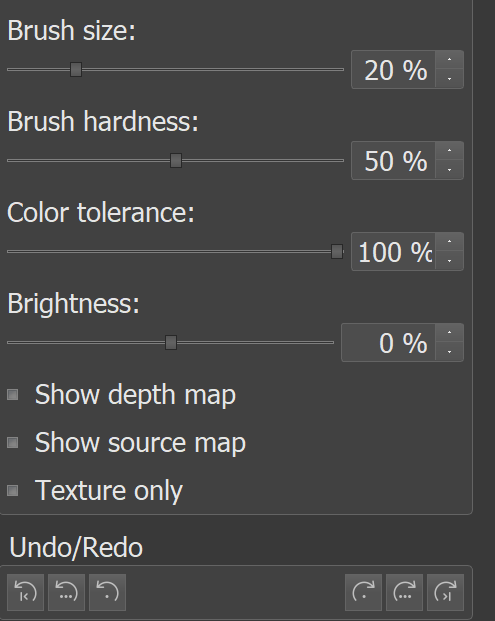
Brush size - sets the diameter of the copied area. Smaller values allow for finer and more precise strokes.
Brush hardness - sets the softness of the brush edges. High values produce sharper edges. Lower values create a gradual transition, resulting in smoother blending with the target image.
Color tolerance determies selectivity of the brush based on color similarity. At 100%, all pixels (100%) within the painted area are copied. At lower values, only pixels whose color is close to the color at the center of the brush are copied, while dissimilar colors are ignored. This allows selective copying and helps preserving fine details or complex outlines while copying surrounding areas , such as backgrounds.
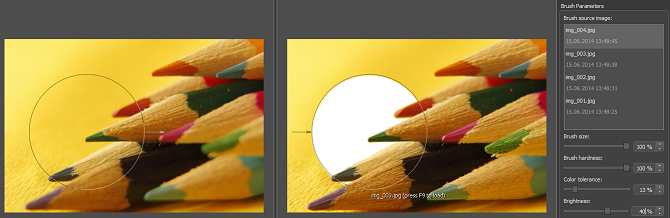
Color tolerance set to low value - the brush is applied only to the yellow background, leaving pencils in the foreground intact.
NB: Brightness is set to a high value for demonstration purposes.
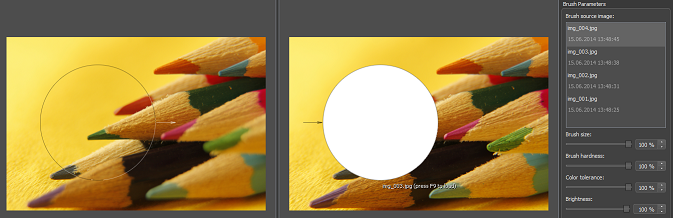
Color tolerance set to maximum - brush is applied to all pixels within the copied area.
Brightness - adjusts the luminance of the copied pixels, making them brighter or darker to better match the brightness of the output image.
Show source map - highlights the areas in the current source image that contributed to the output one.
Show depth map - displays the depth map of the output image during the retouching process.
Texture only - allows cloning just the surface texture while preserving the underlying color of the target area, enabling correction of fine details without affecting the overall background tone.
Cloning
The Clone brush enables duplicating parts of the output image. Two modes are available: Clone area and Paint with pattern.
Clone area moves the source and target regions in parallel, allowing exact replication of elements within the output image.
Paint with pattern picks the source spot and allows cloning it to any target area.
The example below illustrates the difference between the two Clone brush modes.
The first one demonstrates the Clone area brush with default parameters. The parallel movement of the source and target areas allows precise cloning of any element within the output image.
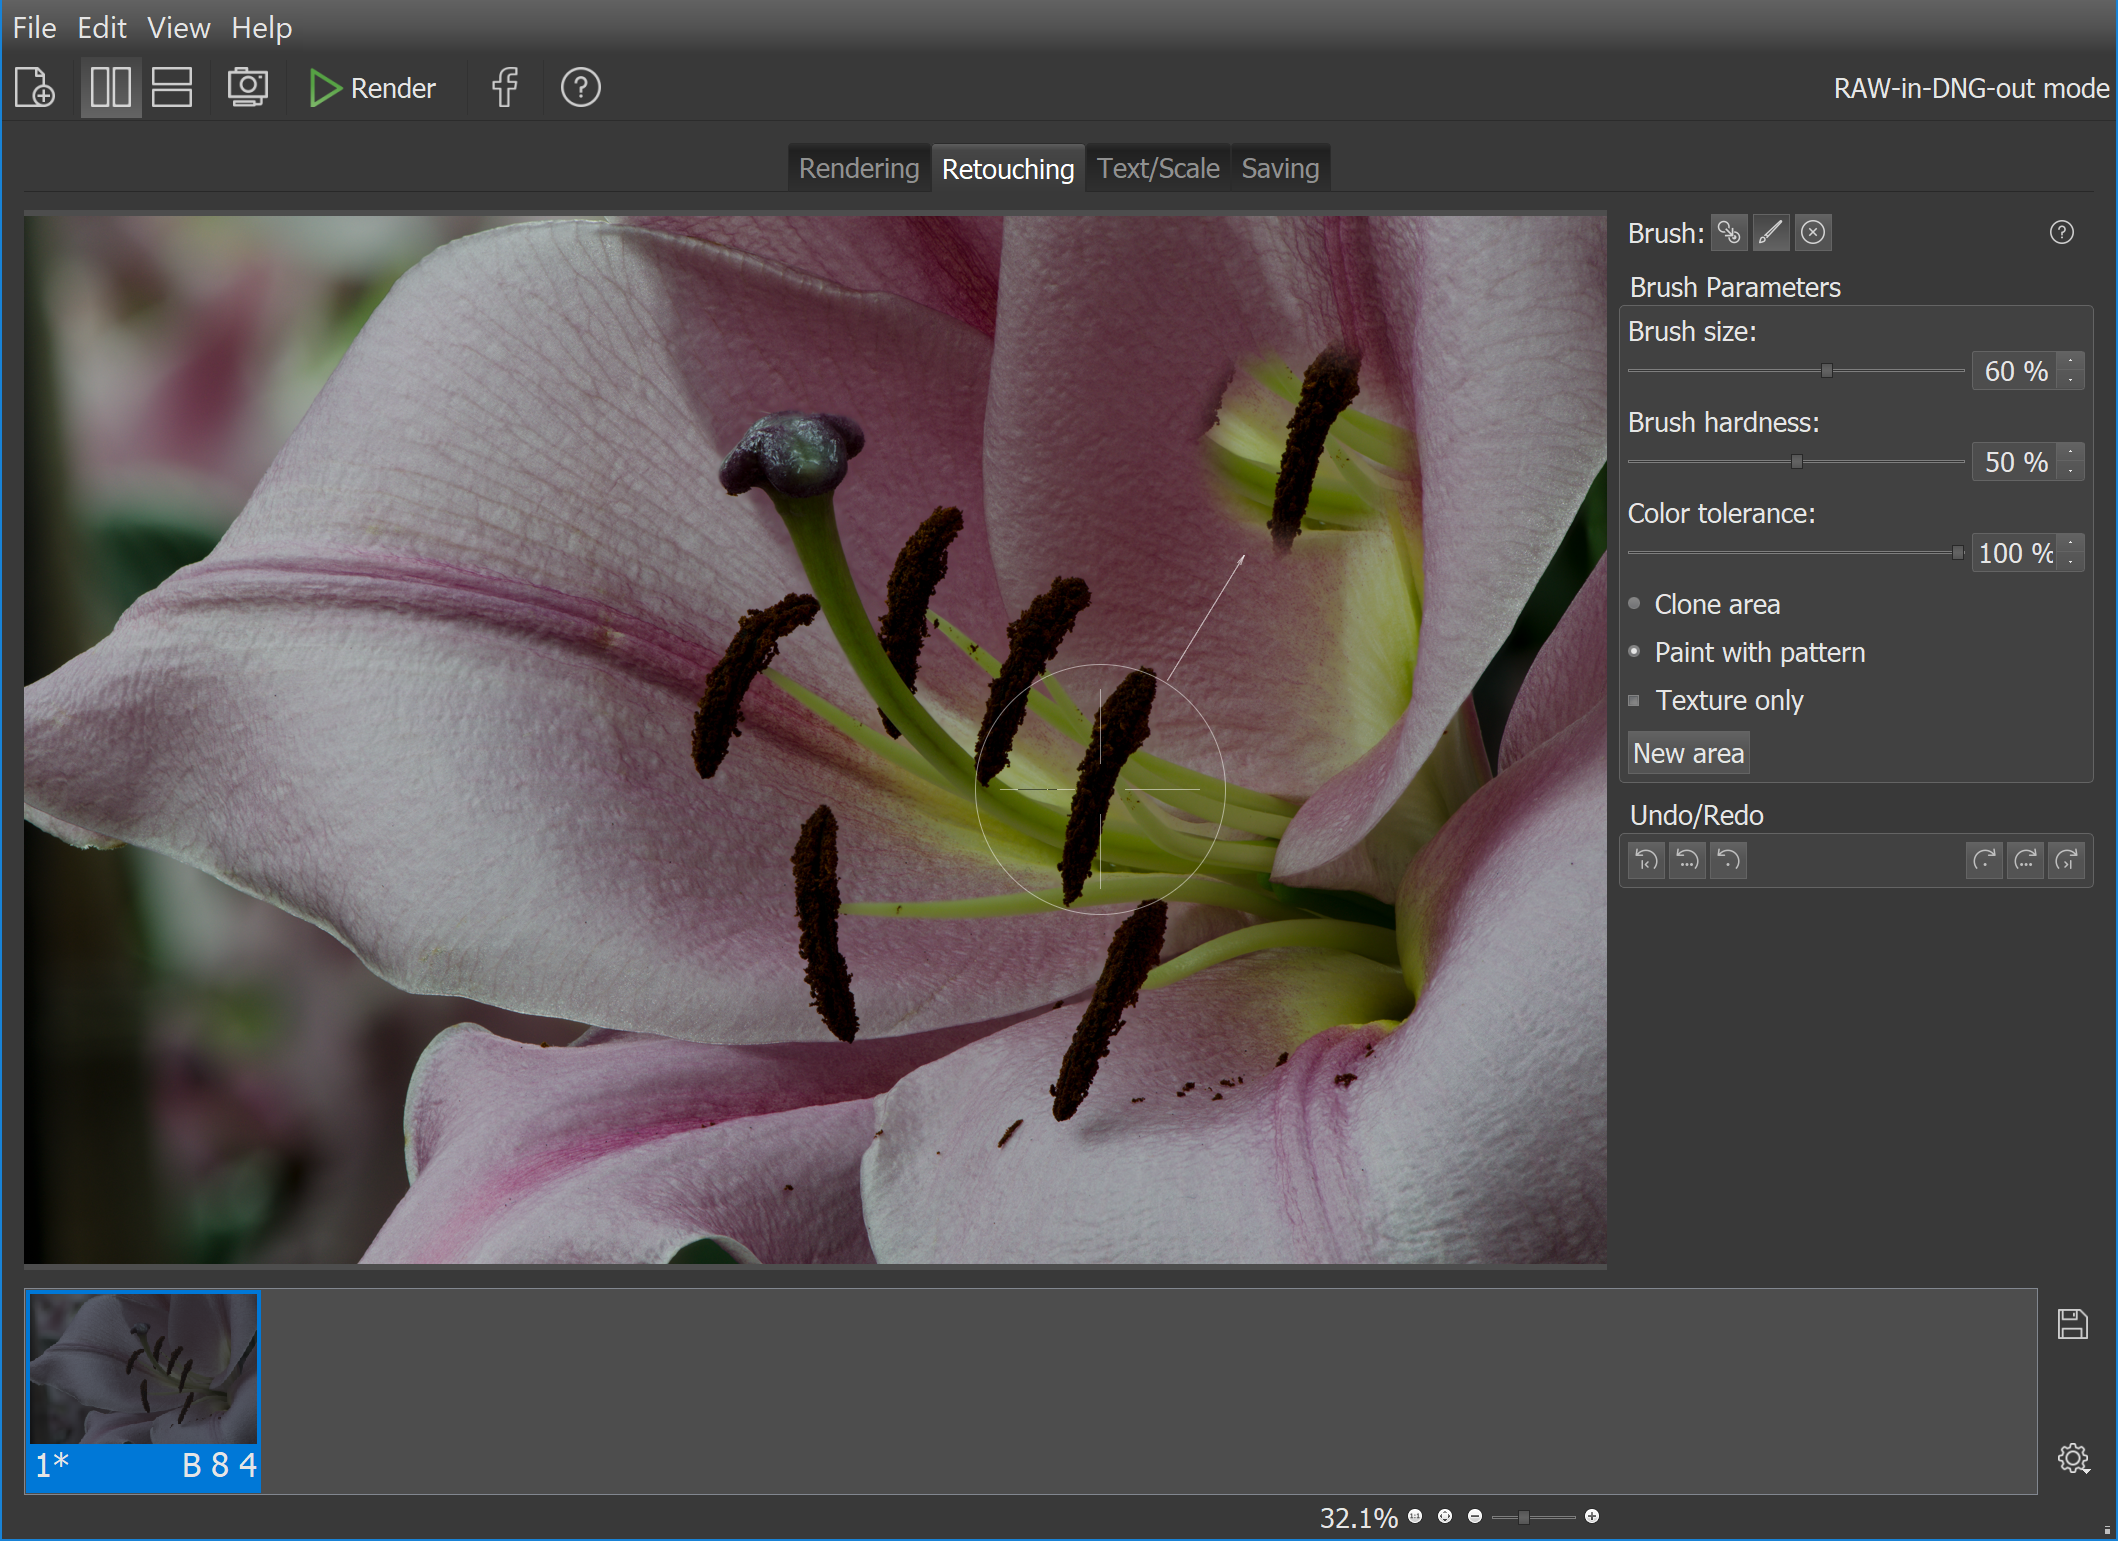
Image: Asian Lily ©Walt Polley
The second brush type is Paint with pattern. This brush allows selecting a pattern from the output image and painting it onto the target area.
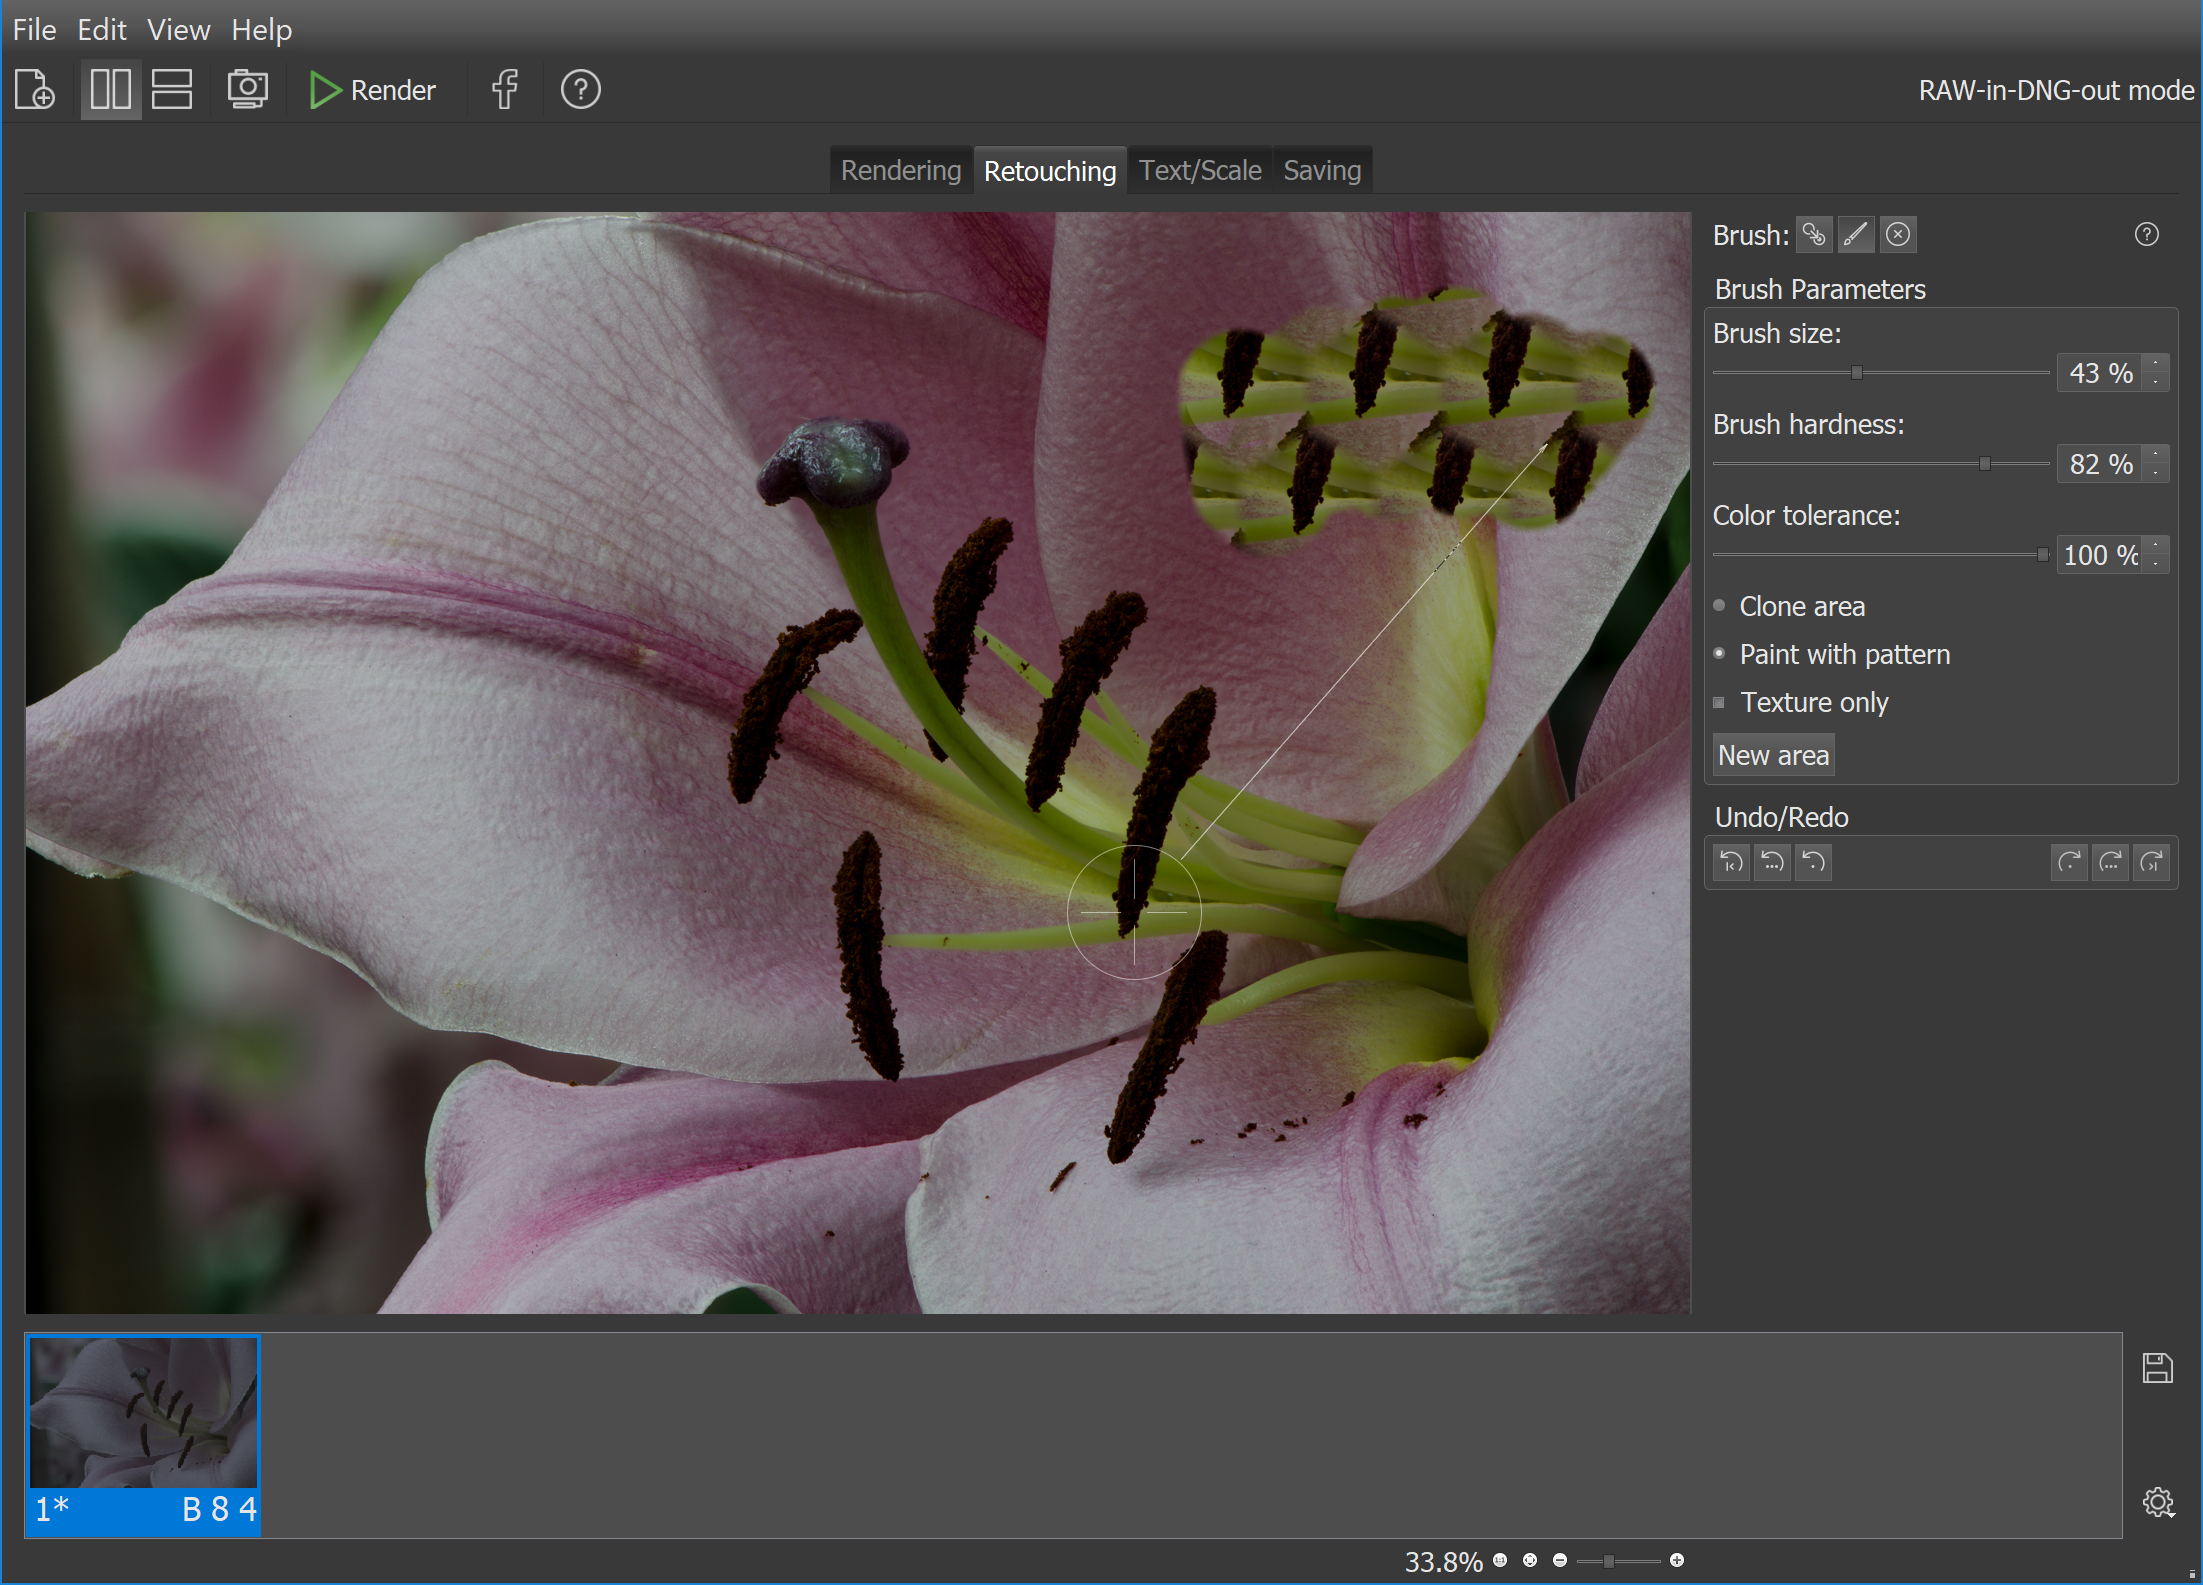
Image: Asian Lily ©Walt Polley
For demonstration purposes, visit the Video tutorials page.
Eraser
The Undo buttons revert unwanted changes - a single point, a stroke, or an entire brush operation.
The Eraser brush restores parts of the image to their original state. Brush settings are adjusted in the same manner as for other retouching brushes, and painting over the desired areas reverts them to the initial image.
Project File - Retouching across sessions
For retouching across multiple sessions, the project file can be saved and reopened later. This preserves all changes to the output image, including adjustments and retouching history, allowing undo operations in subsequent sessions.
To save a project file, go to main menu->File->Save project file..., select the destination folder, and save the data as *.hproj file.
To continue working on a saved project, use main menu->File->Load project file...

On the Text/Scale tab, a scale bar and one or more lines of text can be added to the image.
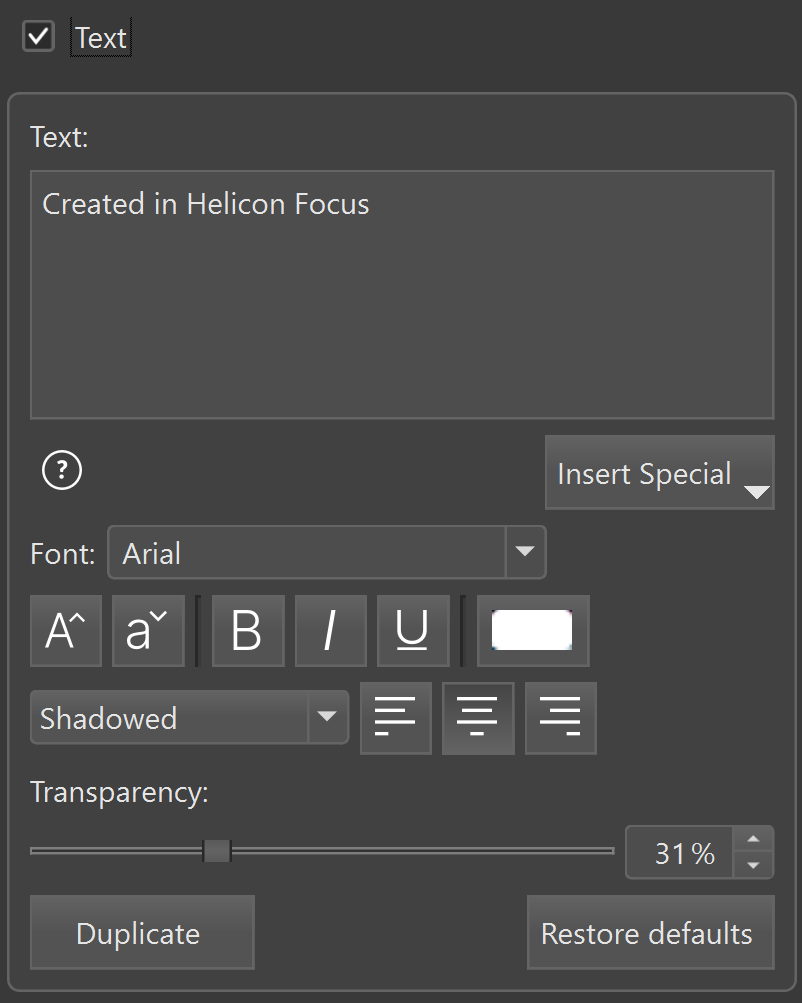
The Text box enables adding or removing text from the image. When checked, text can be entered in the Text window.
The Insert special menu allows insertion of special symbols (©, µ) and image metadata, such as date, time, aperture, ISO and other information.
The font can be selected from the Font list.
![]()
![]() buttons adjust the font size;
buttons adjust the font size; ![]()
![]()
![]() buttons modify the text style; the color picker allows to set the font color.
buttons modify the text style; the color picker allows to set the font color.
The drop-down menu provides the choice of text effects: highlighted, shadowed, embossed, paper, or no effect.
The ![]()
![]()
![]() buttons set the horizontal alignment of the text.
buttons set the horizontal alignment of the text.
The Transparency adjusts the opacity of the text.
Additional lines of text can be added using the Add button.
All text can be removed from the image using the Delete all button.
Existing text can be edited by selecting it (highlighted with a green rectangle) and modifying its content or properties.
A Scale bar provides a reference to understand object dimensions within an image.
To add a scale bar to your image, check the Scale check box.

The appearance of the scale bar can be selected using the Select Scale... button.
Custom scale bar images can be added via the Add button ![]() in the Select Scale window. Scale bars are usually black and white; colors can be inverted by checking the Invert colors box.
in the Select Scale window. Scale bars are usually black and white; colors can be inverted by checking the Invert colors box.
The Scale width parameter indicates the scale size relative to the image width. This value is used to calibrate the scale using objects of known size.
A typical calibration workflow:
1. Shoot a short stack (may just consist of 2 images) of an object with known dimensions, such as a school ruler.
2. Render the stack, go to Text/Scale tab, check Scale, select the scale bar type, and adjust its width to match the known dimension. This establishes the real-world correspondence to the Scale bar width in percentage.
3. Resize the scale bar proportionally according to the desired reference length.
Once calibrated, the scale bar can be applied to other images captured under identical conditions (same lens, focus, and camera position).
There are several ways to save an output after processing.
One option is to right-click the output icon in the Outputs panel.
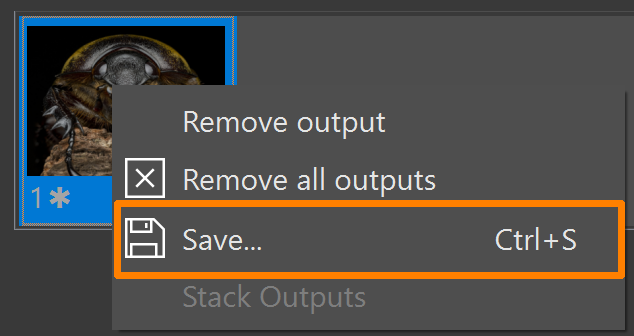
Alternatively, results can be saved via the File menu, which offers two options:
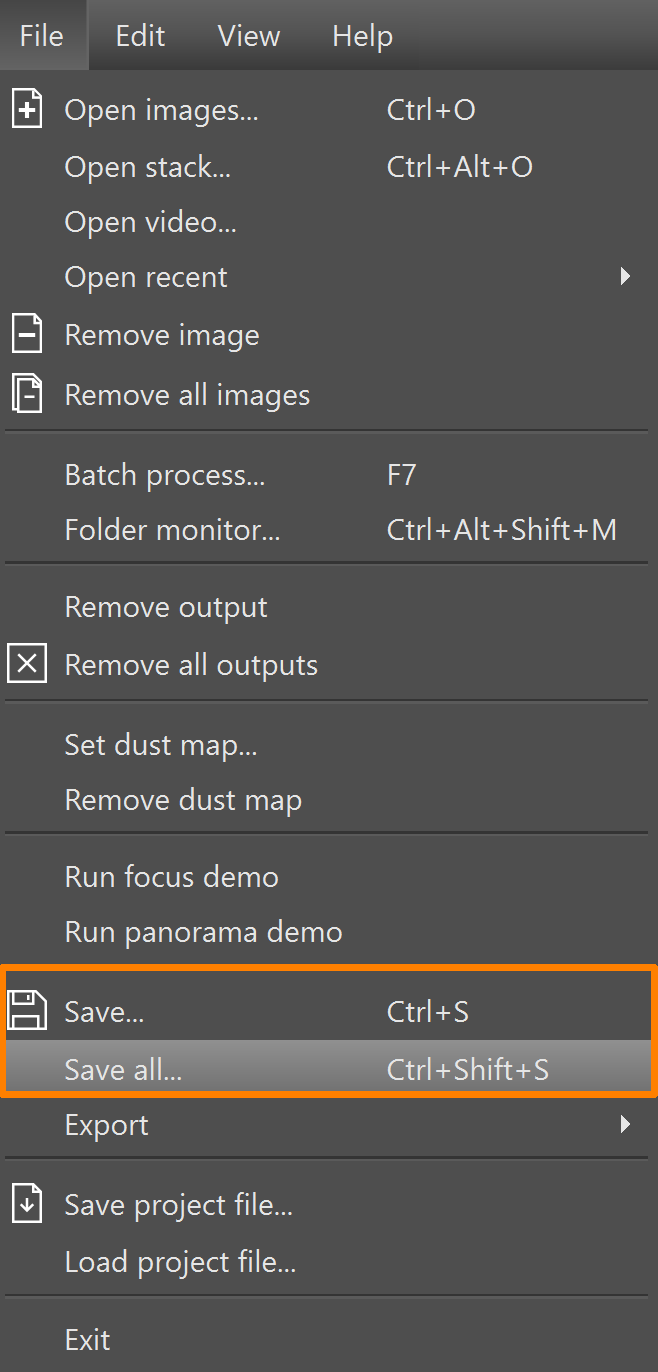

On the Saving tab, the resulting image can be saved or exported.
| Save... | Allows to save the resulting image in .jpeg, .tiff or .dng format. | ||
| Export 3D Model | Generates a 3D model and opens it in Helicon 3D Viewer, where the model can be adjusted and saved in various formats. | ||
| Create Animation | Generates an HTML page containing a JavaScript animation of the stacking process. | ||
| Save Depth Map | Saves depth map as a grayscale image. This image can be used for relief measurements or for 3D modelling. | ||
| Save Contrast Map | Saves the B&W contrast map, visible while rendering. This map highlights the sharp edges and details and can be exported for analysis, documentation, or sharing. | ||
| Export Layers | Exports aligned source images as layers for further work in external editors. This functionality is primarily intended for post-processing in applications such as Adobe Photoshop, where additional manual retouching, masking, or compositing may be required. Aligned layers can be exported in .png or .tiff format. If the best option is unclear, both formats can be tested to determine which suits the intended application. | ||
|
|||
| Copy Result to Clipboard | Copies the current output image to the clipboard for use in other applications. | ||
| Publish to Web | Automatically converts and resizes the image for web use, uploads it to Helicon Soft’s secure server, and provides a unique URL for immediate sharing. | ||
| Share on Facebook | Resizes the image if necessary, allows adding a description, and posts it directly to a Facebook page. | ||
| Save Project file | Saves the project file in the current state of the output, including the history of adjustments and retouching, allowing the project to be reopened later for the work to be resumed. | ||
Please note that the micro panorama function is only available in Pro version.
The Micro Panorama function is intended for stitching images captured through a microscope. It may not produce correct results for images captured by rotating a camera on a tripod.
Images are aligned according to the Panorama autoadjustment settings (main menu->Edit->Preferences->Autoadjustments). Only positional shifts are performed to align the images, no magnification or rotation is applied.
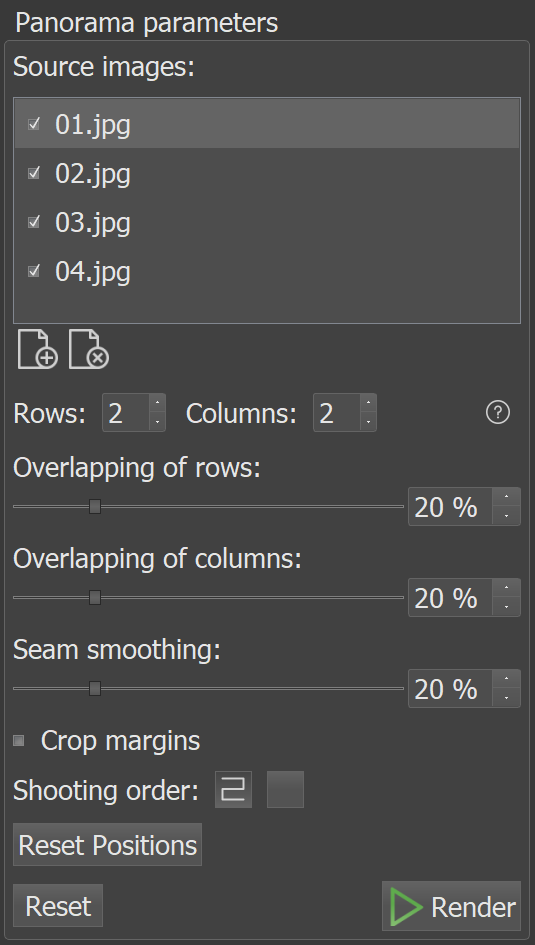
Rows - sets the number of rows in the panorama.
Columns - sets the number of columns in the panorama.
Overlapping of rows - specifies the overlap between adjacent rows. Adjust the slider until the patterns in the images align correctly.
Overlapping of columns - specifies the overlap between adjacent columns. Images can also be adjusted manually by dragging, which may allow for more precise alignment.
Seam smoothing - sets the width of seams with gradient transparency to create smoother transitions between images.
Crop margins - when enabled, crops the resulting panorama to remove blank areas created by shifting image elements.
Shooting order - defines the sequence in which panorama images were captured: eaither each row from left to right, or odd rows (1,3,5,...) from left to right and even rows (2,4,6,...) in reverse. Rows must always be captured consecutively (1st, 2nd, 3rd, etc.).
Reset positions - restores the original positions of images after manual dragging.
Reset - restores all panorama settings to their default values.
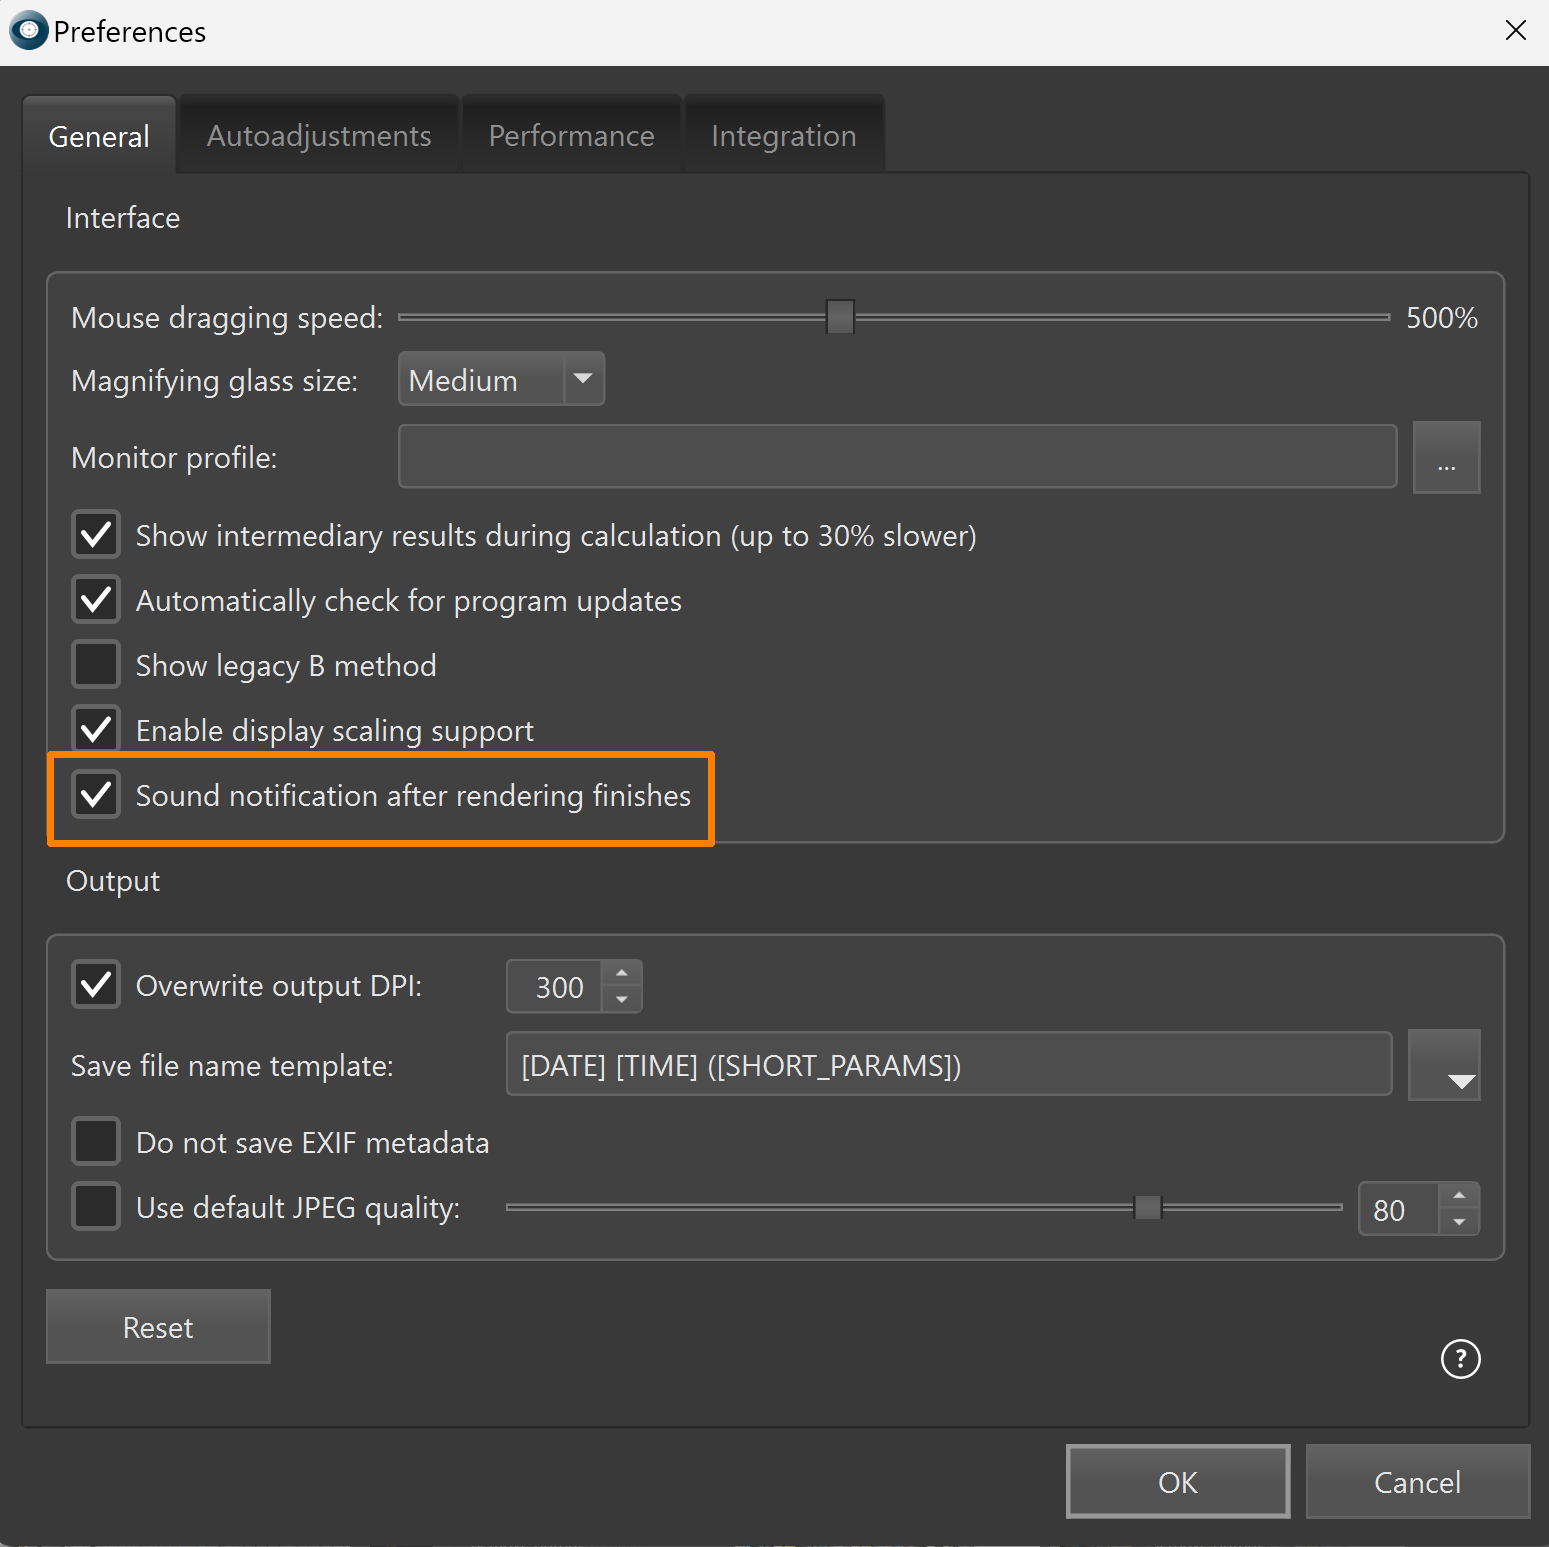
To open the Preferences dialogue, go to the main menu->Edit->Preferences.
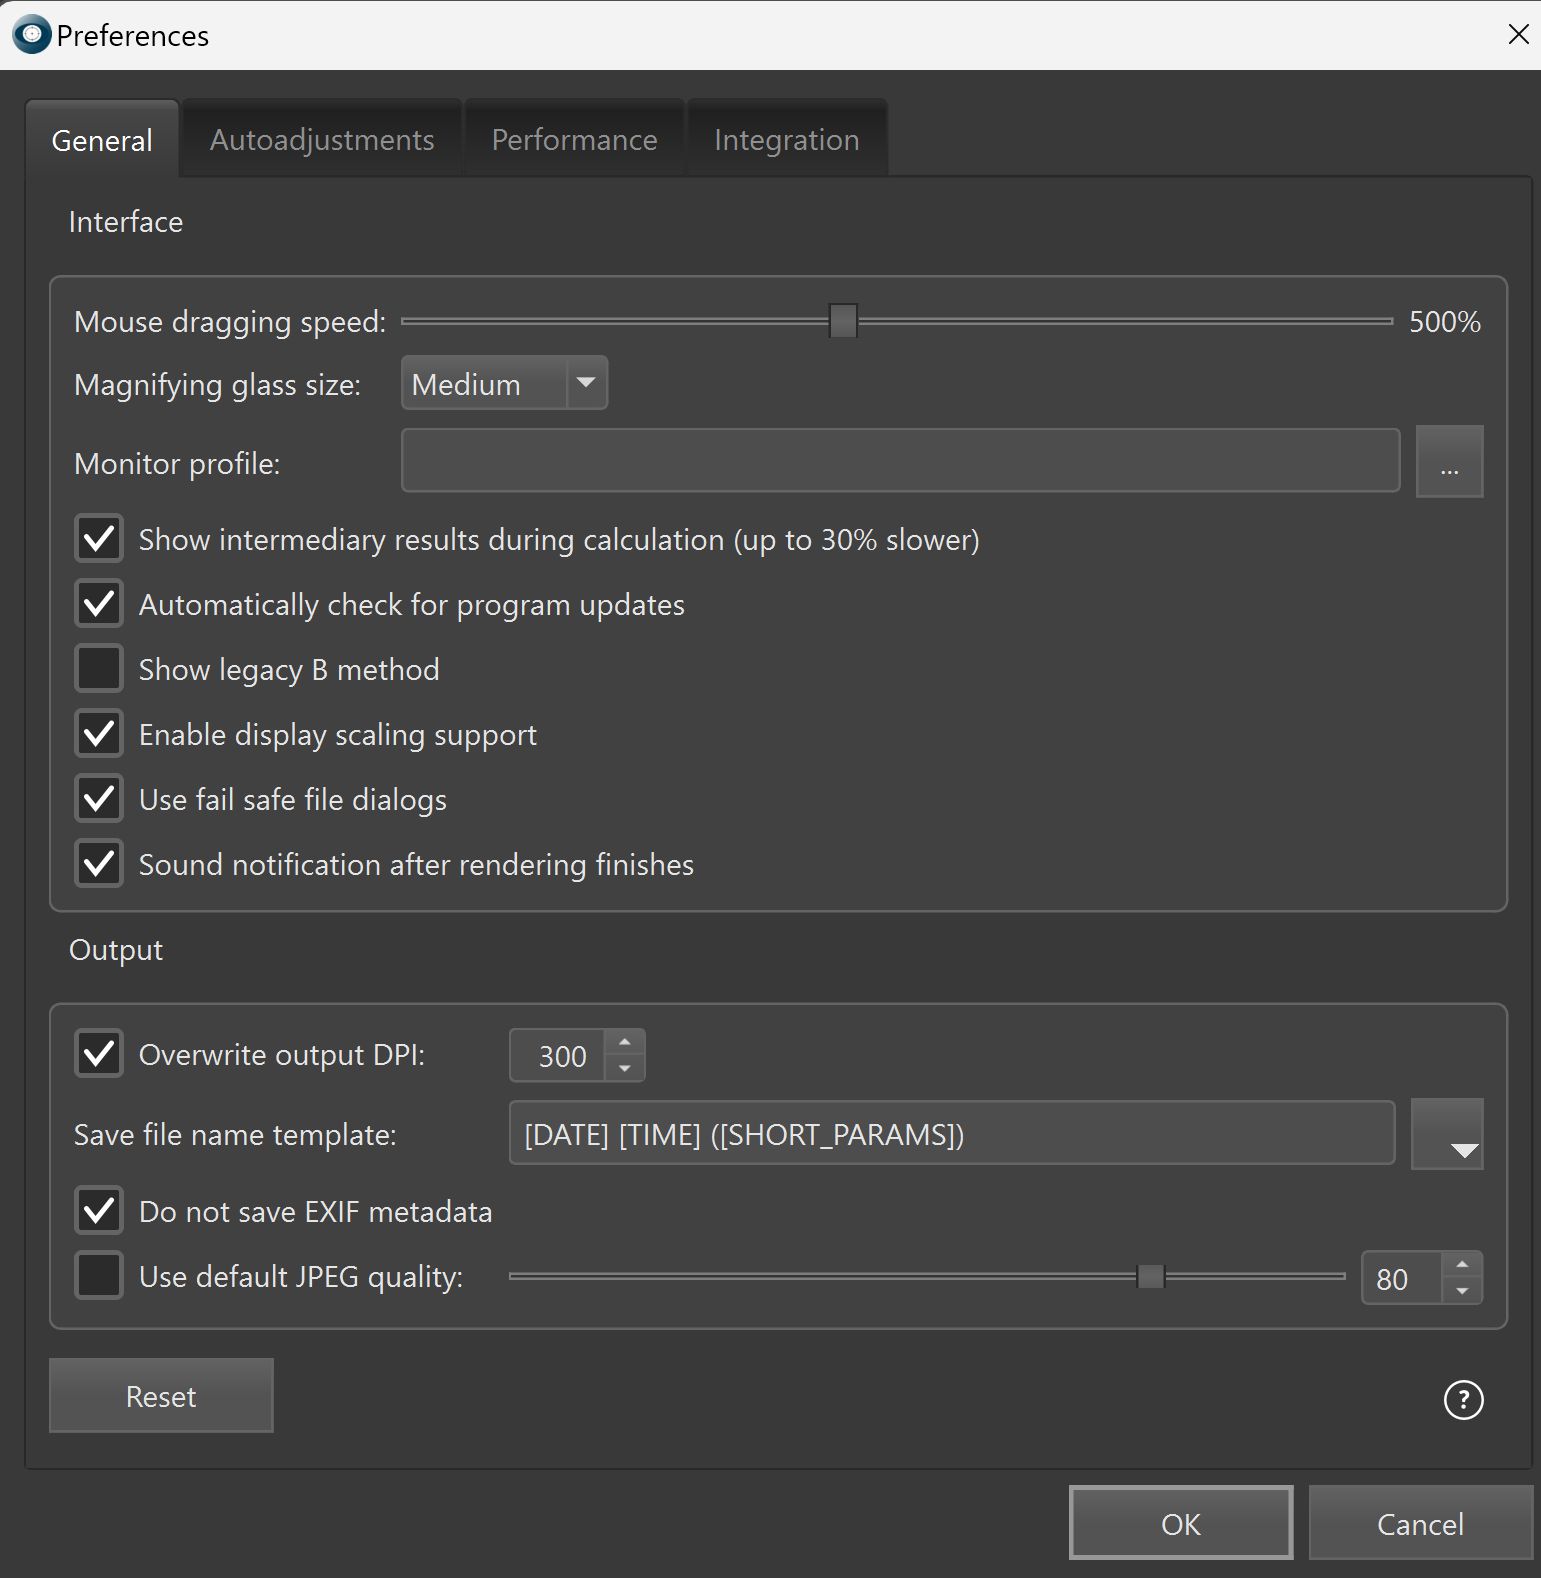
Mouse dragging speed - sets correlation between movement of the mouse and shifting of the image. It makes navigation in the main window faster, especially when working with zoomed images.
Magnifying glass size - defines the size of the virtual magnifying glass that appears if you left-click on the image.
Monitor profile is used to display images on the monitor. Your monitor has its own color profile that was saved to the system folder during monitor installation. Helicon Focus will pull up the relevant default monitor color profile, but you can set an alternate one if you wish.
Show intermediary results during calculation - enables screen updating during processing (may add about 30% to total processing time).
Automatically check for program updates - if enabled, the program will periodically check for updates by connecting to the Helicon Soft server.
Show legacy B method - displays the legacy Method B (i.e. the one used in earlier versions of Helicon Focus) in the list of rendering methods. Legacy method B may allow for faster processing, however it may produce more artifacts on uniform backgrounds, especially if brightness levels varies across the stack.
Enable display scaling support - enables high-DPI and display scaling compatibility, ensuring the user interface and images are rendered correctly on monitors with different resolutions and scaling settings.
Sound notification after rendering finishes - plays a sound when rendering is completed.
Use fail safe file dialogs - enables an alternative file dialog system to prevent issues when saving or opening files. This option should be used if the application experiences crashes or errors with the standard Windows file dialog.
Overwrite output DPI - sets the output file DPI to the specified value when enabled; preserves the original DPI if disabled.
Save file name template - sets the file naming pattern. You can add additional parameters from the dropdown menu.
Do not save EXIF metadata - does not transfer the metadata to the output image.
Use default jpeg quality - uses the specified JPEG quality value as default without prompting for confirmation.
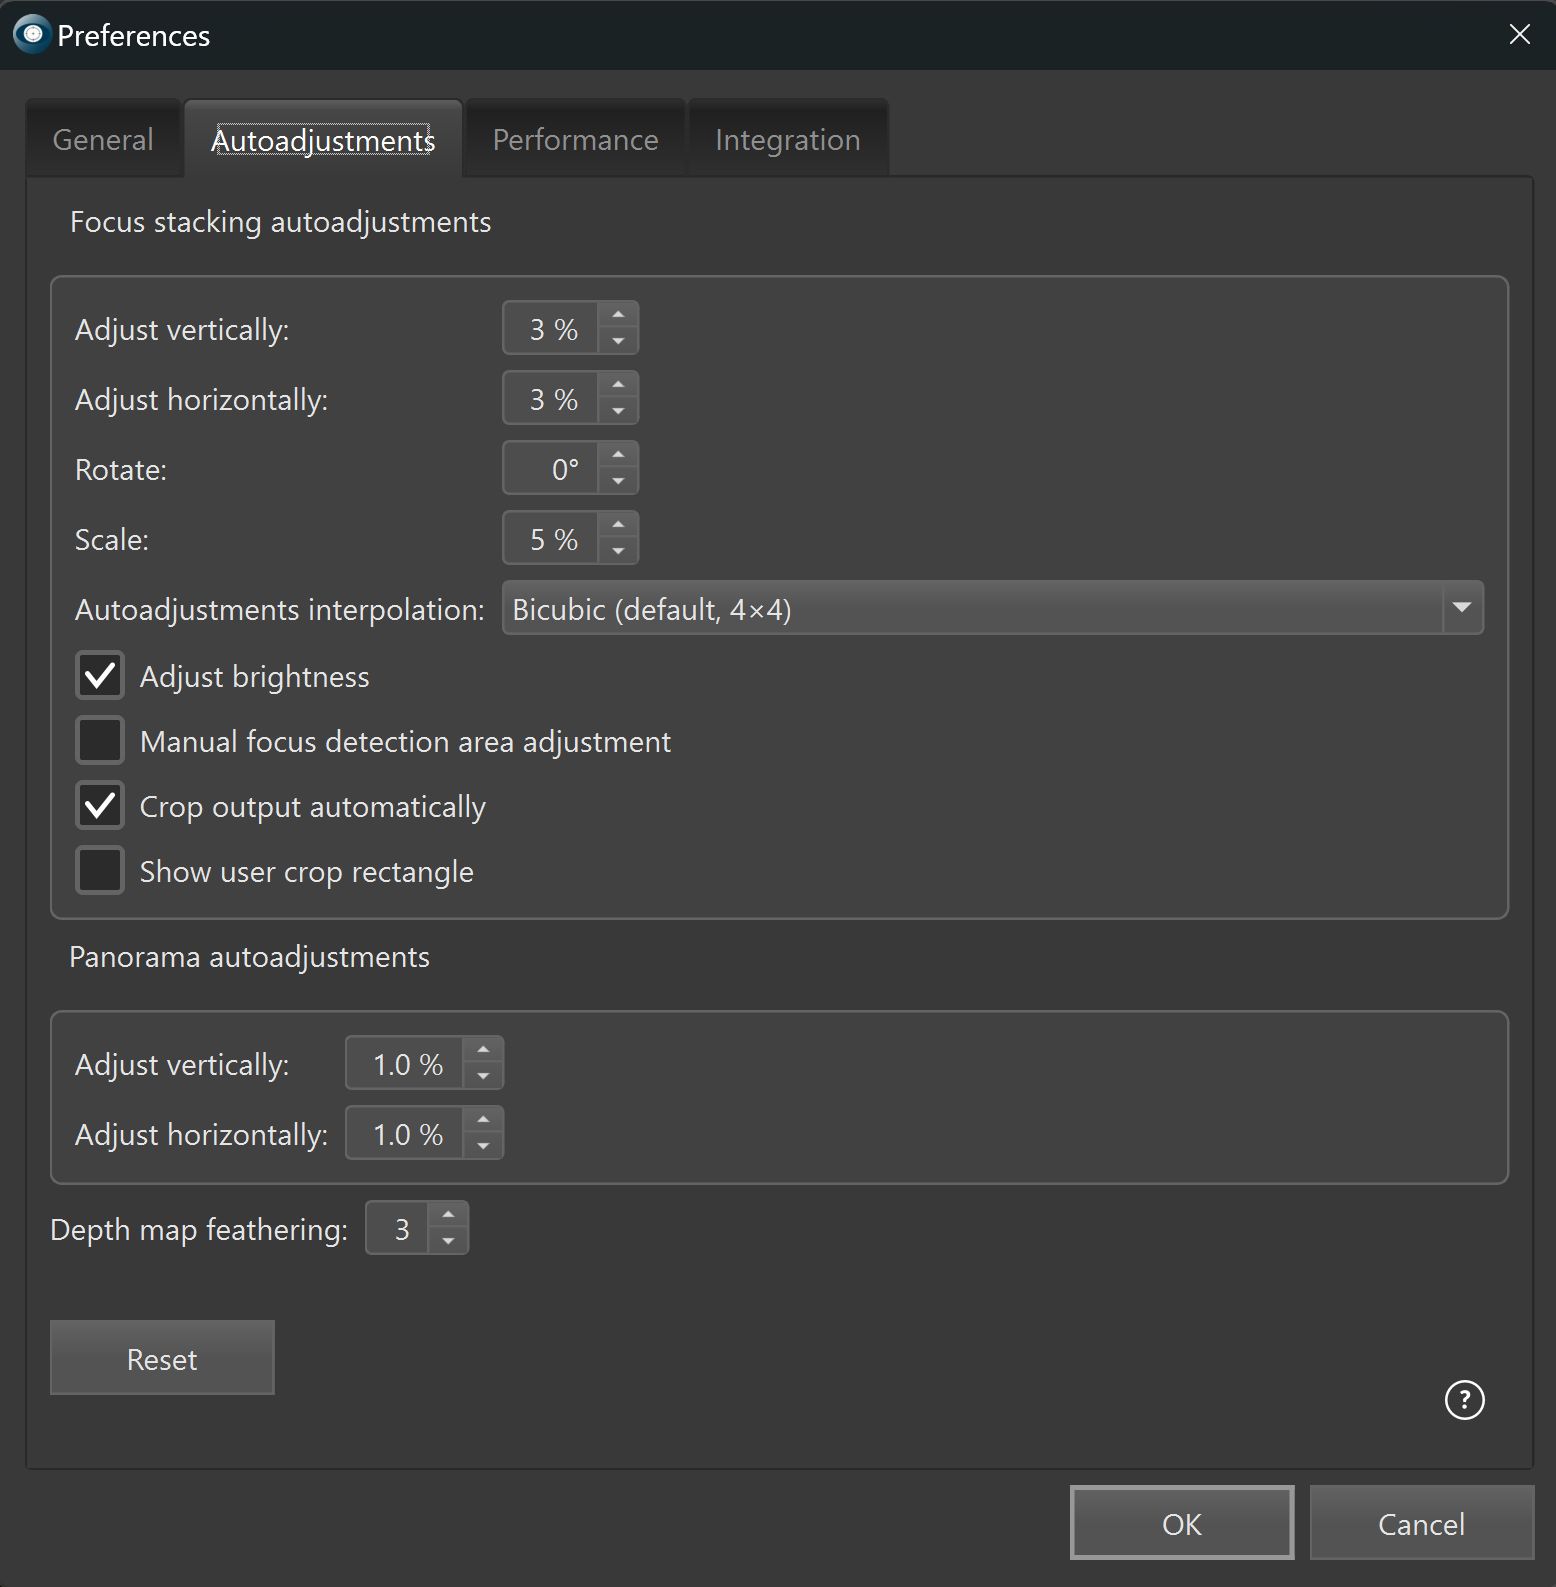
Default alignment settings usually perform well in most situations. However, there are cases where manual adjustment of alignment parameters may be necessary. Setting values to the maximum immediately is not recommended, as it does not guarantee improved results.
The most intuitive way to adjust alignment parameters is in Preview mode, where the same controls are available and their effects can be seen immediately. Global settings apply to all stacks, whereas Preview settings affect only the currently opened stack.
Adjust vertically - sets the maximum vertical shift between consecutive images as a percentage of the greater dimension (width or height).
Adjust horizontally - sets the maximum horizontal shift between consecutive images as a percentage of the greater dimension.
Rotate - sets the maximum rotation between consecutive images in degrees. Usually unnecessary for microscope or tripod captures.
Scale - sets the maximum difference in subject size between consecutive images as a percentage of the greater dimension.
Autoadjustments interpolation - allows to choose the interpolation method. Slow methods are known to preserve the details better, though the difference may not be pronounced.
Adjust brightness - equalizes brightness between consecutive images where needed.
Manual Focus Detection Area Adjustment - displays a selection rectangle and lets the user define the primary area used for alignment. This is useful, for example, when images are shot through a microscope and black edges prevent correct alignment, or when other moving objects in the frame could interfere with proper alignment.
Crop Output Automatically - removes unwanted edges that may appear during stack alignment. These edge areas may contain noise and artifacts due to insufficient data for proper reconstruction. This option automatically crops such areas to produce a clean final image.
Show user crop rectangle - shows a dotted border rectangle allowing the user to select cropping area for the stack.
Group of settings related to processing of the panorama stack.
Adjust vertically - defines maximum vertical shift between two consecutive images in % of their width.
Adjust horizontally - defines maximum horizontal shift between two consecutive images in % of their width.
Depth map feathering - the degree of smoothing of the depth map used in method B.
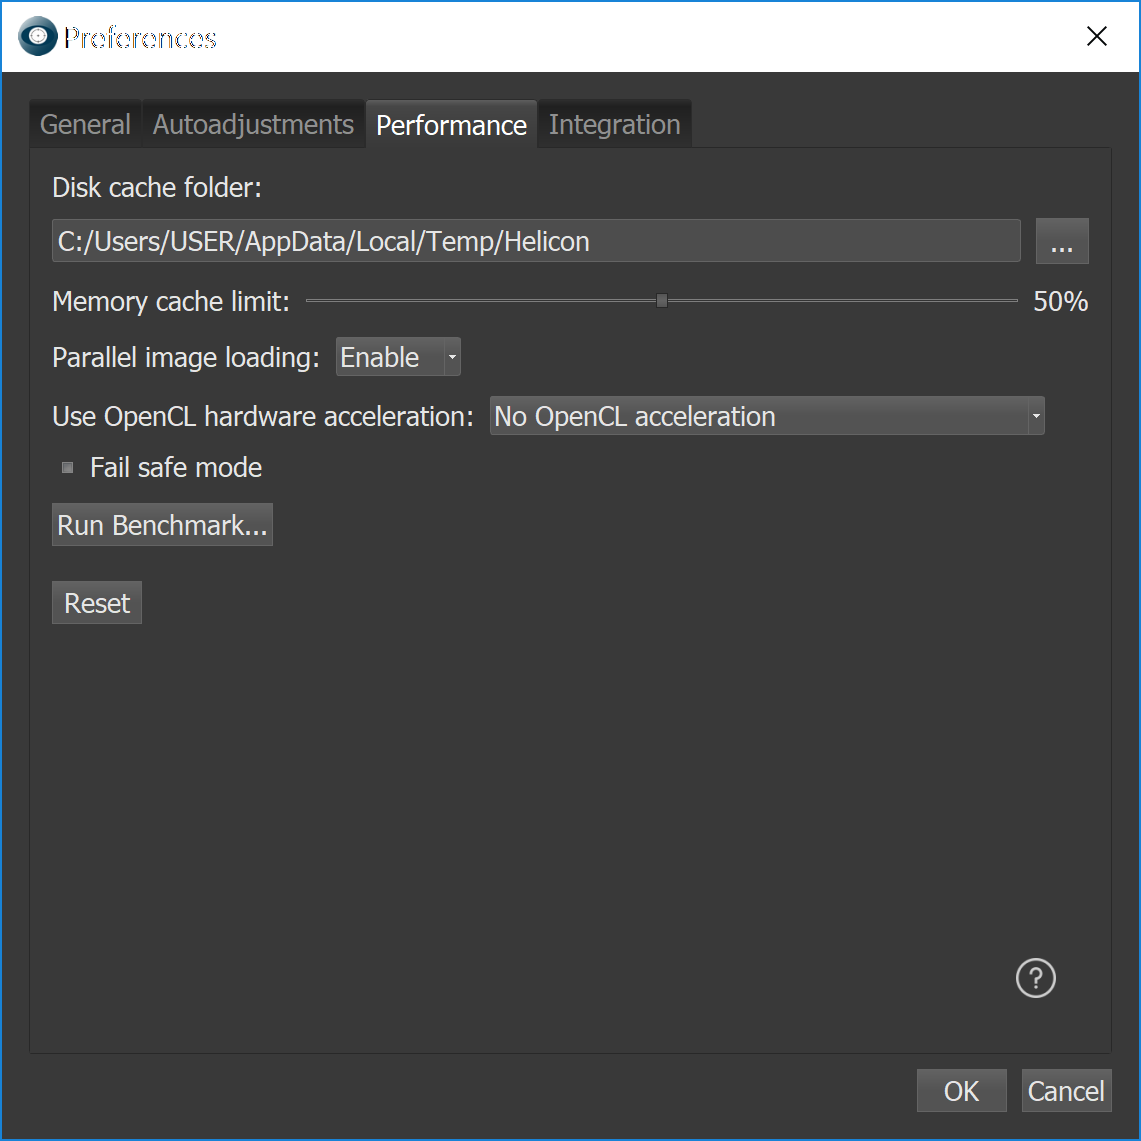
Disk cache folder - sets the path to the folder used for storage of temporary files. Important: all data in the cache folder will be deleted after closing the program. Do not use an existing folder as the cache folder, as this may lead to loss of its contents.
Memory cache limit - sets the portion of RAM that the program can use for storage of the most recently used images. Example: if the system has 16 GB of RAM and the setting is 50%, Helicon Focus can use up to 8 GB of RAM. The cache makes subsequent access to the same images faster (for re-renders from the same source images, or during retouching). Reduce the size if you experience memory issues or unstable operation in Helicon Focus itself or in other software while Helicon Focus is running. Setting it to 0% turns the cache off for minimum possible RAM consumption, but we recommend keeping it at least at 10% if possible. Increasing the cache size is generally not very beneficial, but for large amounts of RAM and very large stacks or high-resolution images, trying higher values may improve performance.
Parallel image loading - enables decoding the source images in parallel, several at once. Can drastically reduce the time it takes to render a stack, but can also slow it down if the source images are on a slow storage (e.g. spinning magnetic hard disk, slow network share, slow memory card) - in this case it should be disabled.
Use OpenCL hardware acceleration - Helicon Focus (Pro version) can use performance capabilities of the graphics processing unit (GPU) to speed up calculations. You can select the device from the drop-down list, restart Helicon Focus and compare the performance results with Run Benchmark feature. If your device has not been detected or is unstable, we recommend to update your GPU drivers. You can compare the performance results of different hardware on the Performance Benchmarks page.
Fail safe mode - should be used if enabling OpenCL hardware acceleration causes crashes or errors. Only check this option if specifically advised by the support team. For OpenCL issues, contact support.
Run benchmark - starts processing 100 frames using Method B. Test result can be compared to the results of other users (by clicking the 'Compare' button in the results window). This helps evaluate current hardware performance and assists in selecting new hardware if needed.

Displays the current installation status of the Lightroom plugin. A green indicator confirms that the plugin is installed and ready for use.
'Reinstall plugin' button reinstalls the Lightroom plugin. This option should be used if the plugin is corrupted, or not functioning correctly.
If the plugin is missing, the status indicator is shown in red and the button label reads 'Install plugin'. Clicking the button installs the plugin. After a successful installation, a confirmation message is displayed and the status indicator turns green.
Always open the "Save" dialog in the source image folder - when enabled, the Save dialog opens automatically in the folder containing the source images when saving the output generated from files exported from Lightroom. This prevents saving files to unintended locations.
Helicon Focus can process raw files opened directly in the program or exported from Lightroom Classic or Capture One.
The free Adobe DNG Converter is used as the main and preferred option for raw development. It is considered a reliable engine that provides correct raw conversion and supports a wide range of modern camera formats.
With Helicon Focus Lite license, raw files can be opened and the output can be saved as .jpeg or .tiff.
Helicon Focus Pro license enables the Raw-in-DNG-out mode (Pro feature), which allows saving the result of a raw stack as a .dng file. A comparison chart for the standard raw workflow vs. Raw-in-DNG-out is available on our website.
Helicon Focus can process raw formats supported by Adobe Camera Raw.
If the 'Failed to open image' error message appears when opening raw files, verify the following:
a. the latest version of Adobe DNG Converter is installed;
b. the Raw-in-DNG-out codec is selected in Raw Development Settings.
When raw files are opened in Helicon Focus, the Raw Development Settings button appears below the Source Images window.
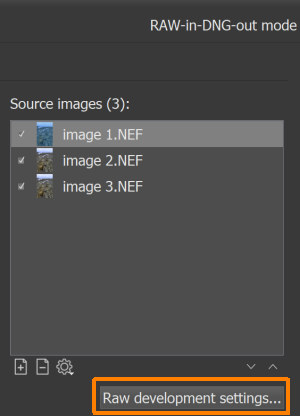
Helicon Focus uses the free Adobe DNG Converter as the main and preferred option for raw development. If Adobe DNG Converter is installed, the Raw-in-DNG-out codec is applied by default and the Raw-in-DNG-out mode indicator is displayed in the upper-right corner of the main workspace.
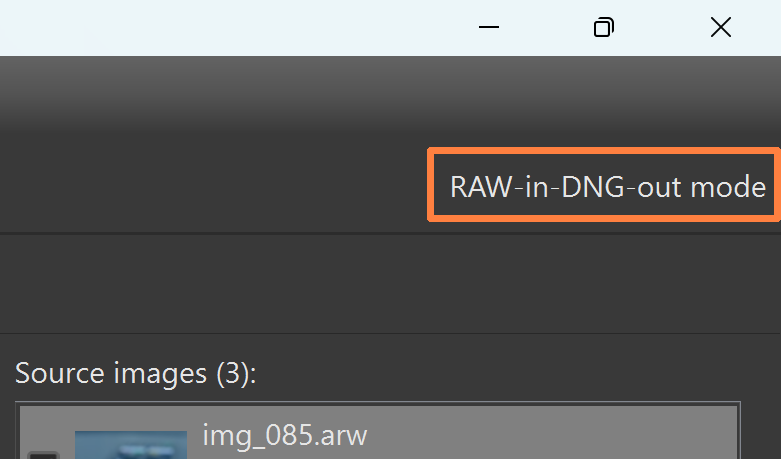
Pre-conversion of raw images to .dng is not required. Manual configuration of the converter path is not required - it is sufficient to have Adobe DNG Converter installed. In Raw-in-DNG-out mode (Pro feature), the result of raw stack processing can be saved as a .dng file.
If saving to .dng is not available, verify the following:
a. the source files are raw files (saving to .dng is not available when processing .jpeg or .tiff sources);
b. the Raw-in-DNG-out codec is selected in Raw Development Settings.
In addition to the default Raw-in-DNG-out codec, other raw codecs can be selected in the Raw Development Settings dialog window, including the built-in dcraw codec and WIC. For .dng files, an additional option is available: DNG Loader.
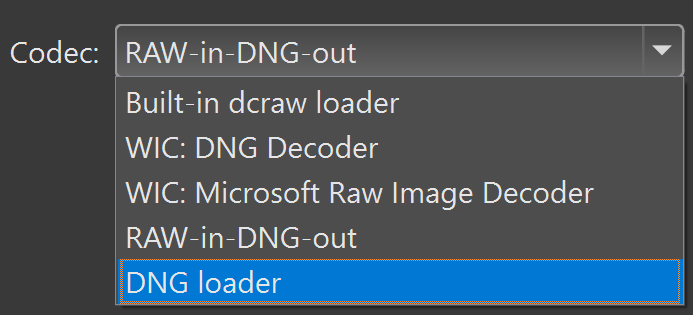
Some .dng files can be opened and processed using the built-in DNG Loader and saved as .dng. This allows faster opening compared to the Raw-in-DNG-out workflow using Adobe DNG Converter. However, not all .dng files are supported by this loader.
If the codec has not been changed, the Raw-in-DNG-out workflow is applied by default. If a codec has been changed, the last one selected for this file format will be automatically applied.
The built-in dcraw codec does not support saving results as .dng. Additional development controls are available for this codec.
Dcraw development parameters

White balance: defines whether white balance is applied automatically or taken from the camera settings used at capture.
Highlights: sets the highlight recovery mode - Clip (clips highlights to increase contrast), Unclip (preserves highlights but may introduce a pink tint), Blend (blends clipped and unclipped values), Rebuild (reconstructs overexposed areas from adjacent properly exposed data).
Interpolation: sets the demosaicing algorithm - Linear (basic, but fast), VNG (Variable Number of Gradients), PPG (Patterned Pixel Grouping), AHD (Adaptive Homogeneity-Directed), DCB.
Color space: defines the range of colors, tones, and brightness used for image representation - Raw, sRGB (the smallest range of colors and tones, but the most commonly used), Adobe RGB (wider color range, though not supported by some browsers and requiring special software to reproduce the colors correctly), ProPhoto (the widest range of colors, 16-bit processing recommended).
Noise threshold: controls the level of noise reduction. Higher values remove more noise, but may affect fine details. Typical optimal values range lies between 100 and 1000.
This feature optimizes and accelerates the processing of multiple stacks.
All Helicon Focus editions allow adding an unlimited number of stacks for processing from the Rendering tab or Preview mode window. In this workflow each render has to be launched manually to be queued to run in sequence.
Batch process mode, being a part of Pro functionality, enables loading multiple stacks simultaneously and adjusting parameters individually for each stack or globally for all stacks before rendering.
Batch process:
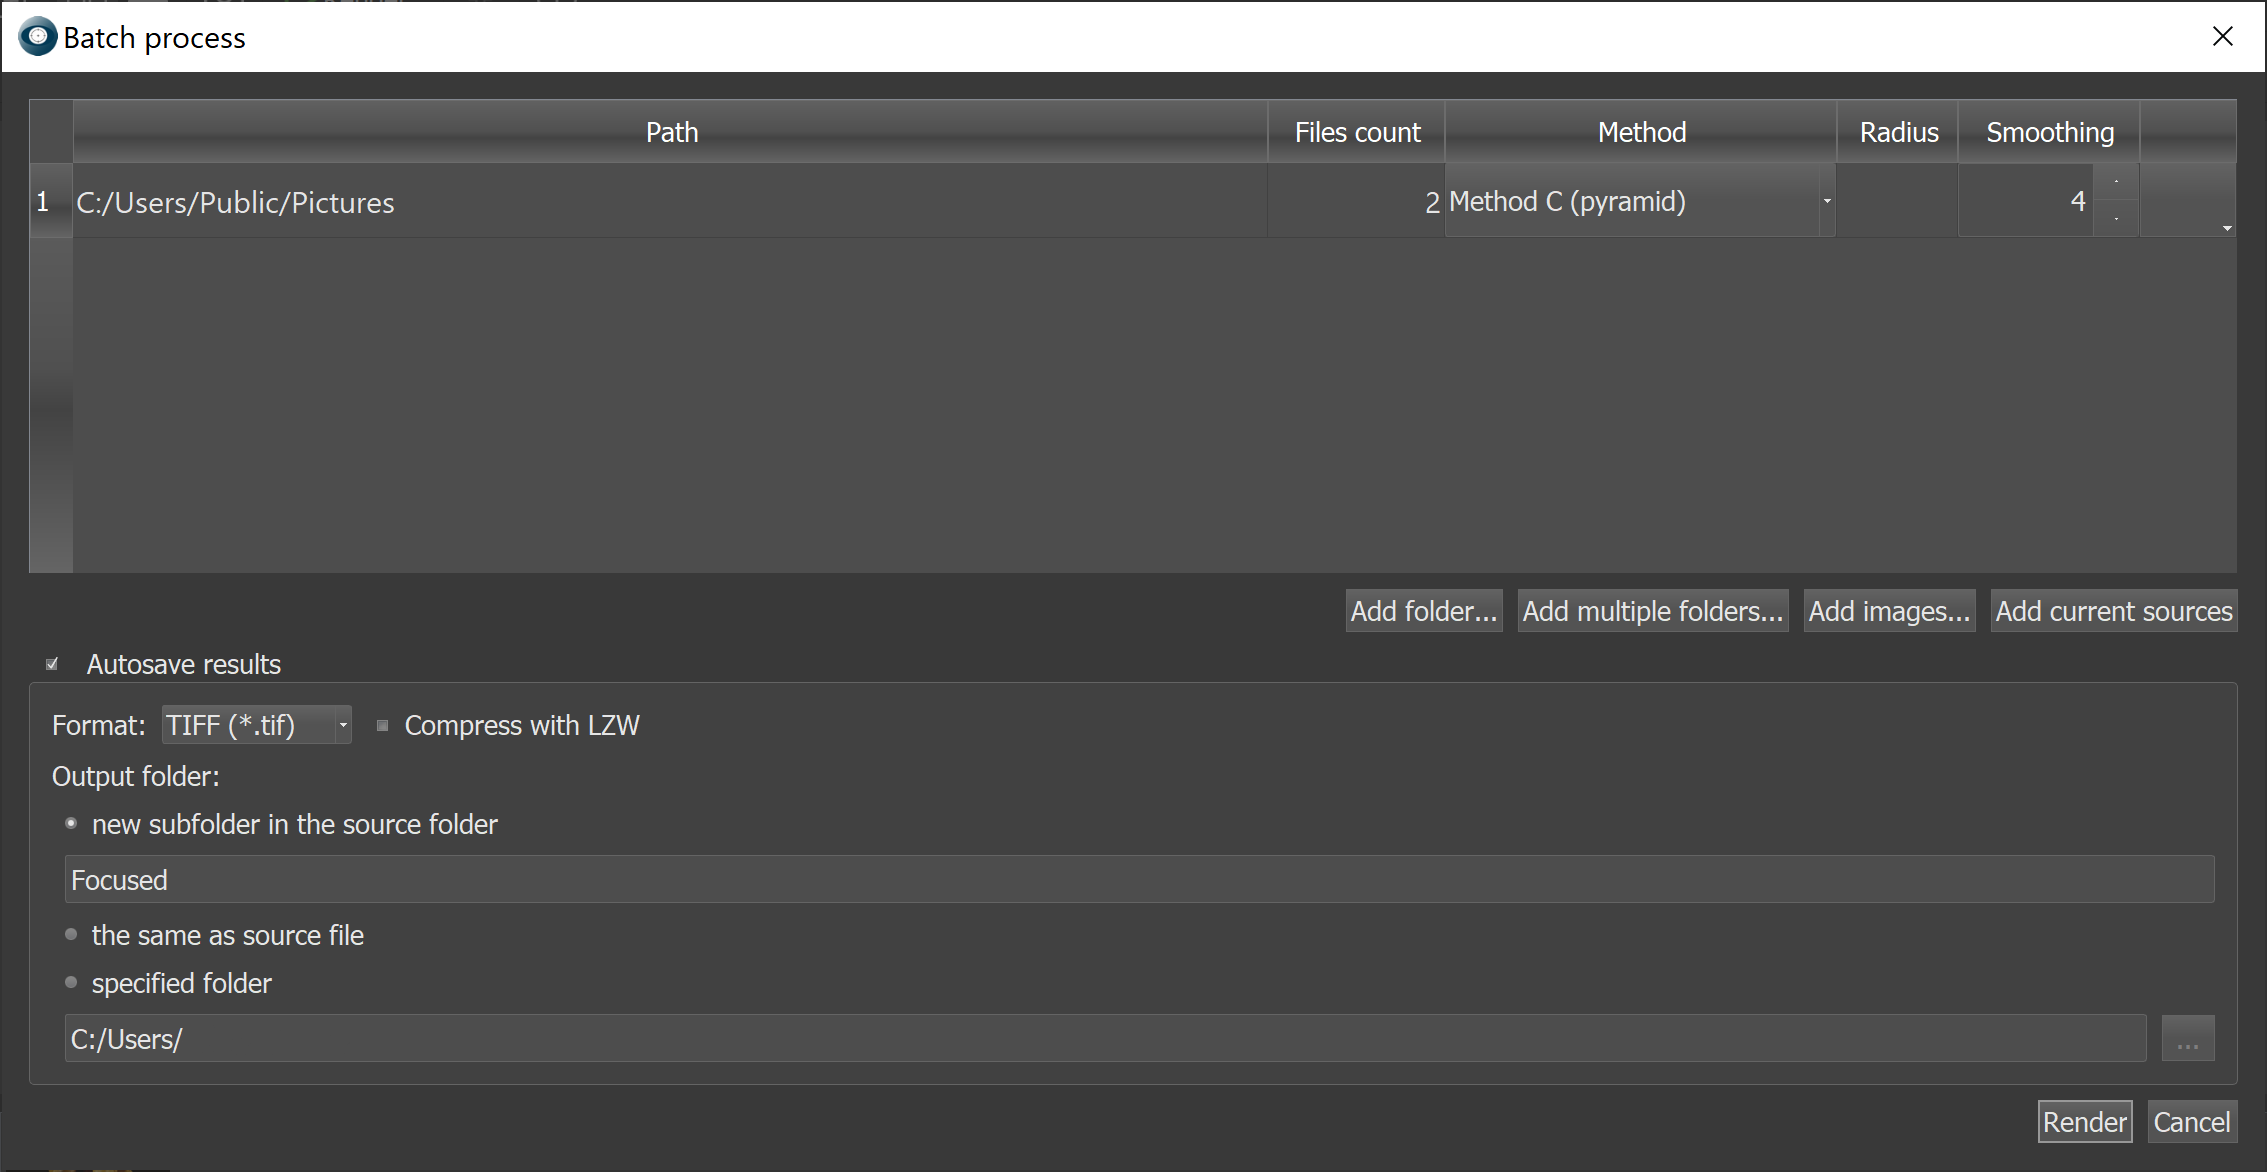
The dropdown list at the end of each table row will open a small pop-up menu, allowing to Remove the stack (just from the list, not from the disk), to Apply current rendering parameters to all other stacks and to Split stacks.

Split stacks:
This function automatically separates a set of images into individual stacks without manual intervention, based on one of the available splitting criteria.

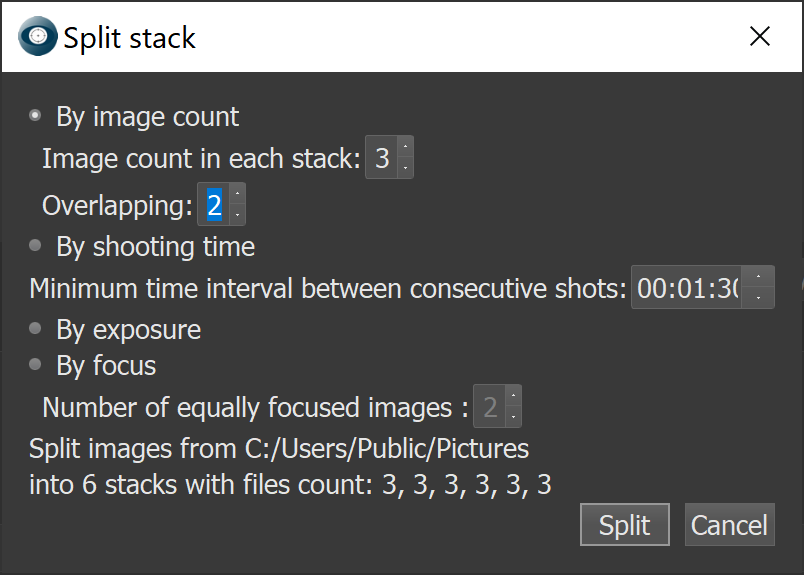
The last line displays a summary of the number of stacks that will be created using the selected splitting parameters.
Split by image count - suitable option when each stack contains the same number of images.
Overlapping - for long stacks, retouching can be simplified by splitting the stack into substacks. Substacks are processed in batch mode and later merged into a single output. An overlap of 10–15% between substacks is recommended for easier retouching.
For example, a stack of 200 images can be split into 20 substacks of 10 images each with 1–2 images overlapping. After rendering all substacks, the 20 outputs can be combined into a single image. This reduces the number of images to select from during retouching (20 vs. 200).
Split by time - applies when the exact number of images per stack is unknown, but the minimum time interval between shooting sessions can be used to separate stacks.
Split by exposure - designed for stacks captured with exposure bracketing (e.g., via Helicon Remote). This method automatically sorts images by exposure.
Split by focus - intended for HDR mode, where multiple shots are taken at each focus position.
All splitting methods create virtual stacks for processing within Helicon Focus, no actual folders are created on disk.
Helicon Focus can monitor the specified folder and process the stack automatically once all the images of the stack are uploaded.
Folder monitor is a Pro feature.
To use the Folder monitor option, go to main menu->File->Folder monitor, or use a shortcut: Alt+Shift+Ctrl+M.
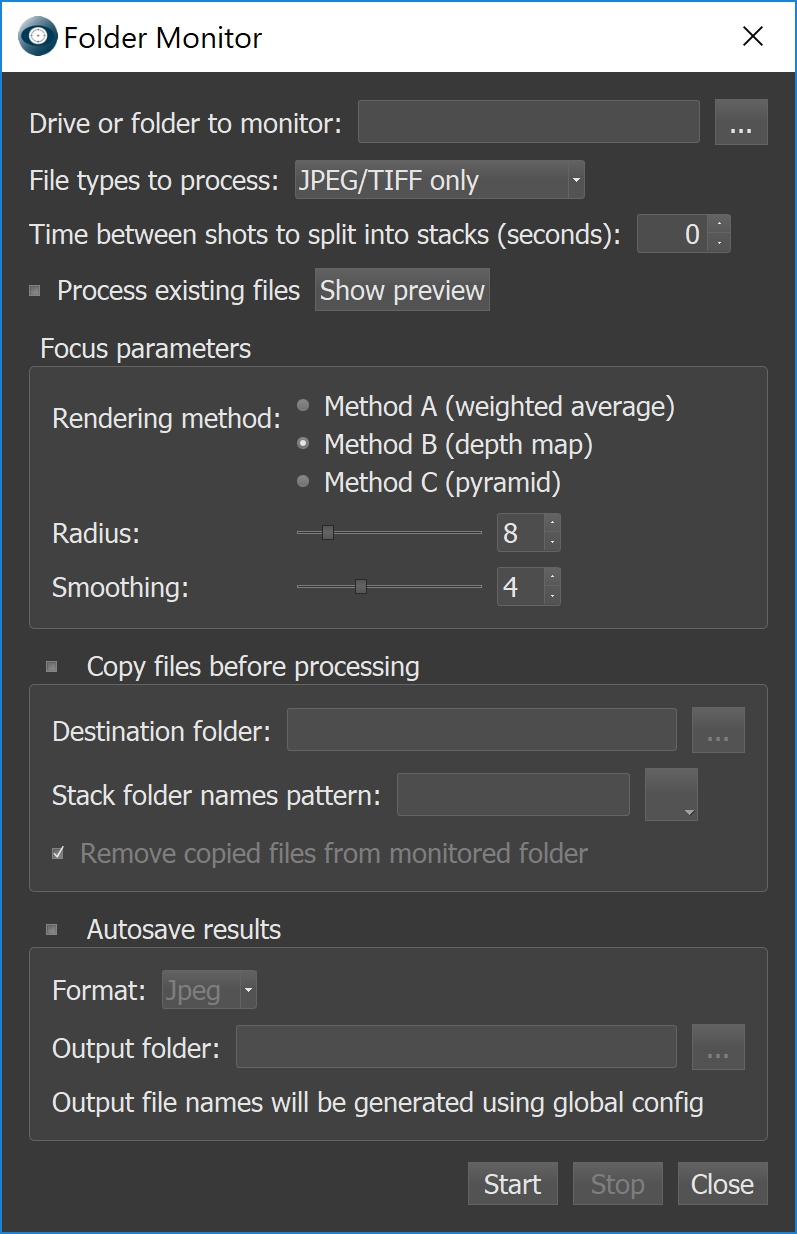
Select the folder to monitor. Both local and network folders are supported. Important: Adobe DNG Converter cannot read RAW files on network drives, which may affect raw workflows.
File types to process - 'JPEG/TIFF then RAW' creates separate stacks for JPEG/TIFF and RAW files when images were captured in JPEG+RAW mode.
Time between shots to split into stacks (seconds) - sets the time interval for the program to determine the end of one stack and the beginning of the other one. The folder monitor needs a way to distinguish one image stack from another one. The 'Time between stacks' setting defines a pause in time that the program uses as a separator. If no new images appear in the monitored folder for the specified interval, Helicon Focus treats this as the end of one stack and assumes that the next incoming images belong to a new stack.
Process existing files - if not checked, only the files added after launching the folder monitoring will be processed.
Show Preview option opens a list of existing stacks in the monitored folder.
Copy Files Before Processing - copies each stack from the monitored folder to the destination folder, creating a separate subfolder for each stack named according to the specified pattern template. If Remove copied files from monitored folder option is enabled, the original files are deleted from the monitored folder after copying, while remaining organized in their respective subfolders in the destination folder.
Autosave Results – enables automatic saving of output to a chosen folder in the selected format.
The Folder Monitor status is shown in the toolbar when active.

The Dust Map feature eliminates artifacts caused by dust particles on the camera sensor or within the optical system. Such particles appear as black dots on single images and produce visible traces in stacked outputs. The function requires providing a reference "dust map," which the program applies across the entire stack to remove these artifacts. The same method can be used to correct hot pixels.
Below is 100% crop of the sample image provided by Phil McCollum demonstrating how the output image looks like with and without a dust map:

Dust map function is OFF. Hover the cursor over the image to see how the dust map function works.
To use the Dust map feature, please follow these steps:
Important: the dust map must have the same dimensions as all other images in the stack.
Here is an example of the dust map (provided by Phil McCollum):

In order to remove the dust map, go to the main menu->File->Remove dust map, or press the "Remove dust map" button next to the dust map file name.
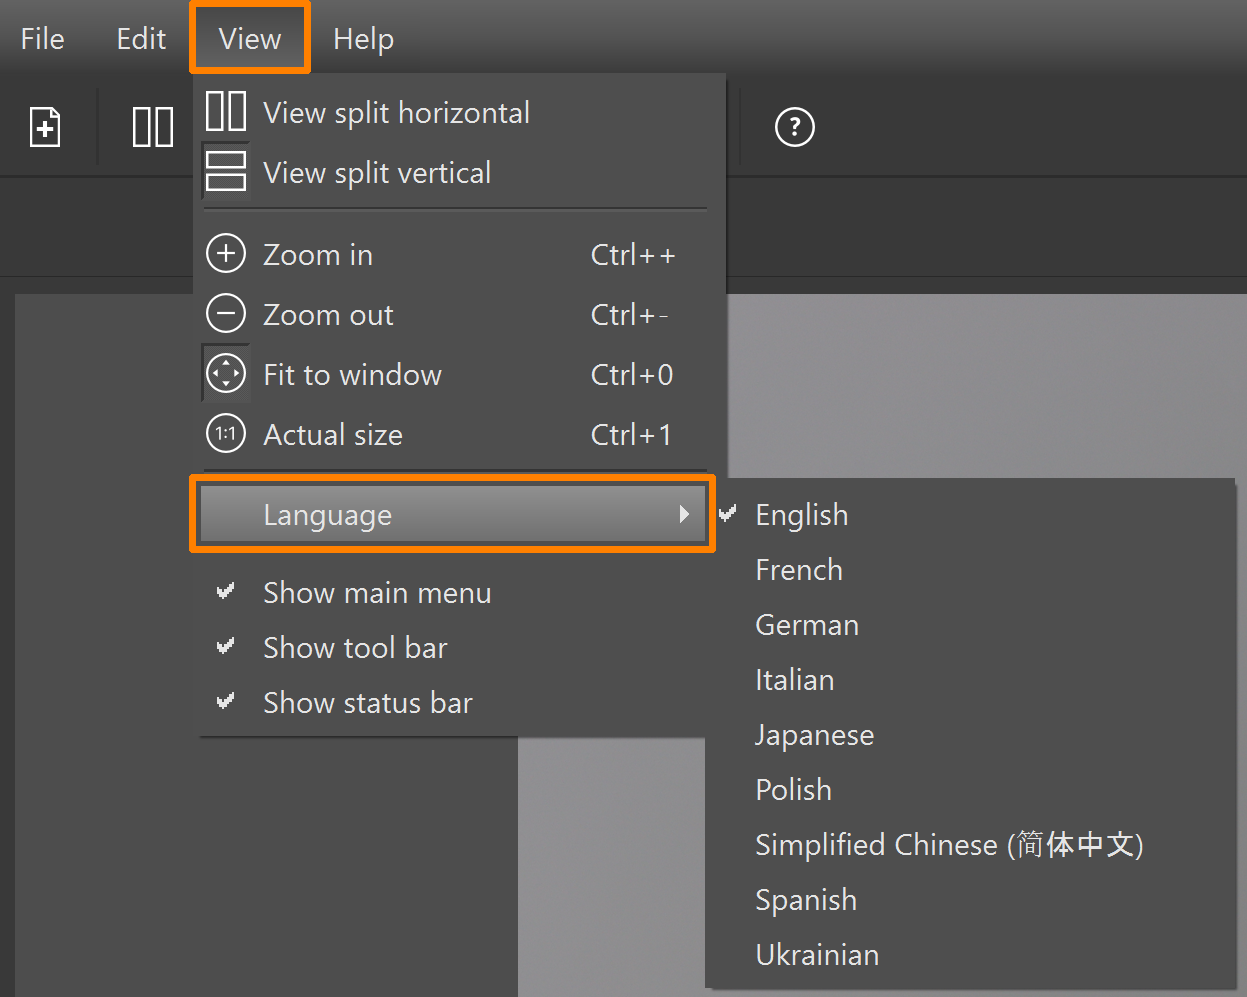
To change the interface language, navigate to the main menu, select View -> Language, and choose a language from the list of available options:
Helicon Focus can be called from other programs using command line parameters.
| Command line parameter | Description |
| -silent | Launches Helicon Focus in console mode, without the graphical interface |
| --activationCode 12345678 | Registers the license automatically |
| --register-global | Registers the license for all users on the computer (requires administrator rights) |
| -save:full_name.ext | Saves the result as full_name.ext. If omitted, the output is saved in the "Focused" subfolder. |
| -j:jpeg_quality | Sets .jpeg quality (0-100) |
| -dmap | Saves depth map image |
| -noresult | Do not save resulting image |
| -3d | Saves a 3D model for opening in Helicon 3D Viewer |
| -noprogress | Hides the rendering progress bar | -i full_name.ext | Specifies a text file with input file names, one per line |
| -o full_name.ext | Specifies a text file to store the list of saved outputs |
| --preferred-output-path folder_name | Sets folder_name as the default folder when saving outputs |
| -tif:x | Sets .tiff compression option: 'lzw' for LZW compression, 'zip' for ZIP compression, or 'u' for uncompressed. If this option is omitted, ZIP compression is applied. Example: -tif:u |
| -project: | Saves a project file |
| -dustmap: | Loads a dust map file |
| -mp:x | Sets Method (0=method A, 1=method B, 2=method C) |
| -rp:xxx | Sets Radius |
| -sp:xxx | Sets Smoothing |
| -sort:asc | Sets ascending sorting order |
| -sort:desc | Sets descending sorting order |
| -sort:auto | Sets automatic sorting order |
| -va:xxx | Sets Vertical shift adjustment |
| -ha:xxx | Sets Horizontal shift adjustment |
| -ra:xxx | Sets Rotation adjustment |
| -ma:xxx | Sets Magnification adjustment |
| -ba:xxx | Sets Brightness adjustment |
| -im:x | Sets Interpolation method (1=Bilinear,...) |
| -dmf:xx | Sets Depth map feathering |
| Examples | Description |
| HeliconFocus.exe -silent "c:\my images\set20" | Process all images in "c:\my images\set20" folder with default parameters |
| "C:\Program Files\Helicon Focus\HeliconFocus.exe" -silent . | Process all images in the current folder and save result to "Focused" subfolder |
| HeliconFocus.exe -silent "c:\my images\set20" -rp:6 -sp:7 -mp:1 | Process images with Radius set to 6 and Smoothing set to 7 |
| HeliconFocus.exe -silent "c:\my images\set20" -save:c:\result.tiff | Process images in "c:\my images\set20" folder and save as tiff file to c:\ |
Helicon Focus is only integrated with Lightroom Classic and Capture One. When it comes to other image handling and processing programs, Helicon Focus has to be run standalone, the stack should be opened in the program directly, the output should be saved and imported in the preferred post-processing software manually.
Lightroom and Capture One plugins allow exporting files into Helicon Focus and importing the saved output back automatically.
The plugin comes pre-installed with the program, so there's no need to install it separately - it should work out of the box. There is no additional cost for the plugin. It's an integrated part of Helicon Focus.
The plug-in is compatible with Lightroom Classic only and is not supported in other Lightroom versions.
It works consistently across all Helicon Focus editions - Lite, Pro, as well as in trial or unregistered demo version of the program.
Make sure to close Lightroom before installing Helicon Focus for the plugin to install correctly.
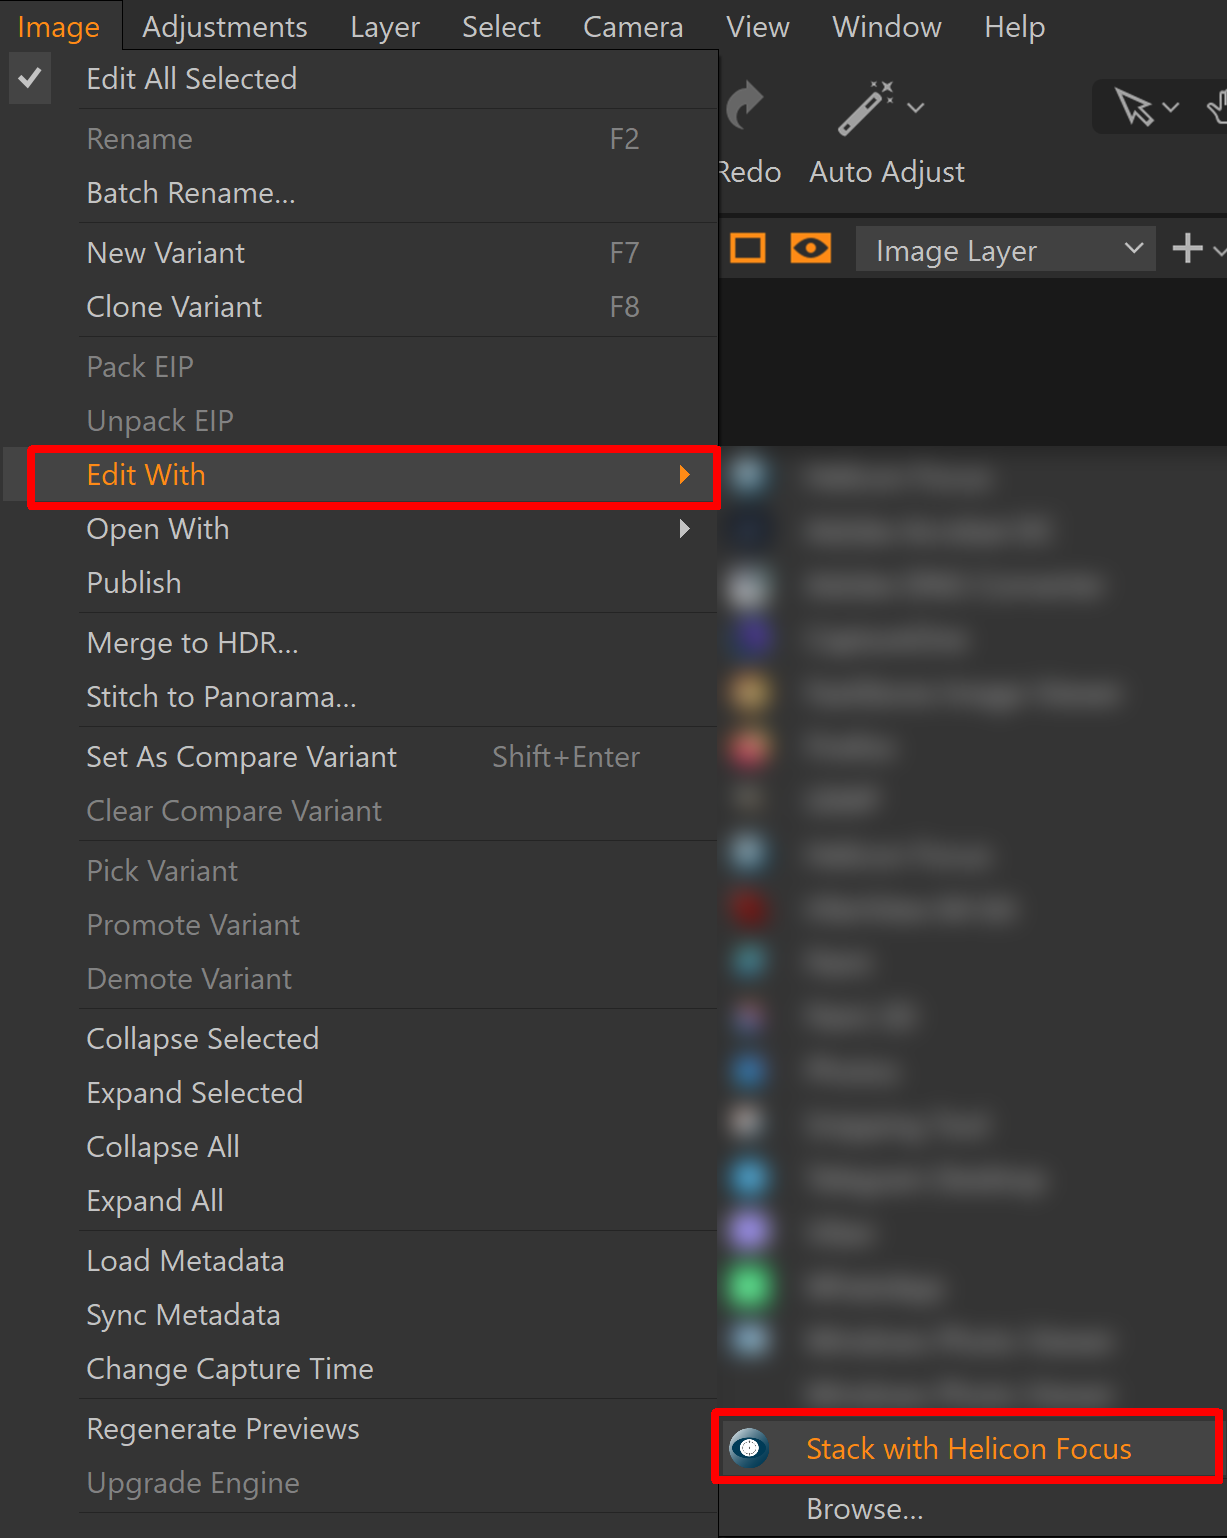
In order to export images from Lightroom for further processing in Helicon Focus, please follow these steps:
Please note that the saved output will only be imported back to Lightroom after you close Helicon Focus window.
Export options
Lightroom exports images to Helicon Focus in .tiff, .jpeg, .dngG and original format.
For .tiff or .dng export, use the relevant export preset:
In order to export in a different format, follow these steps:
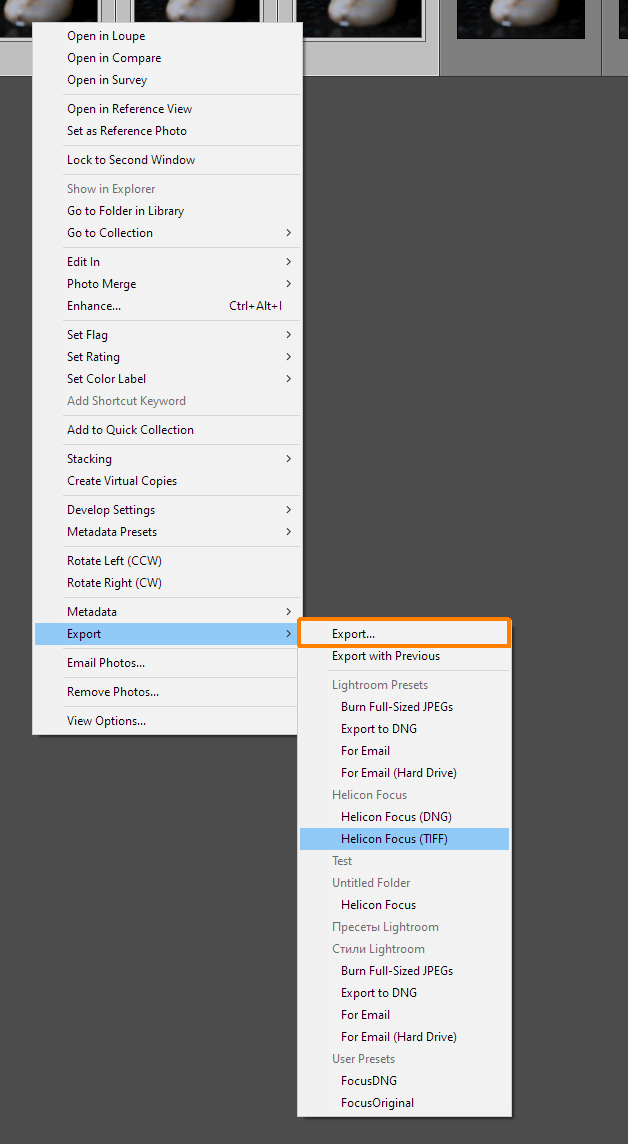

When the same export parameters are used for multiple stacks, configure them once and apply the Export with Previous option.
If exporting from Lightroom fails, reinstall the plug-in: go to Helicon Focus Preferences... -> Integration tab and click the Reinstall plugin button.
If the issue persists, contact our Support team for assistance.
You are welcome to watch the video tutorials on our website for more details.
The plugin comes pre-installed, so there's no need to install it separately - it should work out of the box.
Make sure to close Capture One before installing Helicon Focus for the plugin to install correctly.
There is no additional cost for the plugin. It's an integrated part of Helicon Focus.
The plugin works consistently across all Helicon Focus editions - Lite, Pro, as well as in trial or unregistered demo version of the program.
In order to export images from Capture One for further processing in Helicon Focus, please follow these steps:
Images can be exported in .jpeg, .dng, or .tiff formats.
To change the export format, go to the Basic tab in the Export window:
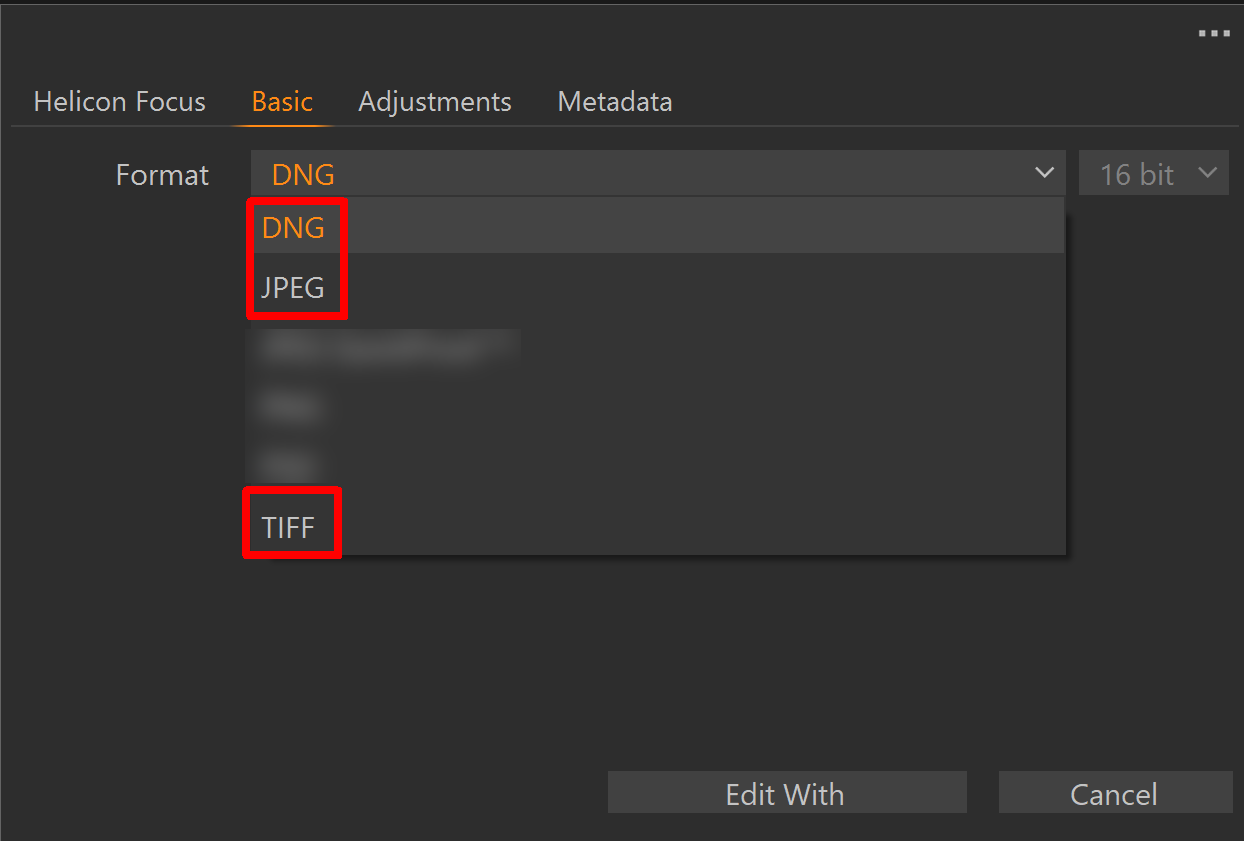
and select one of the supported formats: .dng, .jpg, or .tiff.
Read more about Helicon Remote here.
Read more about Helicon 3D Viewer here.
Below you will find the list of shortcuts used in Helicon Focus. Sometimes using them makes it much more handy to work with images. In order to get used to them we advise you to print out the whole list and to keep it at hand.
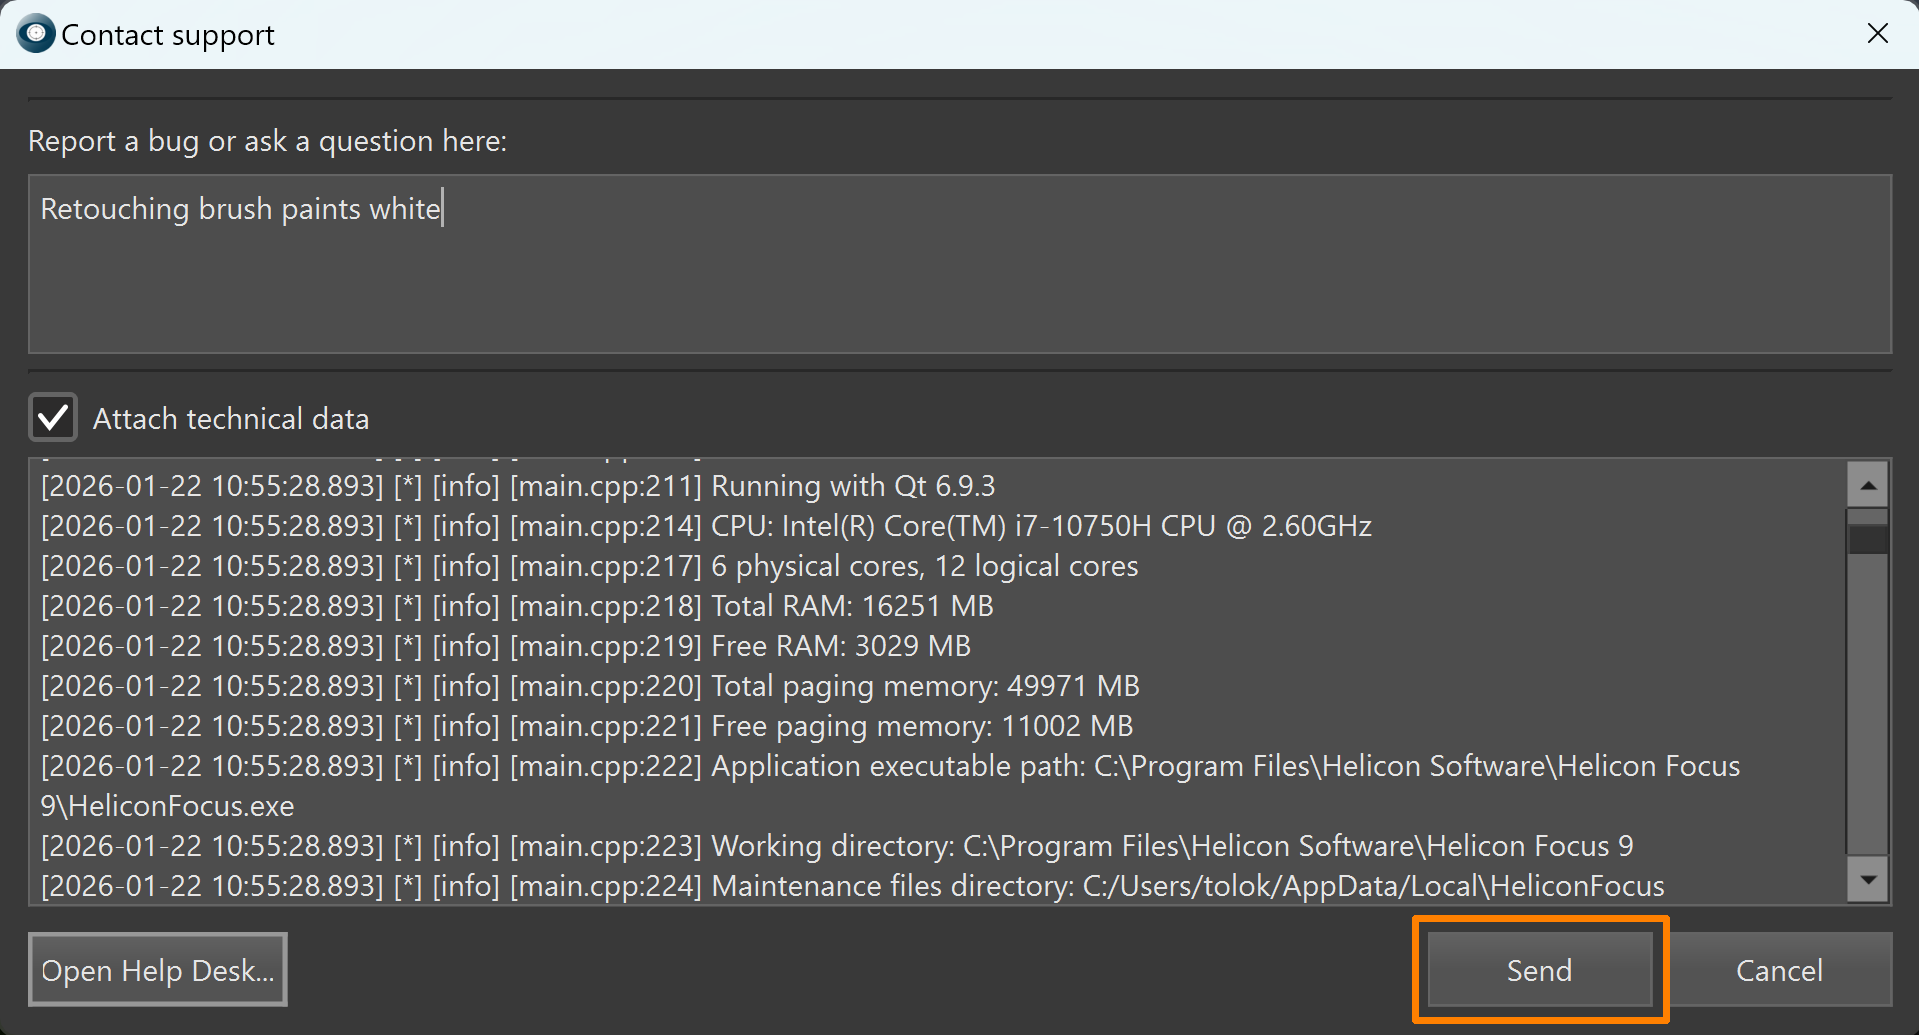
If you experience a problem or unexpected behavior, please submit a bug report as soon as it occurs.
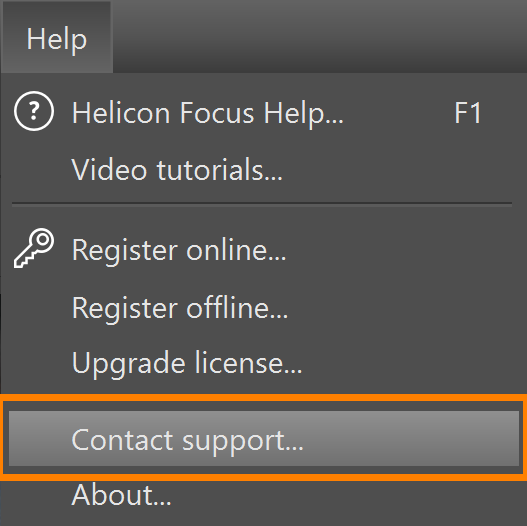
Go to main menu -> Help -> Contact Support
describe the issue, and click Send.
'Thank you for contacting us' message will be displayed upon successfull submission of the report.
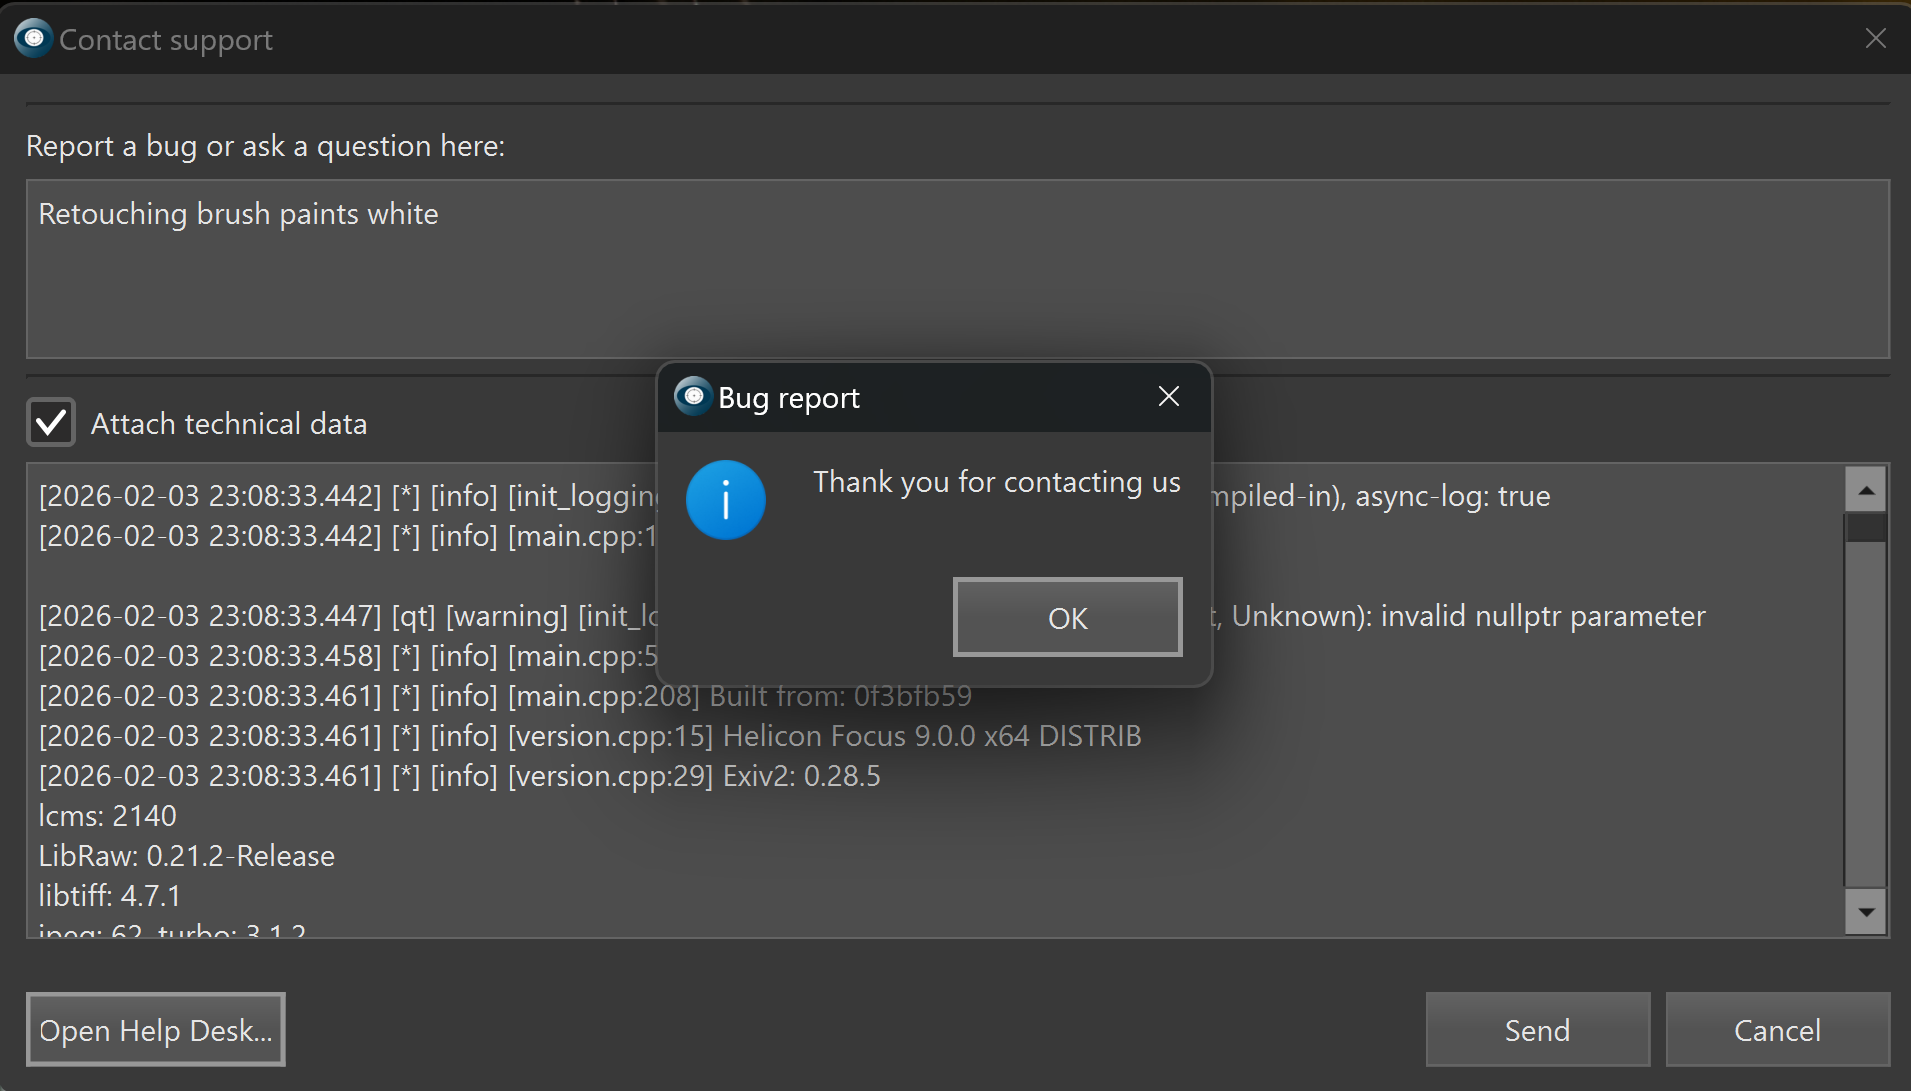
If the program crashes, restart it and submit the bug report immediately after restarting. Submission of report after crash may take longer, as large dump files need to be uploaded. The 'Thank you for contacting us' message will appear to confirm the submission.
We will review the logs and contact you as soon as possible.
 |
 |
 |
 |