Raw-in-DNG-out mode
Helicon Focus Pro now has got another truly valuable feature – it can process raw files in their native color space. It means that color balance and highlights clipping – which are the most destructive operations of all the postprocessing/raw development – can now be done after focus stacking is completed. Even more – you can even retouch stacking result without actually developing it! How is it all possible you ask? Let’s start from the top.
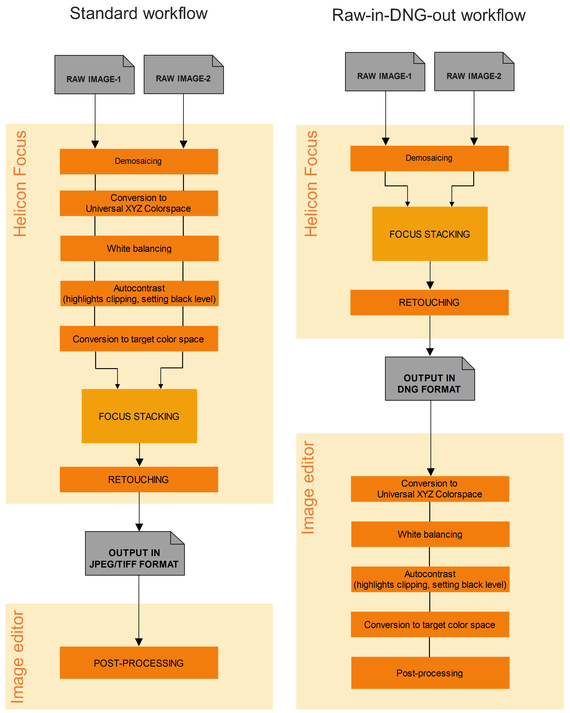
To understand all the benefits of this new processing mode let’s have a simplified overview of raw development process algorithm. Raw image files contain data from the sensor that underwent minimum changes. During raw image development, on the way from raw file to the one in the chosen format data goes through a range of processing stages. On each stage some part of image data might be lost. Once all the stages of raw development are done you will not be able to go back to, let's say, white balancing any more or undo highlights clipping. With a new feature of Helicon Focus the file processing chart looks differently. Let’s compare the processing algorithm structures to make the difference more apparent:
With this new mode Helicon Focus does most of the raw development ‘on the fly’ just in order to display the images on the screen for you. Each time you pan or zoom the image, the program takes raw data and applies all the raw operations. The image update is a bit slower, but the initial underlying raw image stays always absolutely intact! Even when you use retouching brushes in Helicon Focus, the program copies raw data back and forth and then applies postprocessing operations to show you the result on the screen.
So after stacking of source images, after fixing artefacts with retouching tools, even after adding text and scale you still have raw image as an output/result. You can save it to DNG file if you want to postprocess result in your favorite RAW engine like Adobe Camera RAW or UFRAW etc. Or you can save result as JPEG or TIFF and you will get the same image you see in the program.
You may ask about the difference between original raw file and output DNG file. Well, the structure of the files is a bit different indeed. To align source images Helicon Focus needs to scale, shift and sometimes rotate images. To do this, source images should be converted from original raw sensor data to so called interpolated RGB image. This process is also called demosaicing or debayering. There are many demosaicing algorithms, some of them work better with preserving details, the other ones are better coping with colored patterns. Helicon Focus uses Adobe DNG Converter to demosaic raw images, which uses the same engine as Adobe Camera RAW module.
What is the point of using Raw-in-DNG-out mode? Saving result as DNG file you can move the actual raw development to the end of your workflow. You can stack images and only then decide which white balance to choose and if highlights should be clipped or not.
What are the other important things to know about Raw-in-DNG-out mode? Please remember that linear DNG files are big, roughly of the same size as 16 bit per channel TIFF files. If you have hunderds of images, this might be an important factor. You should also keep in mind that DNG is actually a raw file, so if you open it in a couple of years or in a different raw engine you may get a slightly different result, since raw engine algorithm changes over time. If you are happy with the result and want to keep it exactly like this, we would recommend to save it to TIFF or JPEG.