Some thoughts on macro, but not ultra-macro, use of Helicon Remote
Getting Started
Auto-focus stacking is a revelation. My interests lie more with "flower macros" and landscape focus stacking and less with antennae – a focus rail doesn't help at all for landscapes. Nor do I want to spend the money on another piece of gear – but I already have a laptop and an Android tablet, making Helicon Remote the greatest thing since sliced bread.
Manually adjusting the focus for a big stack is tedious and error-prone. Automation – Helicon Remote – to the rescue.
For reference throughout, I am using a Nikon D5100 – the best of the DX sensors in a modestly-priced body.
Picking an Aperture
The oft-quoted rule of thumb says "two stops up from wide open", whatever that is on your lens. My limited experience says "close enough", but testing your lens will help. Run some shots at each stop, then do a vigorous crop – the same on each shot – and eyeball the results. Yes, you could pull out your ISO 12233 chart and a loupe… but that's a lot of work without matching returns. Point your lens through an open window toward your neighbour's house instead:

Somewhere around f/13, this lens is optimally crisp (at 300mm - it may change at other focal lengths) – it shows up well when zoomed-in on the collage above. The "two-stops-up" method would have said f/11, which would have been only close.
So now, at a given focal length (sharpness will vary throughout a zoom range) you know your sharpest aperture, and have a visual idea of where sharpness starts to fall of unacceptably. This last bit is important. If you find your lens to be sharpest at, say, f/3.5 and set this up for a landscape shot ranging from ten feet to six hundred feet, you will have hundreds of images. This takes time, wears out your shutter, and makes for lengthy post-processing. Helicon Focus is faster than most, but two- or three-hundred shots takes time.
Because you know where sharpness falls off, you can stop down and reduce the number of shots while maintaining enough sharpness. You don't always need all of it – your photograph is seen as through the view-finder, not in a 200% crop.
Manual or Automatic Camera Settings?
Helicon recommends fully manual exposure settings. At least fix the aperture – having this vary will wreck your stack immediately. But fix the shutter speed too – if you let it float, thinking that the camera will accommodate lighting changes when the clouds cover the sun, you will end up with more halos and other odd artefacts.
Wait for consistent lighting –the sun should be in the middle of a thick cloud or nowhere near a cloud, or the drapes drawn with a longer shutter speed, or just wipe out the ambient light with shutter and aperture and rely entirely on your flash(es) – then depend on Helicon Remote to snap your stack fast enough to minimize lighting changes.
Automatic Focus Bracketing Tips
Bracketing Start and Stop Points
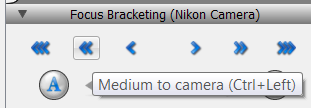
At least with some of my consumer lenses – particularly the 18-55mm kit lens – on my consumer (camera) body – the repeatability of the focus bracketing is imperfect. When I "exactly" set the A and B bracketing stops, I often miss out on some parts of my subject, towards the camera and towards infinity.
Solution: pick the perfect nearest point, and then click a few "Medium to Camera" buttons before "Saving the Nearest Point" when you click "A":
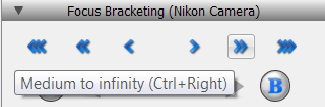
Pick your ideal farthest point, and then click a few "Medium to Infinity" buttons before "Saving the Farthest Point" when you click "B":
You may get some totally-unfocussed frames or some unwanted in-focus areas – but you don't have to use them in your processing stack. My kit lens makes big focus changes with small movements, while my other lenses make much smaller changes. So know your lens and click accordingly.
How Many Shots?
Helicon Remote does a good job of estimating DOF based on your aperture and distance from subject, then splitting up your A and B stop points to decide how many shots to take. But it isn't perfect. Up at "flower-close" range with f/8 or smaller, I find it under-estimates. So I un-select Auto and add a few Shots – typically about 20% more. But this varies by lens, so on your lens-data chart, jot down what works for you.
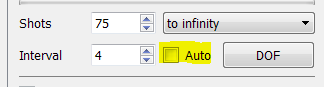
Alternately, Helicon Remote will manage extra (or fewer) Shots for you. Just click on "DOF" from the main screen, and then change the Correction factor as below.

Keep Your Mirror Up
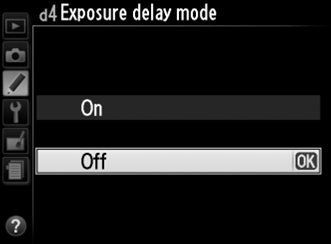
The (relatively) big, heavy mirror slapping up to let the shutter see the world will shake your world – get better results by using a camera setting that lets everything settle down.
On my camera, "d4 Exposure delay mode" lifts the mirror, waits 1 second for vibrations to damp, then releases the shutter. Your camera may do it differently – just so long as you keep the mirror up for the shot to get the best possible value out of all your hard work in finding the sharpest aperture. Turn it "on":
Do I Need a Big, Fast Computer?
In a nutshell, no. My aging laptop, a Lenovo T61 Thinkpad, works perfectly with Helicon Remote. It has 4GB of RAM with Windows 7 32-bit and the "3GB Patch" – nothing to brag about anymore – and it operates my camera perfectly. Running through dozens of shots is limited only by the speed of the USB cable – I get about one shot every five seconds.
But then again, yes. Time is money, and running Helicon Focus after your Helicon Remote session does take some time. A faster computer will give faster results. My "big, fast" workstation is about 3 times faster than my laptop for processing.
Results
Up close, a pretty Lily in perfect focus from anther to ovary, 12 shots stacked:

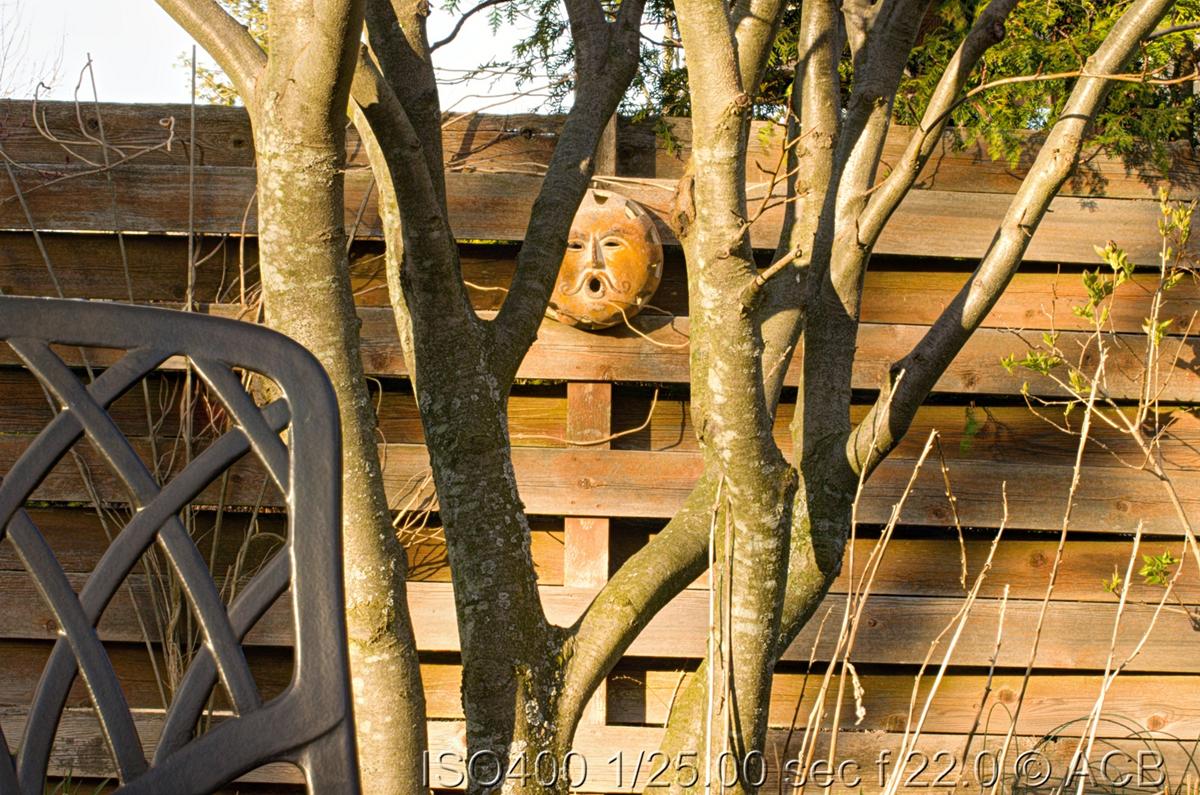
Outdoors, technically-interesting depth of field, 23 shots (try doing that by hand) stacked, focus from 6 feet to about 35 feet – all at f/22 for a soft, but of course in-focus, look. The image is good with just "Method C" defaults and no manual touchup or post-processing at all. Imagine what you will do with more care:
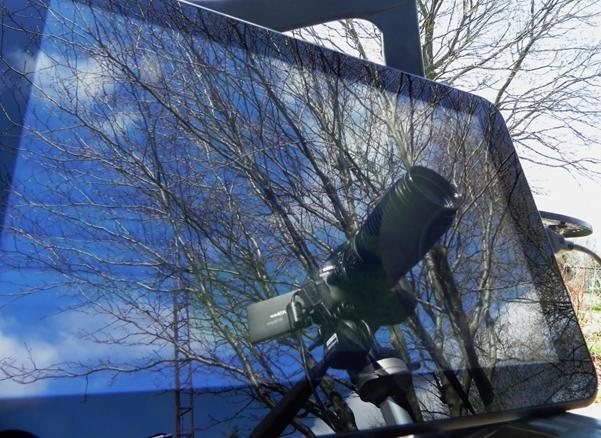
Here is the setup shot – a great way to spend a few minutes on a beautiful day. Notice that I did not drag my laptop outside – everything was done from a handy Android 3.2 tablet propped up on a lawn chair. In this case, a Toshiba AT100 – it has a built-in "USB Host" port, needed for Helicon Remote Android, and built-in full-size HDMI, convenient for showing your stuff on a big screen. The tablet wasn't easy to read in full sunlight – notice the beautiful reflection – but it was better than my laptop and useable enough. Use your camera's LCD loupe as required. My next attempt will have the tablet mounted to the tripod – plenty of commercial mounts are available – and that setup is portable onto a trail. Just keep the screen from being a mirror to a bright surface, as I have used it in this shot, and all is well.
Art is more than technology – notice how compositionally-dull my outdoors stack is – but technology has been helping art since cavemen learned to create charcoal for drawing. Using Helicon Remote is the next step in that evolution.