Sharpening
The sharpening mechanism finds edges and makes them crisper and more noticeable by making the bright edges brighter (white halo) and the dark edges darker (black halo).
There are two sharpening tools in Helicon Filter: Sharpen fine details and Sharpen edges.
The Sharpen fine details tool makes images look less fuzzy by detecting and amplifying thin lines and fine details.
The Sharpen edges tool emphasizes all the edges by adding halos. If you use Sharpen edges, then the Sharpen fine details effect will be almost unnoticeable.
The Sharpen edges tool has several parameters that change the brightness and width of the halos.
 |
 |
 |
| Original | Sharpen fine details | Sharpen edges |
Hints and tips
- Do not overdo sharpening, as the image will look too "digital."
- To keep noise from being emphasized, set a higher value for the Threshold.
- Do not set high values for Edge width without a good reason, as it produces too big halos.
Recommended Workflow
- Set zoom to 100% or 50% to view image closer to its real size.
- Play with the Sharpen edges slider to emphasize outlines of the objects.
- If noise is emphasized, increase the value of the Threshold slider while simultaneously watching the Sharpening map.
- Check if selecting the Suppress halos checkbox makes image look better.
- Use Equalizer to adjust sharpening level for specific color ranges (i.e. skin, sky).
Sharpen fine details
The Sharpen fine details tool detects thin lines and fine details and amplifies them. Wide and/ or smooth edges are not affected. Please note that such sharpening will be noticeable only on larger prints. If you plan to print a 5 megapixels image on 10x15cm (4x6") paper or downsize the image to 25%, fine sharpening will not be noticeable.
Sharpen Edges
The Sharpen edges tool adds contrast to the edges. Bigger values correspond to greater contrast.
The Edge width parameter defines the width of halos.
 |
 |
| Edge width = 1 | Edge width = 10 |
The Threshold parameter sets the minimal size of objects to be sharpened. If noise in your picture is increased, try setting a higher Threshold value.
The White halo parameter defines the intensity of white edge sharpening as a percentage to black edge sharpening. In most cases, white halos are more noticeable than black ones, which is why the default value is set to 50%.
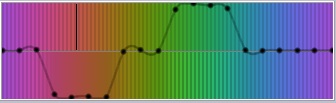
Sharpening Equalizer
The Equalizer lets you define the sharpening level for every hue in the image. A common task is to keep skin details soft while sharpening the rest of the image.
Note: The Equalizer appears when the value of the Sharpen edges slider is not zero.
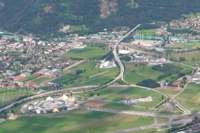
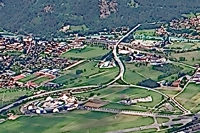
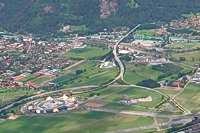
 |
|
|
| Original | Sharpen fine details 100, Entire image sharpened |
Sharpen fine details 100, Skin color is not sharpened. |


Suppress Halos
The Suppress halos tool sharpens blurry edges without introducing white or black halos. If you already have a sharp image, the effect will be minimal.
 |
 |
 |
| Original | Sharpened, Suppress halos is off | Sharpened, Suppress halos is on |
Sharpening Map
When you switch the Sharpening map on, you can see (in pink color) what parts are to be sharpened.
Sharpening Brush
The Sharpening brush can either sharpen or blur a part of an image. Read more about the Sharpening brush here.
Selection brush
The Selection brush selects a specific area of an image. After you have made your selection you can return to the Sharpening filter and apply any transformation either to the selection or to the rest of the image. Learn more about the Selection brush and its parameters here.