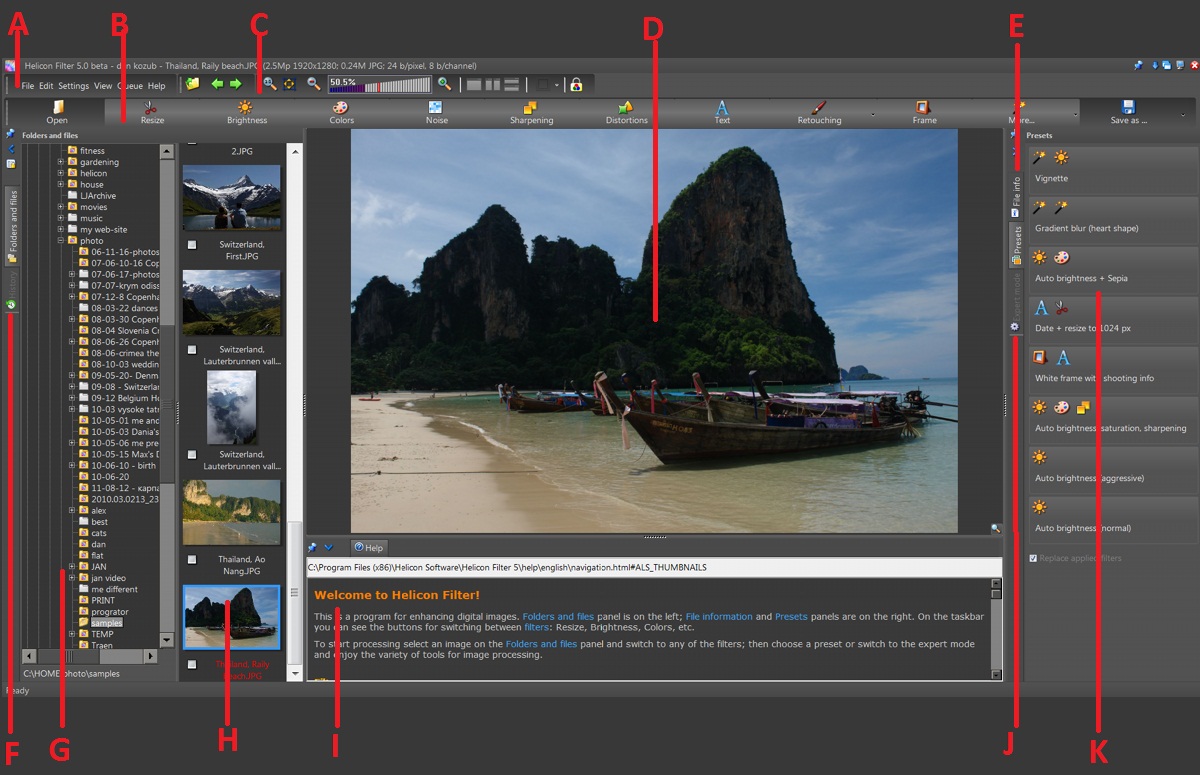
A - main menu; B - buttons for switching between filters; C - taskbar; D - image display area; E - File information panel (on this screenshot it is inactive while the Presets panel is active); F - History panel (on this screenshot it is inactive); G - filetree; H - Thumbnails panel; I - Help panel; J - Expert mode panel (on this screenshot it is inactive); K - Presets panel.

Every filter provides a set of tools that perform similar tasks. For example, the Resize filter has tools for cropping and resizing, and the Brightness filter has tools to change brightness.
After you switch to one of the filters, you can use any of the tools available on the Presets and Expert mode panels.
The Presets panel gives quick access to the most common image processing tasks. You can use the default presets or you can create your own. Read more about presets here.
The Expert mode panel provides access to the full set of tools.
The button applies the current filter and switches the program to default mode when no filter is selected.
The button switches the program to default mode when no filter is selected, without applying the current filter.
The button resets the settings in the current filter to the default settings.
The Folders and files panel consists of the filetree, which shows the folder structure of your hard drive, and the Thumbnails panel, where you can see thumbnails of the images in a selected folder.
![]() /
/![]() The pushpin icon allows you to lock or unlock
a panel. If it's unlocked, it disappears as soon as you move the cursor away
from it and appears when the cursor is near the left edge of the screen.
The pushpin icon allows you to lock or unlock
a panel. If it's unlocked, it disappears as soon as you move the cursor away
from it and appears when the cursor is near the left edge of the screen.
![]() This icon allows you to minimize and restore the whole
panel.
This icon allows you to minimize and restore the whole
panel.
![]() This icon lets you hide and restore the file
tree.
This icon lets you hide and restore the file
tree.
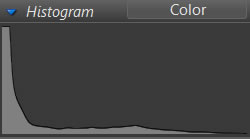
The File information panel shows the image histogram, image information, and EXIF information. The histogram and metadata describe the original image and not the altered one.
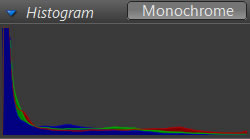
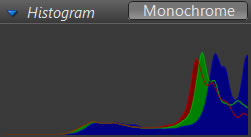
On the image histogram, the horizontal axis represents the range of variation (from 0 to 255) in pixel brightness. This is the dynamic range of a digital image. The vertical axis represents the number of pixels at a brightness level, going from dark on the left side of the histogram to bright on the right side.
 |
 |
 |
Monochrome histograms |
||
 |
 |
 |
Color histograms |
||
 |
 |
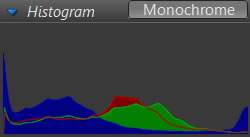 |
| This image is dark: there is a peak on the left side and the rest is fairly flat | This image is bright: there are peaks on the right side and the left side is flat | This image is balanced: it has pixels across the entire dynamic range |
The Presets panel gives quick access to presets. If no filter has been activated, there are presets for several filters available on the Presets panel. If you have switched to one of the filters, there are presets for one selected filter. Read more about the presets here.
The Expert mode panel contains all tools available for the currently selected filter. The panel can only be activated after you switch to one of the filters.
The Thumbnails panel shows thumbnails of the images in a selected folder.

On the screenshot above the first three files are selected (note the green "v" mark ![]() ); the other three - are not. The currently open file ("Candles.JPG") has the blue frame and red title.
); the other three - are not. The currently open file ("Candles.JPG") has the blue frame and red title.
You can call the popup menu by right-clicking on the Thumbnails panel. The operations offered by the popup menu are described below.
Note that opearations like , , , apply to files selected with the green "v" mark ![]() . If the currently open file is not selected, the operation will not be applied to it.
. If the currently open file is not selected, the operation will not be applied to it.
The command selects all the images in the folder. "Selecting" means selecting the checkbox below the image.
The command clears the selection: none of images is selected.
The command reverses the selections to the opposite state. (i.e., selected to deselected, deselected to selected).
The command adds images that have been selected to the queue waiting to have either a preset filter or currently selected set of filters applied. The "currently selected set of filters" means those filters that are applied to the image that is open at the moment. About the preset filters you can read here.
The command lets you rename one or more files using a template. For example, you can rename all your files, "2005.06.25 The Beach," so that your files are always shown sorted by date. More about renaming here.
The command copies the files that have been selected into another folder.
The command moves the files that have been selected into another folder.
The command moves the files that have been selected into the trash folder for deletion.
The commands rotate an image and save it with the original date and time, using a lossless operation in order to keep the JPEG quality from deteriorating. RAW files cannot be rotated with this function.
The command analyzes the EXIF orientation flag and rotates the image accordingly. The orientation flag is reset afterwards.
The History panel shows the list of filters you have applied to an image. You can enable, disable, edit, and delete any filter. To enable/ disable filters, select/ deselect the checkboxes in front of the names of the filters. To edit or delete filter, click on it to bring up the local menu for that filter.
Filters are listed in the same order as they were applied. You can enable/ disable filters in order to preview what an image would be like with or without a specific filter.
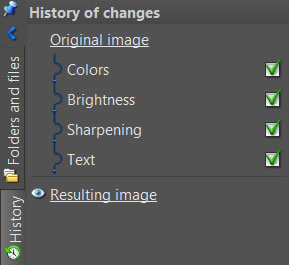
The Original image link lets you open the original image, and the Resulting image link opens it after any filters or changes have been applied.