Chromatic Aberration (CA)
Chromatic aberration (CA) decreases the sharpness of images and removes color contours, lines, and spots that objects do not actually possess. It is caused by certain optical effects and processes in a camera sensor. Two types of CA occur most often in images taken with digital cameras: 1) purple fringing; 2) lateral CA.
Helicon Filter can help to fix both of these.
1) Purple/blue fringing (blooming):
 |
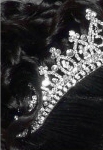 |
| The diadem has a false purple contour. | The purple contour has been removed. |
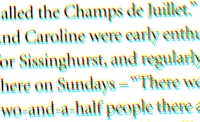
2) Lateral CA
 |
 |
 |
 |
 |
Original image Lateral CA usually appears |
The right top corner of the image (see the red rectangle added to the original image, left) has been magnified to show the effect of lateral CA on the white letters |
The lateral CA has been removed. The letters have no extra outlining. |
Lateral CA is most often visible in contrasting areas on the sides and in the corners of images. It tends to make it look like the red and blue parts of the image have shifted from or to the center of the image.
For more about CA, you can read the following: http://www.dpreview.com/learn/?/key=chromatic+aberration.
Helicon Filter has two mechanisms for fixing CA.
1. To fix purple fringing, the program determines which areas have a brightness level higher than the brightness threshold. Then it desaturates the pixels of the CA colors that are within a specified radius from the bright areas.
2. To fix lateral CA, the program distorts the red and blue color planes of the image to compensate for the error(s) created by the lens.
Recommended workflow
To fix purple fringing:
- Use the eyedroppers (Current CA color & Other CA color) to mark the colors caused by CA.
- Find the minimum radius that will remove the most obvious CA.
- Starting with a low threshold, find the maximum threshold sufficient to remove all the CA.
- Use the CA map to verify that the other parts of the image have not been affected.
To fix lateral CA:
- Move the Lateral CA slider back and forth until you find the value that compensates for the CA.
- If this doesn't help, then use the same approach as for fixing purple fringing.
Current CA Color & Other CA Color
The eyedroppers let you define two exact colors of CA by clicking on the image with the mouse pointer. Based on the desired Color tolerance level, the program will look for similar colors and desaturate them. Zoom in to pick the exact colors.
CA Parameters
The Radius slider defines the distance from the bright, overexposed areas that will be desaturated. Try to find the minimum radius sufficient to remove all the effects of CA.
The Brightness threshold slider defines the bright areas themselves. The program assumes that areas brighter than the threshold cause the blooming effect. Try to find the highest suitable threshold value to minimize the effects of CA in the other parts of the image.
The Color tolerance slider determines the degree of precision for the color match. A zero level of color tolerance means that only the exact colors defined by the current CA color and other CA color parameter will be removed (desaturated). A very high color tolerance (100) will include all colors in the processing.
CA Map
The CA Map switches the software to a special mode in which the intensity of the blue color corresponds to the degree of desaturation. In this mode you can check to see where your image is affected*.
Lateral CA
The Lateral CA slider changes the intensity of the changes in the blue and red color planes. Move the slider back and forth to find the value that will give the best result. Please note that this tool has no effect in the center of the image because lateral CA is most pronounced in the corners.
Lateral CA compensation should be applied before cropping.