Adjusting brightness
The Brightness filter allows correcting brightness, contrast, and removing haze. We recommend to use the automatic brightness correction first, and if not satisfied, try different controls and their combinations. The histogram can help to understand which controls work better for the current image, see Reading the histogram section.
Auto detect brightness
The Auto detect tool adjusts brightness fully automaticaly. The program will analyze your image and set other controls accordingly. You can choose the degree of adjustment: conservative, normal, agressive, or extreme. In most cases the conservative or normal adjustment will work very well. We advice to use this tool first. If you are not satisfied with the automatic brightness correction, you can always do it manually with the help of other tools.
Automatic correction is very useful for batch processing. You can add a folder with images to a queue and apply automatic correction. In most cases the brightness will be optimized automaticaly and you will have to correct only some images manually afterwards. Read more about batch processing here.
Contrast
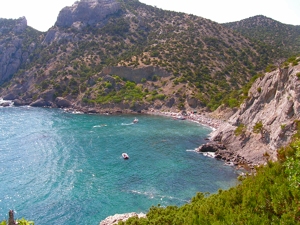
The Contrast slider works well for very contrast or very monotone images. If you look at the histogram of the original image, you can see "a hill" in the middle because most pixels have average brightness. Increasing the contrast makes the image more diverse and interesting.
 |
 |
 |
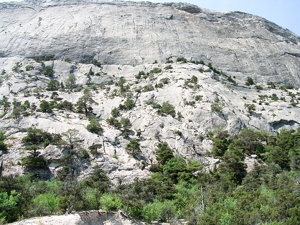
| Original image | Contrast (+68) applied | Notice how the histogram was stretched towards the edges. |
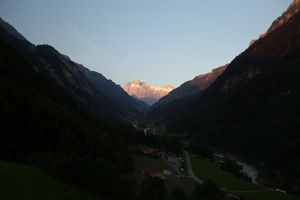
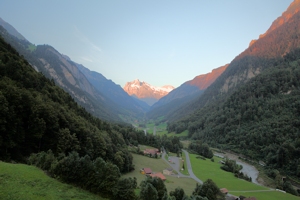
Brightness
The Brightness slider works well if you just need to make an image brighter. Increasing brightness makes dark areas brighter, but at the same time doesn't completely "overlight" the light ones.
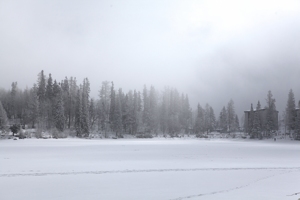
On the sample image below the whole room became brighter, but the mountains in the window became almost undistinguishable. You can apply other controls to improve the situation with mountains. For example, try to darken the Highlights. Typically, you use the Brightness slider when you have most areas on your image dark.
 |
 |
 |
| Before applying Brightness | After applying Brightness (+83) | On the histogram you can see that the darks were "stretched" and the highlights were "compressed", but not lost |
In some cases you can decrease brightness in order to make your image more dramatic. This will work well if you have a lot of light areas which are not overexposed.
Exposure
The Exposure slider makes all pixels brighter or darker by the same degree. The effect is similar to changing the ISO, exposure time or aperture on your camera. When moving the exposure slider please look at the histogram and control that pixels don't "disappear" beyond the limits of the dynamic range which can cause overexposed areas and loss of details.
 |
 |
 |
| Original image | The Exposure slider moved +1.3 | You can see that the majority of pixels moved right which means they became brighter. The pixels are spread more uniformly over the dynamic range after the transformation. |
Local contrast
The Local Contrast decreases contrast between large areas of shadows and highlights, but improves visibility of fine details within those areas.
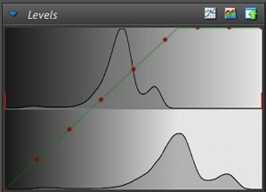
It can be useful when there are only highlights (i.e. sky), shadows (i.e. trees) and almost no midtones. In this case you can see two big hills on the sides of the histogram. Applying local contrast will compress midtones and pull more details from the shadows and the highlights by stretching them.
 |
 |
 |
| Original image | Local contrast slider moved +17 | The pixels are spread more uniformly over the dynamic range after the transformation. |
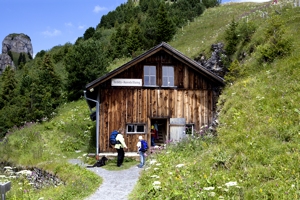
Shadows and Highlights
The Shadows and Highlights sliders allow changing brightness selectively for the shadows or for the highlights only, keeping the rest of the image unchanged.
The Shadows and Hightlights sliders are very useful with RAW files. JPEGs can become greyish if you apply strong trasformations, but not the RAW files. This happens because RAW files contain more information about color than JPEGs. So, the tip is to shoot in RAW if the images come out too dark. Compare the results for JPEG and RAW below.
If you apply the Shadows/Highlights try to change the Zone size - this can make the resulting image less greyish.
 |
 |
 |
| Original image | Shadows correction (+100) applied to RAW | Shadows correction (+100) applied to JPEG |
Zone size
The Zone size slider itself doesn't make any changes to the image, but it affects the work of other controls. It defines whether the transformations are based on the brightness of each individual pixel (zone size 0) or are based on some average brightness of several neighboring pixels. The slider defines the size of the zone to use for such averaging.
If you are not satisfied with the effect of applying other tools, try to change zone size. In order to understand which zone size is better for the a particular image, just change its value until you like the result.
Exposure warnings
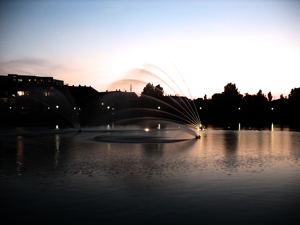
Tick the Exposure warnings checkbox to see the overexposed and underexposed areas of the image. These areas will change in the process of transformations, so it is a good idea to control them periodically as you work with an image. The red areas are overexposed, the blue ones are underexposed.
 |
 |
| Exposure warnings are off | Exposure warnings are on; |
Auto contrast
The Auto contrast tool can optimize the contrast automatically. If you see that an image is grayish and dull then it's a good idea to use auto contrast. The program will analyze your image and will apply necessary transformations. You can choose the degree of contrast adjustment: conservative, normal, agressive, or extreme. The Manual option doesn't automate anything, on the contrary, it gives you the fullest control over the brightness adjustment and is explained below. We recomment trying different degrees of Auto contrast before adjusting the contrast manually.
From the histogram point of view it is a good idea to use the Auto contrast tool if you see that margins of the histogram are flat. The Auto contrast tool will "cut" the unused margins and "stretch" the histogram over the whole dynamic range. Red vertical lines on the histogram show the points where it will be cut.
 |
 |
 |
| Original image | Auto contrast (75%) applied | The original histogram is cut by the sides and the rest is stretched over the full dynamic range. |
Manual contrast adjustment
If you choose the"Manual option in the Auto contrast combo-box the two sliders will appear below: Black point and White point. They allow choosing the points where the histogram will be cut. The Black point slider defines the left limit and the White point slider defines the right limit.
Use the White point slider if you have a lot of unused space in the right part of the histogram. This will make grey toneless areas on your image brighter.
 |
 |
 |
| Original image | White point slider moved to -55 | The pixels are spread more uniformly over the dynamic range after the transformation. |
And use the Black point slider if you have a lot of unused space in the left part of the histogram. In other words, if you would rather have some midtone-pixels black in order to make the image look brighter.
 |
 |
 |
| Original image | Black point slider moved to +14 | After the transformation some grey pixels became black. |
Haze compensation and gradient
For hazy and greyish images use the Haze compensation tool. Haze can be present from the very beginning or can appear after transformations, like increasing brightness of "shadows", for example.
If you want to apply the haze compensation partially, you can do this using the Gradient slider. You may wish this if some part becomes too saturated. If the Gradient value is 0, the compensation is applied to the whole image. If the value is negative (for example, -80) the compensation is applied to the 80% of the image bottom-up. If the value is positive, it is applied top-down.
There will be no visible border between the two parts because the transformation will be applied gradiently. The auxiliary tiny grey line marks the border for your convenience.
 |
 |
 |
| Original image | Haze correction +80 Gradient 70% top-down leaves the green |
Haze correction +80 Gradient 100% makes the green |
Selection brush and Brightness brush
![]() The selection brush selects some area of an image. After you have some selection you can return to the Brightness filter and apply any transformation either to the selection or to the rest of the image. Learn more about the selection brush and it's parameters here.
The selection brush selects some area of an image. After you have some selection you can return to the Brightness filter and apply any transformation either to the selection or to the rest of the image. Learn more about the selection brush and it's parameters here.
![]() The brightness brush allows brightening only parts of an image, for example, a face. Alternatively, you can select the face with the help of the selection brush, return to the Brightness filter and increase Brightness or apply any other transformation. Learn more about brightness brush and it's parameters here.
The brightness brush allows brightening only parts of an image, for example, a face. Alternatively, you can select the face with the help of the selection brush, return to the Brightness filter and increase Brightness or apply any other transformation. Learn more about brightness brush and it's parameters here.
Applying changes to selection
If your image has a selection made with the selection brush, you will see a new control at the bottom of the panel. Use it to define if you want to apply changes to selected areas, to not selected areas or to the whole image.
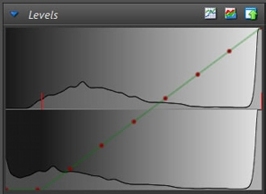
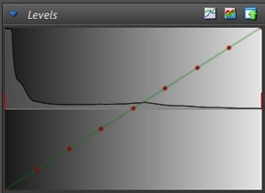
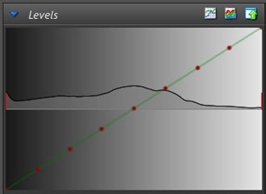
Reading the histogram
The histogram can help to understand which controls work better for the current image. When you switch to the Brightness filter, you can see the histogram at the bottom of the right panel in the Levels group.
The horizontal axis presents the range in which the brightness of pixels can vary (from 0 to 255). This is the dynamic range of a digital image. The vertical axis presents the number of pixels with the given brigtness. Dark pixels are on the left side of the histogram and the bright pixels are on the right side.
 |
 |
 |
 |
 |
 |
| Dark image - there is a "hill" in the left part and the rest is fairly flat |
Bright image - there are "hills" in the right part and the left part is flat |
This image is quite balanced because it has pixels belonging to the whole dynamic range |
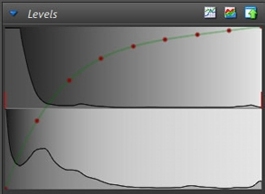
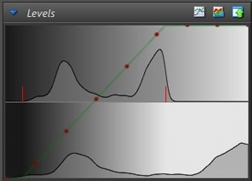
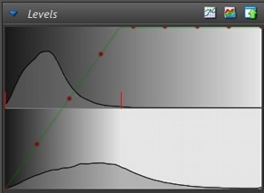
After you apply transformations the histogram changes: it's upper part describes the original image, the lower part describes the result and the green curve with red dots describes the transformation which was applied.
 |
 |
|
| Original image | Auto contrast: Normal (50%), Brightness +16, Shadows +17 |
Histogram of the original image (above), of the resulting image (below) and the curve which describes the transformations made to the image |